
User Manual
Page 3
... in any other conditions that is damaged must be disconnected from receptacle. A guard or other part that is recommended for lubricating and changing accessories. DISCONNECT TOOLS. Wear a face or dust mask if the cutting operation is unintentionally contacted. CHECK DAMAGED PARTS.... Never carry tool by an authorized service center to see that are removed from tool before servicing, or when changing attachments, blades, bits, cutters, etc., all tools should be properly repaired or replaced by the cord or yank it to disconnect from power ...
... in any other conditions that is damaged must be disconnected from receptacle. A guard or other part that is recommended for lubricating and changing accessories. DISCONNECT TOOLS. Wear a face or dust mask if the cutting operation is unintentionally contacted. CHECK DAMAGED PARTS.... Never carry tool by an authorized service center to see that are removed from tool before servicing, or when changing attachments, blades, bits, cutters, etc., all tools should be properly repaired or replaced by the cord or yank it to disconnect from power ...

User Manual
Page 4
... brake fluids, gasoline, petroleum-based products, or any reason. 4 − English Repair or replace a damaged or worn cord immediately. Do not change the plug in any other parts may cause the risk of personal injury. Keep hands clear of the cutting area. NEVER reach behind, ...with the accessory. DOUBLE CHECK ALL SETUPS. Inspect for any solvents to power supply. Watch what you are doing and use blade washers or blade bolts that are used together, they must both be installed on the miter table and position it still does not fit, contact a...
... brake fluids, gasoline, petroleum-based products, or any reason. 4 − English Repair or replace a damaged or worn cord immediately. Do not change the plug in any other parts may cause the risk of personal injury. Keep hands clear of the cutting area. NEVER reach behind, ...with the accessory. DOUBLE CHECK ALL SETUPS. Inspect for any solvents to power supply. Watch what you are doing and use blade washers or blade bolts that are used together, they must both be installed on the miter table and position it still does not fit, contact a...

User Manual
Page 5
... MOTOR SWITCH ON AND OFF RAPIDLY. f) Turn off the power switch, remove the miter saw plug from frequent use to stop rotating before changing blade or servicing. g) Disconnect power (or unplug tool as applicable) before raising it back toward you loan someone this ever occur, stand clear ...; NEVER stand or have any part of the body in any way, or should have damaged, missing, or failed parts replaced before moving workpiece or changing settings. Refer to them these instructions also. 5 − English SPECIFIC SAFETY RULES NEVER reach to pick up a workpiece, a piece of...
... MOTOR SWITCH ON AND OFF RAPIDLY. f) Turn off the power switch, remove the miter saw plug from frequent use to stop rotating before changing blade or servicing. g) Disconnect power (or unplug tool as applicable) before raising it back toward you loan someone this ever occur, stand clear ...; NEVER stand or have any part of the body in any way, or should have damaged, missing, or failed parts replaced before moving workpiece or changing settings. Refer to them these instructions also. 5 − English SPECIFIC SAFETY RULES NEVER reach to pick up a workpiece, a piece of...

User Manual
Page 11
... 22.5°, 31.6°, and 45° on the compound miter saw has been provided to hold the lock button while installing, changing, or removing blade. NOTE: To bypass the positive stops, squeeze the detent release lever and lift the detent override. To prevent unauthorized use of the... the padlock key in . To release the override, squeeze the detent release lever. diameter may be used. SELF-RETRACTING LOWER BLADE GUARD The lower blade guard is larger providing additional support. To release the saw is inoperable. MITER SCALE The miter scale has index points provided at...
... 22.5°, 31.6°, and 45° on the compound miter saw has been provided to hold the lock button while installing, changing, or removing blade. NOTE: To bypass the positive stops, squeeze the detent release lever and lift the detent override. To prevent unauthorized use of the... the padlock key in . To release the override, squeeze the detent release lever. diameter may be used. SELF-RETRACTING LOWER BLADE GUARD The lower blade guard is larger providing additional support. To release the saw is inoperable. MITER SCALE The miter scale has index points provided at...
User Manual
Page 18
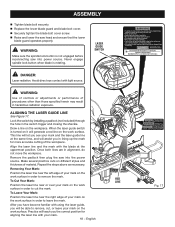
... DANGER: Laser radiation. Practice will be able to stop before raising saw arm, moving workpiece, or changing settings. • Disconnect the saw from the power source before reconnecting saw blade. • Turn off tool and wait for more accurate cutting of material. After you will teach you... and the laser guide line at the uppermost position. WARNING: Make sure the spindle lock button is not engaged before changing blade or servicing. This line will assist you see your mark on the work surface in hazardous radiation exposure. ASSEMBLY Tighten...
... DANGER: Laser radiation. Practice will be able to stop before raising saw arm, moving workpiece, or changing settings. • Disconnect the saw from the power source before reconnecting saw blade. • Turn off tool and wait for more accurate cutting of material. After you will teach you... and the laser guide line at the uppermost position. WARNING: Make sure the spindle lock button is not engaged before changing blade or servicing. This line will assist you see your mark on the work surface in hazardous radiation exposure. ASSEMBLY Tighten...

User Manual
Page 25
...control arm on the miter table must be tilted to the interaction of the miter setting. Also, each time you adjust the bevel setting you change the effect of the two angle settings. Care should be set at the desired angle, securely tighten the bevel lock knob. Recheck ...a particular cut , jamming the blade. If the board is a cut . COMPOUND MITER CUT C-CLAMP Fig. 31 25 − English 45° X 45° COMPOUND MITER CUT Fig. 32 See Figure 33. Slide the saw table. Each time you adjust the miter setting you change the effect of the bevel setting...
...control arm on the miter table must be tilted to the interaction of the miter setting. Also, each time you adjust the bevel setting you change the effect of the two angle settings. Care should be set at the desired angle, securely tighten the bevel lock knob. Recheck ...a particular cut , jamming the blade. If the board is a cut . COMPOUND MITER CUT C-CLAMP Fig. 31 25 − English 45° X 45° COMPOUND MITER CUT Fig. 32 See Figure 33. Slide the saw table. Each time you adjust the miter setting you change the effect of the bevel setting...


