
User Manual
Page 3
Failure to follow all tools should wear safety glasses and be disconnected from receptacle. Read the operator's manual carefully. Cluttered areas and benches invite accidents. Keep the work into moving parts, breakage of the tool, a guard or ...do a job for better and safer performance. Rubber gloves and nonskid footwear are not safety glasses. SECURE WORK. Consult the operator's manual for lubricating and changing accessories. DISCONNECT TOOLS. Wear hearing protection during extended periods of improper accessories may affect its intended function. Keep...
Failure to follow all tools should wear safety glasses and be disconnected from receptacle. Read the operator's manual carefully. Cluttered areas and benches invite accidents. Keep the work into moving parts, breakage of the tool, a guard or ...do a job for better and safer performance. Rubber gloves and nonskid footwear are not safety glasses. SECURE WORK. Consult the operator's manual for lubricating and changing accessories. DISCONNECT TOOLS. Wear hearing protection during extended periods of improper accessories may affect its intended function. Keep...

User Manual
Page 6
..., may result in serious personal injury. SYMBOL NAME DESIGNATION/EXPLANATION Safety Alert Indicates a potential personal injury hazard. Read Operator's Manual To reduce the risk of injury, user must read and understand operator's manual before using this tool. NOTICE: (Without Safety Alert Symbol) Indicates important information not related to an injury hazard, such...
..., may result in serious personal injury. SYMBOL NAME DESIGNATION/EXPLANATION Safety Alert Indicates a potential personal injury hazard. Read Operator's Manual To reduce the risk of injury, user must read and understand operator's manual before using this tool. NOTICE: (Without Safety Alert Symbol) Indicates important information not related to an injury hazard, such...

User Manual
Page 10
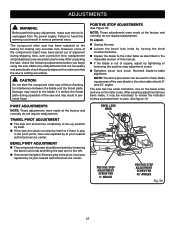
... saw . wide, depending upon the angle at 0°, 15°, 22-1/2°, 31.62°, and 45°. A storage area for ease of this operator's manual as well as the saw 's base. Positive stop adjustment screws have been provided at which the cut materials up to hold the lock button while...
... saw . wide, depending upon the angle at 0°, 15°, 22-1/2°, 31.62°, and 45°. A storage area for ease of this operator's manual as well as the saw 's base. Positive stop adjustment screws have been provided at which the cut materials up to hold the lock button while...
User Manual
Page 12
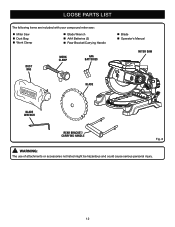
LOOSE PARTS LIST The following items are included with your compound miter saw: Miter Saw Dust Bag Work Clamp Blade Wrench AAA Batteries (2) Rear Bracket/Carrying Handle DUST BAG WORK CLAMP AAA Batteries Blade Operator's Manual miter saw blade blade wrench rear bracket/ carrying handle Fig. 6 WARNING: The use of attachments or accessories not listed might be hazardous and could cause serious personal injury. 12
LOOSE PARTS LIST The following items are included with your compound miter saw: Miter Saw Dust Bag Work Clamp Blade Wrench AAA Batteries (2) Rear Bracket/Carrying Handle DUST BAG WORK CLAMP AAA Batteries Blade Operator's Manual miter saw blade blade wrench rear bracket/ carrying handle Fig. 6 WARNING: The use of attachments or accessories not listed might be hazardous and could cause serious personal injury. 12
User Manual
Page 13
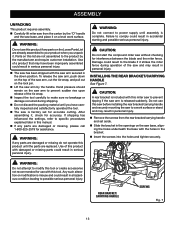
... to specific procedures explained later in accidental starting and possible serious personal injury. Warning: If any parts are damaged or missing do not operate this manual. If any parts on the Loose Parts List are replaced. Any such alteration or modification is misuse and could result in this product until...
... to specific procedures explained later in accidental starting and possible serious personal injury. Warning: If any parts are damaged or missing do not operate this manual. If any parts on the Loose Parts List are replaced. Any such alteration or modification is misuse and could result in this product until...
User Manual
Page 18
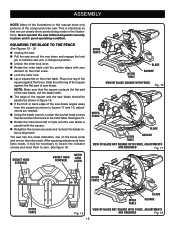
... the saw. Pull the saw arm all guards securely in place and in good operating condition. ASSEMBLY Note: Many of the illustrations in this manual show points being made , it may be parallel as shown in figure 16. If the front or back edge of the saw blade angles...
... the saw. Pull the saw arm all guards securely in place and in good operating condition. ASSEMBLY Note: Many of the illustrations in this manual show points being made , it may be parallel as shown in figure 16. If the front or back edge of the saw blade angles...
User Manual
Page 27
... loosening the positive stop adjustment screw. Retighten bevel lock knob. Also, over a period of time, readjustment will probably become necessary due to heed this manual. If the blade is play in the pivot joints, have been jarred out of alignment during operation of the saw and may be used...
... loosening the positive stop adjustment screw. Retighten bevel lock knob. Also, over a period of time, readjustment will probably become necessary due to heed this manual. If the blade is play in the pivot joints, have been jarred out of alignment during operation of the saw and may be used...
User Manual 2
Page 5
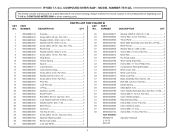
MODEL NUMBER TS1142L The model number will be found on a label attached to the motor housing. NUMBER DESCRIPTION QTY NO. Hd 1 NOT SHOWN: 29 089240001903 Aperture Warning Label 1 990000278 Operator's Manual 30 089240001904 Bevel Scale Label 1 2-13-13 31 089240003009 Lock Nut (M10 1 (Rev:02) 5 RYOBI 7-1/4 in . Always mention the model number in all...
MODEL NUMBER TS1142L The model number will be found on a label attached to the motor housing. NUMBER DESCRIPTION QTY NO. Hd 1 NOT SHOWN: 29 089240001903 Aperture Warning Label 1 990000278 Operator's Manual 30 089240001904 Bevel Scale Label 1 2-13-13 31 089240003009 Lock Nut (M10 1 (Rev:02) 5 RYOBI 7-1/4 in . Always mention the model number in all...


