
Operation Manual
Page 4
... operation. Make sure blade is tight and not making a cut, be cut . MAKE SURE THE MITER TABLE AND SAW ARM (BEVEL FUNCTION) ARE LOCKED IN POSITION BEFORE OPERATING THE SAW. Do not reach underneath work clamp and length stop are used together, they must both be installed on the... fully in . Before making contact with hands and fingers for and remove all adjustments are defective or incorrect. Use of any other moving parts during use. NEVER START A TOOL WHEN ANY ROTATiNG COMPONENT IS IN CONTACT WITH THE WORKPIECE. DO NOT operate A tool while...
... operation. Make sure blade is tight and not making a cut, be cut . MAKE SURE THE MITER TABLE AND SAW ARM (BEVEL FUNCTION) ARE LOCKED IN POSITION BEFORE OPERATING THE SAW. Do not reach underneath work clamp and length stop are used together, they must both be installed on the... fully in . Before making contact with hands and fingers for and remove all adjustments are defective or incorrect. Use of any other moving parts during use. NEVER START A TOOL WHEN ANY ROTATiNG COMPONENT IS IN CONTACT WITH THE WORKPIECE. DO NOT operate A tool while...

Operation Manual
Page 5
... you have damaged, missing, or failed parts replaced before changing blade or servicing. ALWAYS carry the tool only by an authorized service center to a work using the laser guide. SAVE THESE INSTRUCTIONS. NEVER operate your miter saw on the floor or in line with ... before raising saw ) to them these instructions also. 5 NEVER leave the saw blade. e) Never reach around saw blade to come to inflict severe injury. make sure you loan someone this miter saw is missing or should break, bend, or fail in any way, or should any part of your...
... you have damaged, missing, or failed parts replaced before changing blade or servicing. ALWAYS carry the tool only by an authorized service center to a work using the laser guide. SAVE THESE INSTRUCTIONS. NEVER operate your miter saw on the floor or in line with ... before raising saw ) to them these instructions also. 5 NEVER leave the saw blade. e) Never reach around saw blade to come to inflict severe injury. make sure you loan someone this miter saw is missing or should break, bend, or fail in any way, or should any part of your...

Operation Manual
Page 12
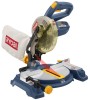
...PARTS LIST The following items are included with your compound miter saw: Miter Saw Base Blade Wrench Miter Saw Head AAA Batteries (2) Dust Bag Rear Bracket/Carrying Handle Work Clamp Bevel Knob Blade Bevel Indicator and Screw Operator's Manual miter saw... base DUST BAG WORK CLAMP AAA Batteries blade wrench miter saw head bevel knob rear bracket/ carrying handle bevel scale and screw blade Fig...
...PARTS LIST The following items are included with your compound miter saw: Miter Saw Base Blade Wrench Miter Saw Head AAA Batteries (2) Dust Bag Rear Bracket/Carrying Handle Work Clamp Bevel Knob Blade Bevel Indicator and Screw Operator's Manual miter saw... base DUST BAG WORK CLAMP AAA Batteries blade wrench miter saw head bevel knob rear bracket/ carrying handle bevel scale and screw blade Fig...
Operation Manual
Page 13
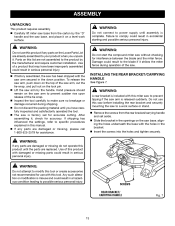
...openings on this list are not assembled to prevent tipping if the saw arm is included with this product if any parts are replaced. installing the rear bracket/carrying handle See Figure 7. Parts on the saw base, aligning the holes underneath the base with the holes in.... WARNING: Do not start the compound miter saw without checking for accurate cutting. WARNING: Do not use this miter saw to the product by the handle. Use of the saw. ASSEMBLY UNPACKING This product requires assembly. Carefully lift miter saw base from the rear bracket/carrying handle ...
...openings on this list are not assembled to prevent tipping if the saw arm is included with this product if any parts are replaced. installing the rear bracket/carrying handle See Figure 7. Parts on the saw base, aligning the holes underneath the base with the holes in.... WARNING: Do not start the compound miter saw without checking for accurate cutting. WARNING: Do not use this miter saw to the product by the handle. Use of the saw. ASSEMBLY UNPACKING This product requires assembly. Carefully lift miter saw base from the rear bracket/carrying handle ...

Operation Manual
Page 20
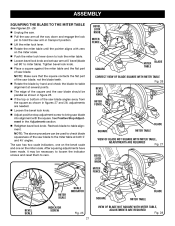
... edge of the square against the flat part of the saw blade angles away from the square as shown in figures 23 and 24, adjustments are needed. Using the blade wrench, loosen the socket head screws that secure the miter fence to the miter table. The saw has two scale indicators, one on the...
... edge of the square against the flat part of the saw blade angles away from the square as shown in figures 23 and 24, adjustments are needed. Using the blade wrench, loosen the socket head screws that secure the miter fence to the miter table. The saw has two scale indicators, one on the...
Operation Manual
Page 21
... Note: Make sure that the square contacts the flat part of the saw blade, not the blade teeth. VIEW OF Blade NOT SQUARe WITH Miter Table, ADJUSTMENTS ARE REQUIRED Fig. 27 BEVEL LOCK KNOB MITER FENCE scale indicator Miter SCALE INDICATOR SCREW square MITER TABLE blade BEVEL SCALE Fig. 25 21 VIEW OF ... two scale indicators, one on the bevel scale and one on the miter scale. Tighten bevel lock knob. Place a square against the miter table and the flat part of the saw blade angles away from the square as shown in figures 27 and 28, adjustments are needed. Loosen ...
... Note: Make sure that the square contacts the flat part of the saw blade, not the blade teeth. VIEW OF Blade NOT SQUARe WITH Miter Table, ADJUSTMENTS ARE REQUIRED Fig. 27 BEVEL LOCK KNOB MITER FENCE scale indicator Miter SCALE INDICATOR SCREW square MITER TABLE blade BEVEL SCALE Fig. 25 21 VIEW OF ... two scale indicators, one on the bevel scale and one on the miter scale. Tighten bevel lock knob. Place a square against the miter table and the flat part of the saw blade angles away from the square as shown in figures 27 and 28, adjustments are needed. Loosen ...

Operation Manual
Page 29
...Square the blade to the left. If movement is tight or if there is cutting accurately. The saw . POSITIVE STOP ADJUSTMENTS CAUTION: Do not start the compound miter saw without checking for making very accurate cuts. Note: These adjustments were made at the factory and normally do not ... sure that are necessary and periodically check the parts alignment to wear. See Figure 39. After unpacking the saw, check the following adjustments before you begin using the saw has two scale indicators, one on the bevel scale and one on the miter scale. Recheck blade-to zero. Also, over...
...Square the blade to the left. If movement is tight or if there is cutting accurately. The saw . POSITIVE STOP ADJUSTMENTS CAUTION: Do not start the compound miter saw without checking for making very accurate cuts. Note: These adjustments were made at the factory and normally do not ... sure that are necessary and periodically check the parts alignment to wear. See Figure 39. After unpacking the saw, check the following adjustments before you begin using the saw has two scale indicators, one on the bevel scale and one on the miter scale. Recheck blade-to zero. Also, over...

Operation Manual
Page 32
... on a plate attached to provide all pertinent facts when you have purchased your tool, should a need ever exist for repair parts or service, simply contact your nearest Authorized Service Center. AND SERIAL NO. ONE WORLD TECHNOLOGIES, INC. 1428 Pearman Dairy Road,... space provided below. • HOW TO ORDER REPAIR PARTS • MODEL NUMBER • SERIAL NUMBER TS1141 When ordering repair parts, always give the following information: Ryobi® is a registered trademark of Ryobi Limited used under license. Compound Miter Saw TS1141 - Be sure to the motor housing. The...
... on a plate attached to provide all pertinent facts when you have purchased your tool, should a need ever exist for repair parts or service, simply contact your nearest Authorized Service Center. AND SERIAL NO. ONE WORLD TECHNOLOGIES, INC. 1428 Pearman Dairy Road,... space provided below. • HOW TO ORDER REPAIR PARTS • MODEL NUMBER • SERIAL NUMBER TS1141 When ordering repair parts, always give the following information: Ryobi® is a registered trademark of Ryobi Limited used under license. Compound Miter Saw TS1141 - Be sure to the motor housing. The...

Repair Sheet
Page 3
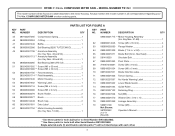
...Assembly (Inc. MODEL NUMBER TS1141 The model number will be found on a label attached to the motor housing. COMPOUND MITER SAW - Key Nos. 31-38 1 30 089240001044 Bearing Holder Plate 1 31 089240001042 Spindle 1 32 080009002055 C-Ring 1 .... KEY PART NO. Always mention the model number in all correspondence regarding your 7-1/4 in . NUMBER DESCRIPTION QTY 1 080006014061 Screw (M4 x 10 mm 1 2 080006014062 Battery Box Cover 1 3 089240001708 Lower Blade Guard Assembly (Inc. COMPOUND MITER SAW or when ordering parts. RYOBI 7-1/4 in...
...Assembly (Inc. MODEL NUMBER TS1141 The model number will be found on a label attached to the motor housing. COMPOUND MITER SAW - Key Nos. 31-38 1 30 089240001044 Bearing Holder Plate 1 31 089240001042 Spindle 1 32 080009002055 C-Ring 1 .... KEY PART NO. Always mention the model number in all correspondence regarding your 7-1/4 in . NUMBER DESCRIPTION QTY 1 080006014061 Screw (M4 x 10 mm 1 2 080006014062 Battery Box Cover 1 3 089240001708 Lower Blade Guard Assembly (Inc. COMPOUND MITER SAW or when ordering parts. RYOBI 7-1/4 in...
Repair Sheet
Page 4
...Blade (7 1/4 in . Single asterisk parts (*) and Double asterisk parts (**) will be found on a label attached to Serial Number BK102323802. ** Use these parts for tools built after Serial Number ...MITER SAW or when ordering parts. Key Nos. 48 and 50 1 089240001713 ** Armature Assembly (Inc. COMPOUND MITER SAW - MODEL NUMBER TS1141 The model number will not interchange with each other. 4 PARTS LIST FOR FIGURE A KEY PART...2-3-11 (Rev:05) * Use these parts for tools built prior to the motor housing. Key Nos. 51-60 1 089240001715 ** Motor Housing...
...Blade (7 1/4 in . Single asterisk parts (*) and Double asterisk parts (**) will be found on a label attached to Serial Number BK102323802. ** Use these parts for tools built after Serial Number ...MITER SAW or when ordering parts. Key Nos. 48 and 50 1 089240001713 ** Armature Assembly (Inc. COMPOUND MITER SAW - MODEL NUMBER TS1141 The model number will not interchange with each other. 4 PARTS LIST FOR FIGURE A KEY PART...2-3-11 (Rev:05) * Use these parts for tools built prior to the motor housing. Key Nos. 51-60 1 089240001715 ** Motor Housing...

Repair Sheet
Page 6
...M8 1 59 089240001906 Logo Label (Small 1 30 089240001011 Table 1 6 Always mention the model number in all correspondence regarding your 7-1/4 in . RYOBI 7-1/4 in . NUMBER DESCRIPTION QTY 1 089240001090 Bevel Handle 1 31 089240001015 Miter Indicator 1 2 089240001030 Bolt (M8 1 32 089240001017 Washer (M3 2 3 080001020014 Bowl Washer (D18 x D8.5 x 0.5t 1 33 ... mm, Hex Soc. MODEL NUMBER TS1141 The model number will be found on a label attached to the motor housing. COMPOUND MITER SAW or when ordering parts. COMPOUND MITER SAW -
...M8 1 59 089240001906 Logo Label (Small 1 30 089240001011 Table 1 6 Always mention the model number in all correspondence regarding your 7-1/4 in . RYOBI 7-1/4 in . NUMBER DESCRIPTION QTY 1 089240001090 Bevel Handle 1 31 089240001015 Miter Indicator 1 2 089240001030 Bolt (M8 1 32 089240001017 Washer (M3 2 3 080001020014 Bowl Washer (D18 x D8.5 x 0.5t 1 33 ... mm, Hex Soc. MODEL NUMBER TS1141 The model number will be found on a label attached to the motor housing. COMPOUND MITER SAW or when ordering parts. COMPOUND MITER SAW -


