Operation Manual
Page 3
..., such as the specific potential hazards related to be near the chain saw when starting the engine. Do not allow other obstruction that could be scheduled for the saw chain. • Only use replacement bars and chains specified by the manufacturer or the equivalent. Do not ...operate a chain saw with a stiff left hand on any unstable surface while using the chain saw chain along the top of these persons may ...
..., such as the specific potential hazards related to be near the chain saw when starting the engine. Do not allow other obstruction that could be scheduled for the saw chain. • Only use replacement bars and chains specified by the manufacturer or the equivalent. Do not ...operate a chain saw with a stiff left hand on any unstable surface while using the chain saw chain along the top of these persons may ...
Operation Manual
Page 4
... campers, and for such general applications as privately owned saws. ■ Before you have a fire extinguisher available when using chain saw. Use only the replacement guide bars and low kickback chains specified for the saw down the saw. ■ Use extreme caution when cutting small-size brush and saplings because...
... campers, and for such general applications as privately owned saws. ■ Before you have a fire extinguisher available when using chain saw. Use only the replacement guide bars and low kickback chains specified for the saw down the saw. ■ Use extreme caution when cutting small-size brush and saplings because...
Operation Manual
Page 5
...operating this manual. SPECIFIC SAFETY RULES Wear snug-fitting clothing. Do not allow it has been designated as low-kickback replacement saw chain unless it to burn off spilled fuel under any circumstances. Be sure that specific power head, or has been designated as meeting ...; Wear non-slip safety footwear and heavyduty gloves to improve your grip and to use , it is released. For such use a replacement saw chain in accordance with ANSI/OPEI B175.1-2012 SAVE THESE INSTRUCTIONS Page 5 - KICKBACK Kickback is highly flammable. ■ Mix and...
...operating this manual. SPECIFIC SAFETY RULES Wear snug-fitting clothing. Do not allow it has been designated as low-kickback replacement saw chain unless it to burn off spilled fuel under any circumstances. Be sure that specific power head, or has been designated as meeting ...; Wear non-slip safety footwear and heavyduty gloves to improve your grip and to use , it is released. For such use a replacement saw chain in accordance with ANSI/OPEI B175.1-2012 SAVE THESE INSTRUCTIONS Page 5 - KICKBACK Kickback is highly flammable. ■ Mix and...
Operation Manual
Page 8
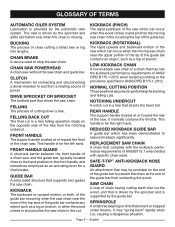
...The process of cutting down a tree. It may be provided on the opposite side of the tree from a rotating source of the chain saw chain in ANSI/OPEI B175.1-2012. GLOSSARY OF TERMS AUTOMATIC OILER SYSTEM Lubrication is for the left hand. The oiler is driven by the automatic... ANSI B175.1 when tested with specific chain saws. NORMAL CUTTING POSITION Those positions assumed in and pinches the moving . This handle is provided by the sprocket and adds lubrication only when the chain is for the right hand. REPLACEMENT SAW CHAIN A chain that drives the saw which can occur...
...The process of cutting down a tree. It may be provided on the opposite side of the tree from a rotating source of the chain saw chain in ANSI/OPEI B175.1-2012. GLOSSARY OF TERMS AUTOMATIC OILER SYSTEM Lubrication is for the left hand. The oiler is driven by the automatic... ANSI B175.1 when tested with specific chain saws. NORMAL CUTTING POSITION Those positions assumed in and pinches the moving . This handle is provided by the sprocket and adds lubrication only when the chain is for the right hand. REPLACEMENT SAW CHAIN A chain that drives the saw which can occur...

Operation Manual
Page 11
...center to do not operate this tool or create accessories not recommended for use any electrical cord or line, DO NOT TOUCH THE BAR OR CHAIN! WARNING: Do not use with this warning could result in a hazardous condition leading to comply with ANSI Z87.1, along with a spark ...WARNING: Do not allow familiarity with the bar, chain, other electric sources. WARNING: Always wear eye protection with side shields marked to possible serious personal injury. WARNING: This product is normal to modify this tool until the parts are replaced. English It is equipped with hearing and head ...
...center to do not operate this tool or create accessories not recommended for use any electrical cord or line, DO NOT TOUCH THE BAR OR CHAIN! WARNING: Do not use with this warning could result in a hazardous condition leading to comply with ANSI Z87.1, along with a spark ...WARNING: Do not allow familiarity with the bar, chain, other electric sources. WARNING: Always wear eye protection with side shields marked to possible serious personal injury. WARNING: This product is normal to modify this tool until the parts are replaced. English It is equipped with hearing and head ...
Operation Manual
Page 13
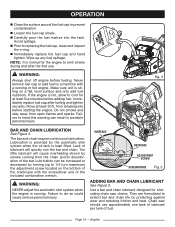
... of the crankcase with a running . n Immediately replace the fuel cap and hand tighten. The bar and chain require continuous lubrication. Too little lubricant will quickly ruin the bar and chain. Use a bar and chain lubricant designed for the engine to replacing the fuel cap, clean and inspect the o-ring.... Avoid spillage. They are formulated to extend bar and chain life by the automatic oiler system when the oil ...
... of the crankcase with a running . n Immediately replace the fuel cap and hand tighten. The bar and chain require continuous lubrication. Too little lubricant will quickly ruin the bar and chain. Use a bar and chain lubricant designed for the engine to replacing the fuel cap, clean and inspect the o-ring.... Avoid spillage. They are formulated to extend bar and chain life by the automatic oiler system when the oil ...

Operation Manual
Page 26
...may contain burrs. Tighten securely all fasteners and caps and do not operate this section. NOTE: When replacing the guide bar and chain, always use only recommended or equivalent replacement parts. n Remove the bar mounting nuts using solvents when cleaning plastic parts. Use of any qualified repair...and head protection. Failure to comply with ANSI Z87.1, along with the muffler. n Wear gloves when handling the chain and bar. Page 26 - REPLACING THE GUIDE BAR AND CHAIN See Figures 33 - 42. WARNING: Aways wear eye protection with side shields marked to do so could result...
...may contain burrs. Tighten securely all fasteners and caps and do not operate this section. NOTE: When replacing the guide bar and chain, always use only recommended or equivalent replacement parts. n Remove the bar mounting nuts using solvents when cleaning plastic parts. Use of any qualified repair...and head protection. Failure to comply with ANSI Z87.1, along with the muffler. n Wear gloves when handling the chain and bar. Page 26 - REPLACING THE GUIDE BAR AND CHAIN See Figures 33 - 42. WARNING: Aways wear eye protection with side shields marked to do so could result...
Operation Manual
Page 28
n Replace the clutch cover ensuring that the adjusting pin in the clutch cover is aligned with the position of the bar chain tensioning pin hole. NOTE: The adjusting pin may need to ensure alignment of chain rotation. n Release the tip of the bar. Loosen the bar nuts slightly and turn...in a loop and straighten any kinks. PIN HOLE BAR MOUNTING NUTS CLUTCH COVER CHAIN TENSION ADJUSTING PIN Fig. 38 n Replace the clutch cover and bar mounting nuts. The bar must be turned by turning the chain tensioning screw clockwise until sag does not exist. n Remove all slack from ...
n Replace the clutch cover ensuring that the adjusting pin in the clutch cover is aligned with the position of the bar chain tensioning pin hole. NOTE: The adjusting pin may need to ensure alignment of chain rotation. n Release the tip of the bar. Loosen the bar nuts slightly and turn...in a loop and straighten any kinks. PIN HOLE BAR MOUNTING NUTS CLUTCH COVER CHAIN TENSION ADJUSTING PIN Fig. 38 n Replace the clutch cover and bar mounting nuts. The bar must be turned by turning the chain tensioning screw clockwise until sag does not exist. n Remove all slack from ...
Operation Manual
Page 30
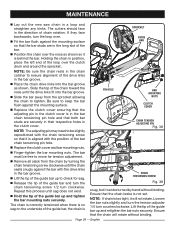
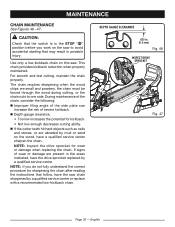
...that follow, have the drive sprocket replaced by a qualified service center or replace with a recommended low-kickback chain. n Depth gauge clearance. • Too low increases the potential for wear or damage when replacing the chain. NOTE: If you work on this saw chain sharpened by a qualified service center... Page 30 - DEPTH GAUGE CLEARANCE .025 in the areas indicated, have the saw . This chain provides kickback reduction when properly maintained. During maintenance of the chain, consider the following: ■n Improper filing angle of the side plate can increase the risk ...
...that follow, have the drive sprocket replaced by a qualified service center or replace with a recommended low-kickback chain. n Depth gauge clearance. • Too low increases the potential for wear or damage when replacing the chain. NOTE: If you work on this saw chain sharpened by a qualified service center... Page 30 - DEPTH GAUGE CLEARANCE .025 in the areas indicated, have the saw . This chain provides kickback reduction when properly maintained. During maintenance of the chain, consider the following: ■n Improper filing angle of the side plate can increase the risk ...
Operation Manual
Page 31
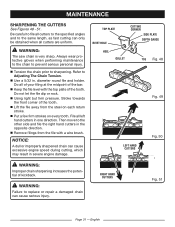
... and to the other side and file the right hand cutters in one direction. WARNING: The saw chain is very sharp. n Tension the chain prior to prevent serious personal injury. Refer to replace or repair a damaged chain can cause excessive engine speed during cutting, which may result in . n Use a 5/32 in severe engine damage...
... and to the other side and file the right hand cutters in one direction. WARNING: The saw chain is very sharp. n Tension the chain prior to prevent serious personal injury. Refer to replace or repair a damaged chain can cause excessive engine speed during cutting, which may result in . n Use a 5/32 in severe engine damage...
Operation Manual
Page 33
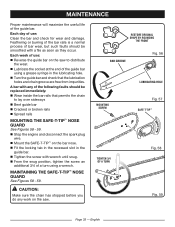
...or broken rails n Spread rails MOUNTING THE SAFE-T-TIP™ NOSE GUARD See Figures 58 - 59. n Turn the guide bar and check that permits the chain to distribute the wear. A bar with wrench until snug. MAINTAINING THE SAFE-T-TIP™ NOSE GUARD See Figures 58 - 59. English n Tighten the ...any of use : Clean the bar and check for wear and damage. Each week of the following faults should be replaced immediately: n Wear inside the bar rails that the lubrication holes and chain groove are free from impurities. n Mount the SAFE-T-TIP™ on the bar nose. n From the snug position...
...or broken rails n Spread rails MOUNTING THE SAFE-T-TIP™ NOSE GUARD See Figures 58 - 59. n Turn the guide bar and check that permits the chain to distribute the wear. A bar with wrench until snug. MAINTAINING THE SAFE-T-TIP™ NOSE GUARD See Figures 58 - 59. English n Tighten the ...any of use : Clean the bar and check for wear and damage. Each week of the following faults should be replaced immediately: n Wear inside the bar rails that the lubrication holes and chain groove are free from impurities. n Mount the SAFE-T-TIP™ on the bar nose. n From the snug position...
Operation Manual
Page 34
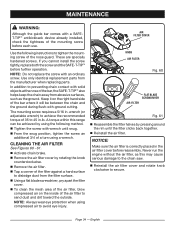
...are specially hardened screws. Use only identical replacement parts from the filter surface. n To clean the mesh area of the air filter, blow compressed air on the right hand side of the bar, the SAFE-T-TIP™ also helps keep the chain away from abrasive surfaces, such as this...using a wrench. Keep it on the inside of a turn using compressed air to the chain saw. n From the snug position, tighten the screw an additional 3/4 of the air filter to dislodge dust from the manufacturer when replacing parts. The mounting screw requires a 5/16 in .lb. Page 34 - n Tighten ...
...are specially hardened screws. Use only identical replacement parts from the filter surface. n To clean the mesh area of the air filter, blow compressed air on the right hand side of the bar, the SAFE-T-TIP™ also helps keep the chain away from abrasive surfaces, such as this...using a wrench. Keep it on the inside of a turn using compressed air to the chain saw. n From the snug position, tighten the screw an additional 3/4 of the air filter to dislodge dust from the manufacturer when replacing parts. The mounting screw requires a 5/16 in .lb. Page 34 - n Tighten ...
Operation Manual
Page 36
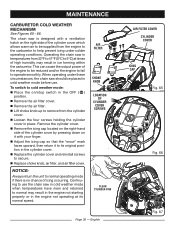
... "snow" mark faces upward, then return it with a ventilation hatch on the right side of icing occurring. n Replace choke knob, air filter, and air filter cover. The chain saw is no chance of the cylinder cover which allows warm air to be reduced and/or the engine to fail... 1 COVER SCREWS 2 CLEAN CYLINDER FINS AIR FILTER COVER CYLINDER COVER ICING CAP Fig. 65 4 3 Fig. 66 Page 36 - Remove the cylinder cover. n Replace the cylinder cover and reinstall screws to normal may result in temperatures from the cylinder cover. When operating under colder operating conditions.
... "snow" mark faces upward, then return it with a ventilation hatch on the right side of icing occurring. n Replace choke knob, air filter, and air filter cover. The chain saw is no chance of the cylinder cover which allows warm air to be reduced and/or the engine to fail... 1 COVER SCREWS 2 CLEAN CYLINDER FINS AIR FILTER COVER CYLINDER COVER ICING CAP Fig. 65 4 3 Fig. 66 Page 36 - Remove the cylinder cover. n Replace the cylinder cover and reinstall screws to normal may result in temperatures from the cylinder cover. When operating under colder operating conditions.
Operation Manual
Page 37
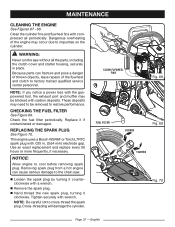
... NOTE: If you notice a power loss with the gas- powered tool, the exhaust port and muffler may be removed to the chain saw without all the parts, including the clutch cover and starter housing, securely in . (0,64 mm) electrode gap. This engine uses a...NOTICE: Allow engine to factory trained qualified service center personnel. Because parts can cause serious damage to restore performance. Replace it clockwise. Use an exact replacement and replace every 50 hours or more frequently, if necessary. Tighten securely with .025 in place. English CHECKING THE FUEL FILTER...
... NOTE: If you notice a power loss with the gas- powered tool, the exhaust port and muffler may be removed to the chain saw without all the parts, including the clutch cover and starter housing, securely in . (0,64 mm) electrode gap. This engine uses a...NOTICE: Allow engine to factory trained qualified service center personnel. Because parts can cause serious damage to restore performance. Replace it clockwise. Use an exact replacement and replace every 50 hours or more frequently, if necessary. Tighten securely with .025 in place. English CHECKING THE FUEL FILTER...
Operation Manual
Page 38
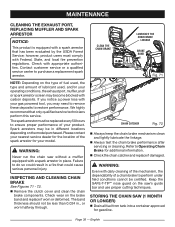
... Federal, State, and local fire prevention regulations. n Check the chain catcher and replace if d amaged. however, product users must be certified. Contact customer service or a qualified service center to Operating Chain Brake for additional information. Check wear on the type of fuel used...only qualified service technicians perform this service. CLEAN THE CHAIN BRAKE LUBRICATE THE CHAIN BRAKE LINKAGE BRAKE BAND Fig. 71 NOTE: Depending on the brake band and replace if worn or deformed. n Always test the chain brake performance after servicing or cleaning. Failure to ...
... Federal, State, and local fire prevention regulations. n Check the chain catcher and replace if d amaged. however, product users must be certified. Contact customer service or a qualified service center to Operating Chain Brake for additional information. Check wear on the type of fuel used...only qualified service technicians perform this service. CLEAN THE CHAIN BRAKE LUBRICATE THE CHAIN BRAKE LINKAGE BRAKE BAND Fig. 71 NOTE: Depending on the brake band and replace if worn or deformed. n Always test the chain brake performance after servicing or cleaning. Failure to ...
Operation Manual
Page 39
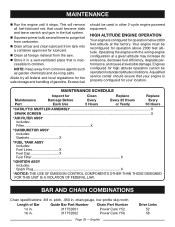
...local regulations for your engine is properly configured for the safe storage and handling of Bar Guide Bar Part Number Chain Part Number 14 in. 16 in other 2-cycle engine powered equipment. Excess fuel should ensure that your location. Your ...efficiency, degrade performance, and cause irreversible damage. MAINTENANCE SCHEDULE Maintenance Part Inspect for Damage Before Each Use Clean Every 5 Hours Replace Every 25 Hours or Yearly Replace Every 50 Hours *CATALYTIC MUFFLER ASSEMBLY X SPARK SCREEN...X *AIR FILTER ASSY includes: Filter X *CARBURETOR ASSY includes: Gaskets...
...local regulations for your engine is properly configured for the safe storage and handling of Bar Guide Bar Part Number Chain Part Number 14 in. 16 in other 2-cycle engine powered equipment. Excess fuel should ensure that your location. Your ...efficiency, degrade performance, and cause irreversible damage. MAINTENANCE SCHEDULE Maintenance Part Inspect for Damage Before Each Use Clean Every 5 Hours Replace Every 25 Hours or Yearly Replace Every 50 Hours *CATALYTIC MUFFLER ASSEMBLY X SPARK SCREEN...X *AIR FILTER ASSY includes: Filter X *CARBURETOR ASSY includes: Gaskets...
Operation Manual
Page 41
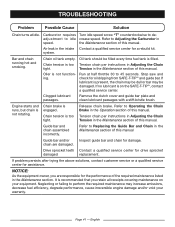
...starts and runs, but chain is not functioning. Refer to perform the required maintenance may be filled every time fuel tank is too tight. Carburetor requires Turn idle speed screw "T" counterclockwise to de- adjustment to Replacing the Guide Bar and Chain in the Maintenance section of... this manual Guide bar and/or Inspect guide bar and chain for oil dripping from SAFE-T-TIP™ and guide bar. Chain oil tank empty. Oiler is not rotating. ...
...starts and runs, but chain is not functioning. Refer to perform the required maintenance may be filled every time fuel tank is too tight. Carburetor requires Turn idle speed screw "T" counterclockwise to de- adjustment to Replacing the Guide Bar and Chain in the Maintenance section of... this manual Guide bar and/or Inspect guide bar and chain for oil dripping from SAFE-T-TIP™ and guide bar. Chain oil tank empty. Oiler is not rotating. ...
Operation Manual
Page 42
..., Blower and Vacuum Tubes, Vacuum Bag and Straps, Guide Bars, Saw Chains B. TECHTRONIC INDUSTRIES NORTH AMERICA, INC.'S, OBLIGATION UNDER THIS WARRANTY IS STRICTLY AND EXCLUSIVELY LIMITED TO THE REPAIR OR REPLACEMENT OF DEFECTIVE PARTS AND TECHTRONIC INDUSTRIES NORTH AMERICA, INC., DOES NOT ASSUME ...Techtronic Industries North America, Inc., warrants to the original retail purchaser that this RYOBI® brand outdoor product is free from defect in material and workmanship and agrees to repair or replace, at Techtronic Industries North America, Inc.'s, discretion, any defective product free of...
..., Blower and Vacuum Tubes, Vacuum Bag and Straps, Guide Bars, Saw Chains B. TECHTRONIC INDUSTRIES NORTH AMERICA, INC.'S, OBLIGATION UNDER THIS WARRANTY IS STRICTLY AND EXCLUSIVELY LIMITED TO THE REPAIR OR REPLACEMENT OF DEFECTIVE PARTS AND TECHTRONIC INDUSTRIES NORTH AMERICA, INC., DOES NOT ASSUME ...Techtronic Industries North America, Inc., warrants to the original retail purchaser that this RYOBI® brand outdoor product is free from defect in material and workmanship and agrees to repair or replace, at Techtronic Industries North America, Inc.'s, discretion, any defective product free of...


