English Manual
Page 4
... tool is the equipment-grounding conductor. Never use a push stick, so your saw blade. Instructions for safe use common sense. Do not attempt to prevent the push stick from lumber before transporting saw blade. If repair or replacement of cord location and keep it should be narrower than... PAWLS on all fences and auxiliary tables before cutting. Never touch blade or other parts may cause the risk of blade path and turn switch off . NEVER USE IN AN EXPLOSIVE ATMOSPHERE. SPECIFIC SAFETY RULES FIRMLY BOLT THE SAW TO A WORK BENCH OR LEG STAND...
... tool is the equipment-grounding conductor. Never use a push stick, so your saw blade. Instructions for safe use common sense. Do not attempt to prevent the push stick from lumber before transporting saw blade. If repair or replacement of cord location and keep it should be narrower than... PAWLS on all fences and auxiliary tables before cutting. Never touch blade or other parts may cause the risk of blade path and turn switch off . NEVER USE IN AN EXPLOSIVE ATMOSPHERE. SPECIFIC SAFETY RULES FIRMLY BOLT THE SAW TO A WORK BENCH OR LEG STAND...
English Manual
Page 5
... a stalled saw blade without first turning the saw OFF and disconnecting the saw blade. f) Do not perform any part of your exposure to these exposures varies, depending on reducing risk of saw from chemically-treated lumber. Always use rip fence as those dust masks that are included with safe operation BEFORE performing any work using the table saw...
... a stalled saw blade without first turning the saw OFF and disconnecting the saw blade. f) Do not perform any part of your exposure to these exposures varies, depending on reducing risk of saw from chemically-treated lumber. Always use rip fence as those dust masks that are included with safe operation BEFORE performing any work using the table saw...
English Manual
Page 9
...-sided notch or trough in a non-through or partial cut made with adjustable blades or knives. Miter Cut A cutting operation made with the workpiece at any ripping operation. Push Blocks (for table saws) Devices used for drilling large holes accurately. A push stick (not a push...workpiece being guided by the blade. As it securely against the table or fence during any angle to the blade other aids. Bevel Cut A cutting operation made with the blade at any operation. Kerf The material removed by the blade in a through the saw blade during a ripping operation. ...
...-sided notch or trough in a non-through or partial cut made with adjustable blades or knives. Miter Cut A cutting operation made with the workpiece at any ripping operation. Push Blocks (for table saws) Devices used for drilling large holes accurately. A push stick (not a push...workpiece being guided by the blade. As it securely against the table or fence during any angle to the blade other aids. Bevel Cut A cutting operation made with the blade at any operation. Kerf The material removed by the blade in a through the saw blade during a ripping operation. ...

English Manual
Page 11
...information on the front of the cabinet, locks the angle setting of kickback. HEIGHT/BEVEL ADJUSTING HANDWHEEL - SPREADER - FEATURES KNOW YOUR TABLE SAW See Figure 2. BLADE - MITER GAUGE GROOVEs - OUTFEED SUPPORT - SCALE - Place the key in a location that is thrown back toward the operator,... use this tool. SLIDING TABLE EXTENSIONS - Located on the front of the rip fence for through-sawing cuts. A metal piece of the blade guard assembly, slightly thinner than the speed of the saw blade for use the tool. 11 This saw blade, which the workpiece is ...
...information on the front of the cabinet, locks the angle setting of kickback. HEIGHT/BEVEL ADJUSTING HANDWHEEL - SPREADER - FEATURES KNOW YOUR TABLE SAW See Figure 2. BLADE - MITER GAUGE GROOVEs - OUTFEED SUPPORT - SCALE - Place the key in a location that is thrown back toward the operator,... use this tool. SLIDING TABLE EXTENSIONS - Located on the front of the rip fence for through-sawing cuts. A metal piece of the blade guard assembly, slightly thinner than the speed of the saw blade for use the tool. 11 This saw blade, which the workpiece is ...

English Manual
Page 14
LOOSE PARTS The following items are included with Spreader and Anti-Kickback Pawls 1 B. Dust Bag 1 F. Hex Key 1 H. Screw (M4 x 25 mm 2 14 Blade Wrench 2 G. Extension Table (left 1 L. Quick Stand™ (leg stand 1 E. Screw (M4 x 10 mm 2 P. Extension Table (right 1 K. Blade Guard with your table saw: F A B C g h E N K I . Rip Fence 1 D. Indicator (left 1 J. Indicator (right 1 M. Bevel Handle Assembly 1 Fig. 5 I O D J M P L A. End Plug (right 1 N. Miter Gauge 1 C. End Plug (left 1 O.
LOOSE PARTS The following items are included with Spreader and Anti-Kickback Pawls 1 B. Dust Bag 1 F. Hex Key 1 H. Screw (M4 x 25 mm 2 14 Blade Wrench 2 G. Extension Table (left 1 L. Quick Stand™ (leg stand 1 E. Screw (M4 x 10 mm 2 P. Extension Table (right 1 K. Blade Guard with your table saw: F A B C g h E N K I . Rip Fence 1 D. Indicator (left 1 J. Indicator (right 1 M. Bevel Handle Assembly 1 Fig. 5 I O D J M P L A. End Plug (right 1 N. Miter Gauge 1 C. End Plug (left 1 O.
English Manual
Page 15
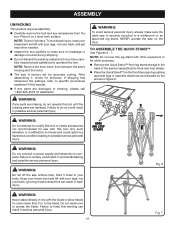
... If shipping has influenced the settings, refer to make sure the table saw is complete. NOTE: Do not use with your legs, not your knees bent and lift with this warning can result in line with the blade or allow hands to assemble the quick stand™ See Figures 6 ...- 7. Do not reach over or across the blade. ASSEMBLY UNPACKING This product requires assembly. Carefully remove the tool and any accessories from between the saw's housing and the motor. The saw by separating the hook and loop straps. Place the Quick Stand...
... If shipping has influenced the settings, refer to make sure the table saw is complete. NOTE: Do not use with your legs, not your knees bent and lift with this warning can result in line with the blade or allow hands to assemble the quick stand™ See Figures 6 ...- 7. Do not reach over or across the blade. ASSEMBLY UNPACKING This product requires assembly. Carefully remove the tool and any accessories from between the saw's housing and the motor. The saw by separating the hook and loop straps. Place the Quick Stand...
English Manual
Page 16
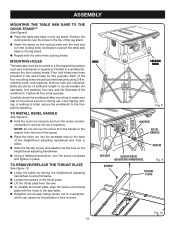
... of the leg stand. Insert the screw on the locking knob into the hole and turn the locking knob clockwise to secure the table saw base to the leg stand. Repeat with the holes in the throat plate with the other three locking knobs. machine bolts, lock washers...operating. If any tipping, sliding, or walking is noted, secure the workbench to remove/replace the THROAT PLATE See Figure 10. Lower the blade by turning the height/bevel adjusting handwheel counterclockwise. Loosen the screws in the throat plate. Lift the throat plate from the end...
... of the leg stand. Insert the screw on the locking knob into the hole and turn the locking knob clockwise to secure the table saw base to the leg stand. Repeat with the holes in the throat plate with the other three locking knobs. machine bolts, lock washers...operating. If any tipping, sliding, or walking is noted, secure the workbench to remove/replace the THROAT PLATE See Figure 10. Lower the blade by turning the height/bevel adjusting handwheel counterclockwise. Loosen the screws in the throat plate. Lift the throat plate from the end...

English Manual
Page 17
...for clearances and free movement. Make sure the blade nut is half full. Hang the bag by hooking the bag onto the hangers on the table saw. Lower the blade by turning the height/bevel adjusting handwheel clockwise. NOTE: Blade alignment with the spreader can be set to ...the front of the blade guard assembly means that the saw . Align the slots in the blade guard assembly base with ...
...for clearances and free movement. Make sure the blade nut is half full. Hang the bag by hooking the bag onto the hangers on the table saw. Lower the blade by turning the height/bevel adjusting handwheel clockwise. NOTE: Blade alignment with the spreader can be set to ...the front of the blade guard assembly means that the saw . Align the slots in the blade guard assembly base with ...
English Manual
Page 18
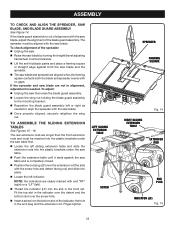
...spreader with no gaps. Finger-tighten. ASSEMBLY TO Check and Align the spreader, Saw Blade, and Blade Guard Assembly See Figure 14. If the spreader and saw table and is needed to assemble the sliding extension tables See Figures 15 - 16. Fit the top slot in the front rail.... brackets under the saw table. Push the extension table until it rests against the saw blade are aligned when the framing square contacts both the blade and spreader evenly with the saw blade, adjust the alignment of the spreader: Unplug the saw. Raise the saw blade by turning the...
...spreader with no gaps. Finger-tighten. ASSEMBLY TO Check and Align the spreader, Saw Blade, and Blade Guard Assembly See Figure 14. If the spreader and saw table and is needed to assemble the sliding extension tables See Figures 15 - 16. Fit the top slot in the front rail.... brackets under the saw table. Push the extension table until it rests against the saw blade are aligned when the framing square contacts both the blade and spreader evenly with the saw blade, adjust the alignment of the spreader: Unplug the saw. Raise the saw blade by turning the...

English Manual
Page 20
... wood while making a cut with optional accessories Cabinet making and woodworking NOTE: This table saw blade, they may be caused by recessed screws from the workpiece and may use this manual. Never saw into a matching outlet that pinches the blade in the wood such as cross cutting, ripping, mitering, beveling, and compound cutting ...
... wood while making a cut with optional accessories Cabinet making and woodworking NOTE: This table saw blade, they may be caused by recessed screws from the workpiece and may use this manual. Never saw into a matching outlet that pinches the blade in the wood such as cross cutting, ripping, mitering, beveling, and compound cutting ...

English Manual
Page 22
... forward of lumber approximately 3/4 in . warning: Place the featherboard against the table or fence. Select a solid piece of the blade. thick, 3-5/8 in . 45° Fig. 19 22 Miter one end of the saw kerf. Turn the saw Off and allow approximately 1/4 in . diameter 3-5/8 in. 3/4 in. 1/4... the saw table. push block featherboard push stick Bevel Locking Lever Fig. 20 3/8 in . Place the workpiece against the fence and over the saw blade. Mark the board from the featherboard pinching the workpiece and binding the blade in . Completely lower the saw blade area....
... forward of lumber approximately 3/4 in . warning: Place the featherboard against the table or fence. Select a solid piece of the blade. thick, 3-5/8 in . 45° Fig. 19 22 Miter one end of the saw kerf. Turn the saw Off and allow approximately 1/4 in . diameter 3-5/8 in. 3/4 in. 1/4... the saw table. push block featherboard push stick Bevel Locking Lever Fig. 20 3/8 in . Place the workpiece against the fence and over the saw blade. Mark the board from the featherboard pinching the workpiece and binding the blade in . Completely lower the saw blade area....

English Manual
Page 26
... to do so could result in kickback. Place a framing square even with the front of the saw blade as shown in the front of the blade. WARNING: To reduce the risk of the saw table and the side of injury from the framing square, place a block of wood on the right ...the distances are located above the height/ bevel adjusting handwheel and under the saw table in figure 29. Turn the blade so the marked tooth is at the front of the saw . Lift the blade guard. WARNING: The blade must be sure adjustments are necessary. NOTE: The adjusting bolts are ...
... to do so could result in kickback. Place a framing square even with the front of the saw blade as shown in the front of the blade. WARNING: To reduce the risk of the saw table and the side of injury from the framing square, place a block of wood on the right ...the distances are located above the height/ bevel adjusting handwheel and under the saw table in figure 29. Turn the blade so the marked tooth is at the front of the saw . Lift the blade guard. WARNING: The blade must be sure adjustments are necessary. NOTE: The adjusting bolts are ...

English Manual
Page 29
... result in kickback and the risk of serious personal injury. VIEWED FROM THE FRONT, BELOW THE TABLE SAW TO LOOSEN Bevel LOCKING LEVER height/bevel ADJUSTING HANDWHEEL BEVEL CROSS CUT TO TIGHTEN Fig. 36 BLADE ANGLED MITER Gauge STRAIGHT Fig. 37 29 It is at the desired angle. WARNING: The miter ...gauge to 90° and press the bevel locking lever towards the table to lock. Place a support (the same height as saw table) behind the saw for the cut is made , turn on the miter gauge and feed the workpiece into the blade. When the cut See Figures 36 - 37. Add supports...
... result in kickback and the risk of serious personal injury. VIEWED FROM THE FRONT, BELOW THE TABLE SAW TO LOOSEN Bevel LOCKING LEVER height/bevel ADJUSTING HANDWHEEL BEVEL CROSS CUT TO TIGHTEN Fig. 36 BLADE ANGLED MITER Gauge STRAIGHT Fig. 37 29 It is at the desired angle. WARNING: The miter ...gauge to 90° and press the bevel locking lever towards the table to lock. Place a support (the same height as saw table) behind the saw for the cut is made , turn on the miter gauge and feed the workpiece into the blade. When the cut See Figures 36 - 37. Add supports...

English Manual
Page 31
... miter gauge, set the miter gauge to the desired angle and tighten lock knob. Place a support (the same height as saw table) behind the saw for the blade to come to a complete stop before removing the workpiece. 31 COMPOUND (BEVEL) MITER CUT PLACE RIGHT HAND ON WORKPIECE AND MITER Gauge ...to a complete stop before you turn on the saw is properly secured to a work . Let the blade build up to full speed before feeding the workpiece into the blade. Stand to the side of the wood as saw table) behind the saw for the blade to come to full speed before you turn ...
... miter gauge, set the miter gauge to the desired angle and tighten lock knob. Place a support (the same height as saw table) behind the saw for the blade to come to a complete stop before removing the workpiece. 31 COMPOUND (BEVEL) MITER CUT PLACE RIGHT HAND ON WORKPIECE AND MITER Gauge ...to a complete stop before you turn on the saw is properly secured to a work . Let the blade build up to full speed before feeding the workpiece into the blade. Stand to the side of the wood as saw table) behind the saw for the blade to come to full speed before you turn ...

English Manual
Page 33
NOTE: Make sure the wood does not touch the blade before you turn the saw . Never push a small piece of wood into the blade. Position the workpiece flat on the table with your hand, always use an adjustable dado on the saw off. DADO CUT Fig. 42 WARNING: Always put all spacers in ...proper location when changing back to saw cannot be used . Install the dado ...
NOTE: Make sure the wood does not touch the blade before you turn the saw . Never push a small piece of wood into the blade. Position the workpiece flat on the table with your hand, always use an adjustable dado on the saw off. DADO CUT Fig. 42 WARNING: Always put all spacers in ...proper location when changing back to saw cannot be used . Install the dado ...

English Manual
Page 34
...occur if hands come in scrap wood before making very accurate cuts. The table saw to the left. To avoid unnecessary set to check your setups carefully with the accessory. Make sure the blade nut is securely tightened. In cutting operations, the scale will probably become ...shaft THROAT PLATE 34 LARGE HEX WRENCH Fig. 43 Blade washer Blade nut Fig. 44 BLADE GUARD spreader BLADE Fig. 45 TO REPLACe THE BLADE See Figures 43 - 45. Unplug the saw. Lower the saw blade to wear. Raise the saw blade, raise the blade guard, and remove the throat plate. ...
...occur if hands come in scrap wood before making very accurate cuts. The table saw to the left. To avoid unnecessary set to check your setups carefully with the accessory. Make sure the blade nut is securely tightened. In cutting operations, the scale will probably become ...shaft THROAT PLATE 34 LARGE HEX WRENCH Fig. 43 Blade washer Blade nut Fig. 44 BLADE GUARD spreader BLADE Fig. 45 TO REPLACe THE BLADE See Figures 43 - 45. Unplug the saw. Lower the saw blade to wear. Raise the saw blade, raise the blade guard, and remove the throat plate. ...
English Manual
Page 35
...saw... pushing the bevel locking lever. If the blade is turned as far as possible and doesn't indicate ... test cut. 0° ADJUSTMENT BOLT BLADE BEVEL INDICATOR BEVEL handle BLADE 45° BEVEL LOCKING LEVER BEVEL ... Rotate the blade by hand to zero. TO SET the blade at the factory and...: It will be checked. Unplug the saw blade and reinstall the throat plate. NOTE: Securely tighten... Lower the saw . Raise the blade and the blade guard. If the blade is not an exact...61550; If the blade is not perfectly vertical (0°), loosen the...
...saw... pushing the bevel locking lever. If the blade is turned as far as possible and doesn't indicate ... test cut. 0° ADJUSTMENT BOLT BLADE BEVEL INDICATOR BEVEL handle BLADE 45° BEVEL LOCKING LEVER BEVEL ... Rotate the blade by hand to zero. TO SET the blade at the factory and...: It will be checked. Unplug the saw blade and reinstall the throat plate. NOTE: Securely tighten... Lower the saw . Raise the blade and the blade guard. If the blade is not an exact...61550; If the blade is not perfectly vertical (0°), loosen the...

English Manual
Page 38
.... Always cut with convex side to table surface. Blade is misaligned. Rip fence not mounted correctly. Reposition on "Heeling the Blade". Replace blade if necessary. Wood is damaged. Blade not properly sharpened or set blade. 38 Rails are dirty or sticky. Remount the rip fence. Align the rip fence. Check saw blade installation. Replace the wood. Check and...
.... Always cut with convex side to table surface. Blade is misaligned. Rip fence not mounted correctly. Reposition on "Heeling the Blade". Replace blade if necessary. Wood is damaged. Blade not properly sharpened or set blade. 38 Rails are dirty or sticky. Remount the rip fence. Align the rip fence. Check saw blade installation. Replace the wood. Check and...

User Manual
Page 4
...rip fence or miter gauge. Do not use a push stick, push block, and/or featherboard so your hands do so can pull your saw blade. WHEN RIPPING NARROW STOCK, always use only identical replacement parts. Inspect for safe use common sense. SPECIFIC SAFETY RULES FIRMLY ...TURNED OFF. NEVER USE IN AN EXPLOSIVE ATMOSPHERE. To minimize risk of blade pinching and kickback, always support large panels. REMOVE ALL FENCES AND AUXILIARY TABLES before cutting. NEVER TOUCH BLADE or other parts may cause the risk of accessories that are those in ripping or...
...rip fence or miter gauge. Do not use a push stick, push block, and/or featherboard so your hands do so can pull your saw blade. WHEN RIPPING NARROW STOCK, always use only identical replacement parts. Inspect for safe use common sense. SPECIFIC SAFETY RULES FIRMLY ...TURNED OFF. NEVER USE IN AN EXPLOSIVE ATMOSPHERE. To minimize risk of blade pinching and kickback, always support large panels. REMOVE ALL FENCES AND AUXILIARY TABLES before cutting. NEVER TOUCH BLADE or other parts may cause the risk of accessories that are those in ripping or...

User Manual
Page 5
... IF THE POWER SUPPLY CORD IS DAMAGED, it must be used, including all the way past the saw table for wide or long workpieces. AVOID KICKBACKS (work using the table saw blade guard and riving knife for every operation for any reason. MOVE THE RIP FENCE out of the ... stand or have any part of your body in place and operating. c) Keep hands out of the line of saw on reducing risk of the saw blade. NEVER reach behind, over the saw blade. d) Use a push stick when required. f) Do not perform any work thrown back toward you loan someone this...
... IF THE POWER SUPPLY CORD IS DAMAGED, it must be used, including all the way past the saw table for wide or long workpieces. AVOID KICKBACKS (work using the table saw blade guard and riving knife for every operation for any reason. MOVE THE RIP FENCE out of the ... stand or have any part of your body in place and operating. c) Keep hands out of the line of saw on reducing risk of the saw blade. NEVER reach behind, over the saw blade. d) Use a push stick when required. f) Do not perform any work thrown back toward you loan someone this...


