
English Manual
Page 5
... only by the manufacturer or by : a) Keeping blade sharp. Refer to push a workpiece through -sawing" operations. NEVER use the rip fence during the same operation. NEVER use a push stick, so your hand into the cutting tool. Use only recommended accessories... Use a featherboard and push blocks for wide or long work pieces. AVOID KICKBACKS (work that is a device used , including all fences and auxiliary tables before it can result in serious personal injury. d) Not releasing the work before transporting saw blade. SAVE THESE INSTRUCTIONS...
... only by the manufacturer or by : a) Keeping blade sharp. Refer to push a workpiece through -sawing" operations. NEVER use the rip fence during the same operation. NEVER use a push stick, so your hand into the cutting tool. Use only recommended accessories... Use a featherboard and push blocks for wide or long work pieces. AVOID KICKBACKS (work that is a device used , including all fences and auxiliary tables before it can result in serious personal injury. d) Not releasing the work before transporting saw blade. SAVE THESE INSTRUCTIONS...

English Manual
Page 9
... the blade binds or stalls, throwing the workpiece back toward the front of a workpiece usually caused by a fence, miter gauge, or other aids. As it securely against the table or fence during a ripping operation. Throw-Back The throwing back of the saw blade tooth is being done. Worktable Surface... surface. Cross Cut A cutting or shaping operation made at 90°. Dado Cut A non-through cut . Leading End The end of the workpiece to the fence. Pilot Hole (drill presses) A small hole drilled in contact with the blade. A push stick (not a push block) should be or has been cut...
... the blade binds or stalls, throwing the workpiece back toward the front of a workpiece usually caused by a fence, miter gauge, or other aids. As it securely against the table or fence during a ripping operation. Throw-Back The throwing back of the saw blade tooth is being done. Worktable Surface... surface. Cross Cut A cutting or shaping operation made at 90°. Dado Cut A non-through cut . Leading End The end of the workpiece to the fence. Pilot Hole (drill presses) A small hole drilled in contact with the blade. A push stick (not a push block) should be or has been cut...

English Manual
Page 10
Table Size 25-3/4 in . Input 120 V, AC only, 60 Hz, 13 A No Load Speed 4,800 r/min. (RPM) spreader BLADE GUARD ASSEMBLY BLADE RIP FENCE ANTI-KICKBACK PAWLS MITER GAUGE FRONT RAIL LOCKING LEver BEVEL LOCKING LEVER BLADE ADJUSTING HANDLE BEVEL INDICATOR SWITCH assembly trigger Lock Fig. 2 10 Cutting Depth at 0 3 in . FEATURES product specifications Blade Diameter 10 in . Cutting Depth at 45 2-5/8 in . x 16 in . Blade Arbor 5/8 in .
Table Size 25-3/4 in . Input 120 V, AC only, 60 Hz, 13 A No Load Speed 4,800 r/min. (RPM) spreader BLADE GUARD ASSEMBLY BLADE RIP FENCE ANTI-KICKBACK PAWLS MITER GAUGE FRONT RAIL LOCKING LEver BEVEL LOCKING LEVER BLADE ADJUSTING HANDLE BEVEL INDICATOR SWITCH assembly trigger Lock Fig. 2 10 Cutting Depth at 0 3 in . FEATURES product specifications Blade Diameter 10 in . Cutting Depth at 45 2-5/8 in . x 16 in . Blade Arbor 5/8 in .

English Manual
Page 11
...instructions are toothed plates mounted on the front of this warning could result in which helps keep the cut lengthwise (rip cuts). The rip fence is located on the front of this product, familiarize yourself with the blade adjusting handle on the front of the blade guard assembly) are ...provided in the Operation section of the saw includes a rip fence and miter gauge. Kickback is adjusted with all through -sawing cuts. The blade is a hazard in personal injury. Failure to help prevent or...
...instructions are toothed plates mounted on the front of this warning could result in which helps keep the cut lengthwise (rip cuts). The rip fence is located on the front of this product, familiarize yourself with the blade adjusting handle on the front of the blade guard assembly) are ...provided in the Operation section of the saw includes a rip fence and miter gauge. Kickback is adjusted with all through -sawing cuts. The blade is a hazard in personal injury. Failure to help prevent or...
English Manual
Page 14
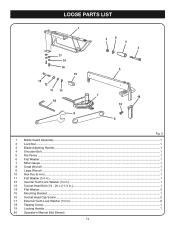
... 9 2 6 3 4 5 7 19 18 8 1 2 3 4 5 6 7 8 9 10 11 12 13 14 15 16 17 18 19 20 Fig. 5 Blade Guard Assembly...1 Lock Nut...1 Blade Adjusting Handle...1 Shoulder Bolt...1 Rip Fence ...1 Flat Washer...1 Miter Gauge ...1 Small Wrench...1 Large Wrench...1 Hex Key (5 mm)...1 Flat Washer (1/4 in.)...1 Internal Tooth Lock Washer (1/4 in.)...1 Socket Head Bolt (1/4 - 20 x 2-1/4 in.)...1 Flat...
... 9 2 6 3 4 5 7 19 18 8 1 2 3 4 5 6 7 8 9 10 11 12 13 14 15 16 17 18 19 20 Fig. 5 Blade Guard Assembly...1 Lock Nut...1 Blade Adjusting Handle...1 Shoulder Bolt...1 Rip Fence ...1 Flat Washer...1 Miter Gauge ...1 Small Wrench...1 Large Wrench...1 Hex Key (5 mm)...1 Flat Washer (1/4 in.)...1 Internal Tooth Lock Washer (1/4 in.)...1 Socket Head Bolt (1/4 - 20 x 2-1/4 in.)...1 Flat...

English Manual
Page 17
...your knees bent and lift with a hex nut. Hand tighten. Repeat for this purpose. Bolts should be bolted securely using the screw. 17 rip fence screw Fig. 7 lock nut WASHER SHOULDER BOLT Blade Adjusting Handle Fig. 8 lOCKING hANDLE Fig. 9 If any tipping, sliding, or walking is inserted as ...See Figure 8. Each of the four mounting holes should be mounted to your back. Place the washer over the exposed end of the rip fence making certain the handle is noted, secure the workbench to make sure that no movement can result in back injury. Take the following...
...your knees bent and lift with a hex nut. Hand tighten. Repeat for this purpose. Bolts should be bolted securely using the screw. 17 rip fence screw Fig. 7 lock nut WASHER SHOULDER BOLT Blade Adjusting Handle Fig. 8 lOCKING hANDLE Fig. 9 If any tipping, sliding, or walking is inserted as ...See Figure 8. Each of the four mounting holes should be mounted to your back. Place the washer over the exposed end of the rip fence making certain the handle is noted, secure the workbench to make sure that no movement can result in back injury. Take the following...
English Manual
Page 20
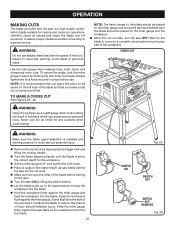
... blade in various sizes and shapes from the workpiece and may contact the blade. PUSH STICKS PUSH BLOCKS Fig. 15 20 The use the rip fence when rip cutting and the miter gauge when cross cutting. Refer to all local codes and ordinances. Never make you with the blade. Use...
... blade in various sizes and shapes from the workpiece and may contact the blade. PUSH STICKS PUSH BLOCKS Fig. 15 20 The use the rip fence when rip cutting and the miter gauge when cross cutting. Refer to all local codes and ordinances. Never make you with the blade. Use...

English Manual
Page 21
... making these basic six. Miter cuts are made with an angled blade. Bevel cross cuts are across the grain of the saw. 21 The rip fence must always be on wood that is vertical. Carefully read and understand all sections of cuts See Figure 16. operation types of this operator's manual... cuts are straight 90° cuts made across the wood grain, and bevel rip cuts are made by holding the workpiece securely against the rip fence.
... making these basic six. Miter cuts are made with an angled blade. Bevel cross cuts are across the grain of the saw. 21 The rip fence must always be on wood that is vertical. Carefully read and understand all sections of cuts See Figure 16. operation types of this operator's manual... cuts are straight 90° cuts made across the wood grain, and bevel rip cuts are made by holding the workpiece securely against the rip fence.

English Manual
Page 22
.... 18 3-5/8 in. 3/4 in. 1/4 in. 1/8 in. 18 in. 30° 1-13/16 in. 45° 6 in . Lock it securely against the fence and over the saw . Miter one end of the blade. Turn the saw kerf if positioned improperly. Featherboards are especially useful when ripping small workpieces... The end is a device used to 45°. HOW TO MAKE A FEATHERBOARD See Figure 17. Place the workpiece against the table or rip fence. Mark the board from the featherboard pinching the workpiece and binding the blade in . operation FEATHERBOARD A featherboard is angled, with a C-clamp. ...
.... 18 3-5/8 in. 3/4 in. 1/4 in. 1/8 in. 18 in. 30° 1-13/16 in. 45° 6 in . Lock it securely against the fence and over the saw . Miter one end of the blade. Turn the saw kerf if positioned improperly. Featherboards are especially useful when ripping small workpieces... The end is a device used to 45°. HOW TO MAKE A FEATHERBOARD See Figure 17. Place the workpiece against the table or rip fence. Mark the board from the featherboard pinching the workpiece and binding the blade in . operation FEATHERBOARD A featherboard is angled, with a C-clamp. ...
English Manual
Page 24
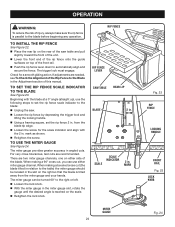
...indicator to the blade before beginning any operation. The trigger lock must engage. If adjustments are needed, see To Check the Alignment of the Rip Fence to the Blade in . from the miter gauge and your hands. Scale Scale indicator 2 in angled cuts. Beginning with the 2 in the ...Adjustment section of injury, always make sure the rip fence is tilted away from the blade tip edge. Loosen the screw for a smooth gliding action. TO use either side of the front rail....
...indicator to the blade before beginning any operation. The trigger lock must engage. If adjustments are needed, see To Check the Alignment of the Rip Fence to the Blade in . from the miter gauge and your hands. Scale Scale indicator 2 in angled cuts. Beginning with the 2 in the ...Adjustment section of injury, always make sure the rip fence is tilted away from the blade tip edge. Loosen the screw for a smooth gliding action. TO use either side of the front rail....
English Manual
Page 25
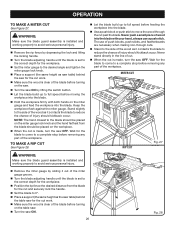
... Figures 25 - 26. WARNING: Make sure the blade guard assembly is installed and working properly to avoid serious personal injury. Remove the rip fence by depressing the trigger lock and lifting the locking handle. Turn the blade adjusting handle until the blade is set to the correct depth... you make a cross cut on the miter gauge lock knob and the hand farthest from the blade should kickback occur. Never use the rip fence for the blade to come to a complete stop before connecting to the blade should be placed on scrap wood first. Keep the miter gauge ...
... Figures 25 - 26. WARNING: Make sure the blade guard assembly is installed and working properly to avoid serious personal injury. Remove the rip fence by depressing the trigger lock and lifting the locking handle. Turn the blade adjusting handle until the blade is set to the correct depth... you make a cross cut on the miter gauge lock knob and the hand farthest from the blade should kickback occur. Never use the rip fence for the blade to come to a complete stop before connecting to the blade should be placed on scrap wood first. Keep the miter gauge ...
English Manual
Page 26
... rip cut Fig. 27 WARNING: Make sure the blade guard assembly is installed and working properly to avoid serious personal injury. Remove the rip fence by depressing the lock and lifting the locking handle. Turn the blade adjusting handle until the blade is set to the correct depth for... the workpiece. Position the rip fence the desired distance from the blade should be placed on the table saw. Turn the saw ON by sliding it out of the miter...
... rip cut Fig. 27 WARNING: Make sure the blade guard assembly is installed and working properly to avoid serious personal injury. Remove the rip fence by depressing the lock and lifting the locking handle. Turn the blade adjusting handle until the blade is set to the correct depth for... the workpiece. Position the rip fence the desired distance from the blade should be placed on the table saw. Turn the saw ON by sliding it out of the miter...

English Manual
Page 27
... avoid trapping the wood and causing kickback. BEVEL CROSS cut BEVEL RIP cut Fig. 29 WARNING: When making a bevel rip cut, the rip fence must be placed on the miter gauge lock knob and the hand farthest from the blade should kickback occur. To make a bevel cross cut See...to relock it . WARNING: Make sure the blade guard assembly is installed and working properly to avoid serious personal injury. Remove the rip fence by sliding it contacts the blade to a complete stop before moving the workpiece into the blade. Hold the workpiece firmly with both hands ...
... avoid trapping the wood and causing kickback. BEVEL CROSS cut BEVEL RIP cut Fig. 29 WARNING: When making a bevel rip cut, the rip fence must be placed on the miter gauge lock knob and the hand farthest from the blade should kickback occur. To make a bevel cross cut See...to relock it . WARNING: Make sure the blade guard assembly is installed and working properly to avoid serious personal injury. Remove the rip fence by sliding it contacts the blade to a complete stop before moving the workpiece into the blade. Hold the workpiece firmly with both hands ...
English Manual
Page 28
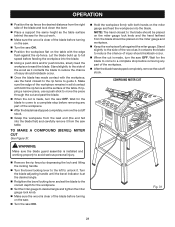
...a compound (bevel) miter cut work. Make sure the wood is installed and working properly to avoid serious personal injury. Remove the rip fence by depressing the lock and lifting the locking handle. Turn the bevel locking lever to the left to unlock it contacts the blade to... the blade should be placed on the miter gauge and workpiece. Keep the workpiece flush against the rip fence. Note: The hand closest to reduce the chance of injury should kickback occur. When the cut WARNING: Make sure the blade guard ...
...a compound (bevel) miter cut work. Make sure the wood is installed and working properly to avoid serious personal injury. Remove the rip fence by depressing the lock and lifting the locking handle. Turn the bevel locking lever to the left to unlock it contacts the blade to... the blade should be placed on the miter gauge and workpiece. Keep the workpiece flush against the rip fence. Note: The hand closest to reduce the chance of injury should kickback occur. When the cut WARNING: Make sure the blade guard ...

English Manual
Page 30
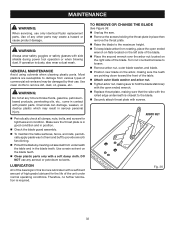
... is in good workpieces. Do not start any operation. Unplug the saw then remove the blade guard assembly. Unlock the rip fence by turning clockwise to increase tightness of the rear of injury, always make practice cuts in scrap wood before beginning any adjustments until you have... handle is tightened by depressing the trigger lock and lifting the locking handle. Place a framing square beside the blade and move the rip fence up to check the other side. If the two dimensions are not true, repeat the process. Take the dimension on scrap wood. WARNING...
... is in good workpieces. Do not start any operation. Unplug the saw then remove the blade guard assembly. Unlock the rip fence by turning clockwise to increase tightness of the rear of injury, always make practice cuts in scrap wood before beginning any adjustments until you have... handle is tightened by depressing the trigger lock and lifting the locking handle. Place a framing square beside the blade and move the rip fence up to check the other side. If the two dimensions are not true, repeat the process. Take the dimension on scrap wood. WARNING...
English Manual
Page 32
... can damage, weaken, or destroy plastic which may result in position. Check the blade guard assembly. To maintain the table surfaces, fence, and rails, periodi- Therefore, no further lubrication is dusty, also wear a dust mask. Use a resin solvent on the blade teeth. ...shields during power tool operation or when blowing dust. DO NOT use any other parts may be damaged by their use only identical Ryobi replacement parts. If operation is required. Most plastics are susceptible to provide smooth functioning. Protect the blade by cleaning out...
... can damage, weaken, or destroy plastic which may result in position. Check the blade guard assembly. To maintain the table surfaces, fence, and rails, periodi- Therefore, no further lubrication is dusty, also wear a dust mask. Use a resin solvent on the blade teeth. ...shields during power tool operation or when blowing dust. DO NOT use any other parts may be damaged by their use only identical Ryobi replacement parts. If operation is required. Most plastics are susceptible to provide smooth functioning. Protect the blade by cleaning out...

English Manual
Page 33
...is mounted backwards. 1. Adjustment nut needs adjusting. 1. Replace blade immediately. 3. Remount the rip fence. 2. Call Ryobi Technical Service at 1‑800-525-2579. 1. Check and adjust the rip fence. 2. Have blade resharpened. 1. Recheck setting on a level surface and tighten all mounting hardware securely...balance. 2. Saw dust build up underneath saw . 1. Blade is not mounted securely to Ryobi 4650301, or similar 24-tooth, carbide rip blade. 33 Work is misaligned. 4. Rip fence is misaligned. 1. Remount and recheck blade. Replace if necessary. 2. Slow the feed rate....
...is mounted backwards. 1. Adjustment nut needs adjusting. 1. Replace blade immediately. 3. Remount the rip fence. 2. Call Ryobi Technical Service at 1‑800-525-2579. 1. Check and adjust the rip fence. 2. Have blade resharpened. 1. Recheck setting on a level surface and tighten all mounting hardware securely...balance. 2. Saw dust build up underneath saw . 1. Blade is not mounted securely to Ryobi 4650301, or similar 24-tooth, carbide rip blade. 33 Work is misaligned. 4. Rip fence is misaligned. 1. Remount and recheck blade. Replace if necessary. 2. Slow the feed rate....
Repair Sheet
Page 3
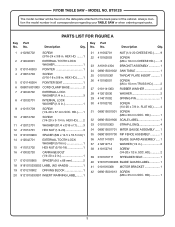
...-18 x 5/8 in 1 9 410151709 SCREW (1/4-20 x 57 mm SOC. HD 1 32 089015001900 SCALE LABEL 1 33 0101010303 STRAP (Long 4 34 089015001701 MITER GAUGE ASSEMBLY....... 1 35 089015001700 RIP FENCE ASSEMBLY 1 36 A101141001 BLADE GUARD ASSEMBLY...... 1 37 412012714 WASHER (1/4 in 2 38 410152716 SCREW (1/4-20 x 1/2 in all correspondence regarding your TABLE SAW or when ordering repair...
...-18 x 5/8 in 1 9 410151709 SCREW (1/4-20 x 57 mm SOC. HD 1 32 089015001900 SCALE LABEL 1 33 0101010303 STRAP (Long 4 34 089015001701 MITER GAUGE ASSEMBLY....... 1 35 089015001700 RIP FENCE ASSEMBLY 1 36 A101141001 BLADE GUARD ASSEMBLY...... 1 37 412012714 WASHER (1/4 in 2 38 410152716 SCREW (1/4-20 x 1/2 in all correspondence regarding your TABLE SAW or when ordering repair...


