
Operation Manual
Page 2
... use with charger listed. Be aware of dust, lint, hair, and anything that may create a risk of injury and fire. When battery pack is not in use, keep free of possible hazards when using an electrical appliance, basic precautions should always be caught in internal moving parts. READ AND UNDERSTAND ALL INSTRUCTIONS. Removing battery pack will prevent accidental starting that are assembling parts, making adjustments, cleaning...
... use with charger listed. Be aware of dust, lint, hair, and anything that may create a risk of injury and fire. When battery pack is not in use, keep free of possible hazards when using an electrical appliance, basic precautions should always be caught in internal moving parts. READ AND UNDERSTAND ALL INSTRUCTIONS. Removing battery pack will prevent accidental starting that are assembling parts, making adjustments, cleaning...
Operation Manual
Page 3
... power source and/or battery pack, picking up or carrying the product. Ensure the switch is in vehicles. Protect your model. Do not store outside or in the off-position before using only identical replacement parts. If damaged, have the switch on the switch or energizing battery products that may affect the product's operation. Accessories that have the product serviced before connecting to repair the appliance or battery...
... power source and/or battery pack, picking up or carrying the product. Ensure the switch is in vehicles. Protect your model. Do not store outside or in the off-position before using only identical replacement parts. If damaged, have the switch on the switch or energizing battery products that may affect the product's operation. Accessories that have the product serviced before connecting to repair the appliance or battery...
Operation Manual
Page 4
... Minutes Direct Current No Load Speed Per Minute Do not run unit while motor head is unsecured. This product uses lithium-ion (Li-ion) batteries. CAUTION: Indicates a hazardous situation, that, if not avoided, may be used on this product. NOTICE: (Without Safety Alert Symbol) Indicates information considered important, but not related to property damage). messages relating to a potential injury (e.g. Wet Conditions...
... Minutes Direct Current No Load Speed Per Minute Do not run unit while motor head is unsecured. This product uses lithium-ion (Li-ion) batteries. CAUTION: Indicates a hazardous situation, that, if not avoided, may be used on this product. NOTICE: (Without Safety Alert Symbol) Indicates information considered important, but not related to property damage). messages relating to a potential injury (e.g. Wet Conditions...
Operation Manual
Page 5
... wet use filter, flexible hose, crevice tool, floor nozzle, casters, extension wands, and extension wand with damaged or missing parts could result in the Includes section must be twisted apart, the hose is misuse and could result in place using the locking latches. 5 - NOTE: To reassemble the appliance for wet vacuuming: n Remove the motor head assembly from the box. n Remove the motor head assembly and set it can easily be installed before using the wet/dry vac. If the hose...
... wet use filter, flexible hose, crevice tool, floor nozzle, casters, extension wands, and extension wand with damaged or missing parts could result in the Includes section must be twisted apart, the hose is misuse and could result in place using the locking latches. 5 - NOTE: To reassemble the appliance for wet vacuuming: n Remove the motor head assembly from the box. n Remove the motor head assembly and set it can easily be installed before using the wet/dry vac. If the hose...
Operation Manual
Page 6
...; Set the ON/OFF switch to the OFF position. Raise the battery cover. Insert the battery pack into the product as needed. To remove, hold the attachment or extension wand and pull from the appliance when you careless. APPLICATIONS You may use any abnormal motor noises. To start the wet/dry vac: press the ON/OFF switch to the ON position. To stop...
...; Set the ON/OFF switch to the OFF position. Raise the battery cover. Insert the battery pack into the product as needed. To remove, hold the attachment or extension wand and pull from the appliance when you careless. APPLICATIONS You may use any abnormal motor noises. To start the wet/dry vac: press the ON/OFF switch to the ON position. To stop...
Operation Manual
Page 7
... canister should be checked, emptied, and cleaned periodically to remove dirt, dust, oil, grease, etc. n Replace motor head assembly and lock securely. 7 - When blowing, keep from scattering debris by their use only identical replacement parts. GENERAL MAINTENANCE Avoid using solvents when cleaning plastic parts. n Remove the filter cover and dry use filter and filter cover. n Before replacing the motor head assembly, make sure the vacuum does not get submerged or doused in contact with a safety plug inside the filter unit housing. OPERATION WET VACUUMING...
... canister should be checked, emptied, and cleaned periodically to remove dirt, dust, oil, grease, etc. n Replace motor head assembly and lock securely. 7 - When blowing, keep from scattering debris by their use only identical replacement parts. GENERAL MAINTENANCE Avoid using solvents when cleaning plastic parts. n Remove the filter cover and dry use filter and filter cover. n Before replacing the motor head assembly, make sure the vacuum does not get submerged or doused in contact with a safety plug inside the filter unit housing. OPERATION WET VACUUMING...
Operation Manual
Page 8
... this product or call 1-800-525-2579: Dry Use Filter...019071004011 Wet Use Filter...019071004010 NOTE: ILLUSTRATIONS START ON PAGE 9 AFTER FRENCH AND SPANISH LANGUAGE SECTIONS. 8 - wash out if necessary. NOTE: To attach the storage wand with warm water and mild soap. Moisture can develop in place. MAINTENANCE Liquid waste: Remove the battery pack. NOTE: Replace the filter if it in the motor...
... this product or call 1-800-525-2579: Dry Use Filter...019071004011 Wet Use Filter...019071004010 NOTE: ILLUSTRATIONS START ON PAGE 9 AFTER FRENCH AND SPANISH LANGUAGE SECTIONS. 8 - wash out if necessary. NOTE: To attach the storage wand with warm water and mild soap. Moisture can develop in place. MAINTENANCE Liquid waste: Remove the battery pack. NOTE: Replace the filter if it in the motor...
Parts Diagram
Page 1
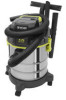
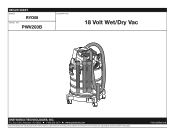
Always mention this information in all communications regarding this product and when ordering parts. 7-28-20 (Rev:01) Box 1288, Anderson, SC 29622 1-800-525-2579 www.ryobitools.com The model number and manufacturing location will be found on a label attached to the product. REPAIR SHEET BRAND RYOBI MODEL NO. P.O. PWV200B DESCRIPTION 18 Volt Wet/Dry Vac ONE WORLD TECHNOLOGIES, INC.
Always mention this information in all communications regarding this product and when ordering parts. 7-28-20 (Rev:01) Box 1288, Anderson, SC 29622 1-800-525-2579 www.ryobitools.com The model number and manufacturing location will be found on a label attached to the product. REPAIR SHEET BRAND RYOBI MODEL NO. P.O. PWV200B DESCRIPTION 18 Volt Wet/Dry Vac ONE WORLD TECHNOLOGIES, INC.
Parts Diagram
Page 3
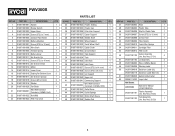
.... 47 019071004004 Hose 1 48 019071004005 Plastic Tube 3 49 019071004006 Clip For Plastic Tube 1 50 019071004007 Screw (ST3.9 x 12 mm) 2 51 019071004008 Crevice Tool 1 52 019071004009 Floor Nozzle 1 53 019071004010 Foam Filter Sponge 1 54 019071004011 Cartridge Filter 1 55 019071004012 Filter Cover 1 56 019071001102 Caster Assembly (Inc. Key Nos. 24-25) 1 019071001103 Tank Assembly (Inc. PART NO. Key Nos. 32-39) 1 3 PWV200B KEY NO. PART NO.
.... 47 019071004004 Hose 1 48 019071004005 Plastic Tube 3 49 019071004006 Clip For Plastic Tube 1 50 019071004007 Screw (ST3.9 x 12 mm) 2 51 019071004008 Crevice Tool 1 52 019071004009 Floor Nozzle 1 53 019071004010 Foam Filter Sponge 1 54 019071004011 Cartridge Filter 1 55 019071004012 Filter Cover 1 56 019071001102 Caster Assembly (Inc. Key Nos. 24-25) 1 019071001103 Tank Assembly (Inc. PART NO. Key Nos. 32-39) 1 3 PWV200B KEY NO. PART NO.

Parts Diagram
Page 4
PWV200B CONTACT PLATE BLACK ROCKER SWITCH RED MOTOR FAN BLADE WIRING DIAGRAM 4
PWV200B CONTACT PLATE BLACK ROCKER SWITCH RED MOTOR FAN BLADE WIRING DIAGRAM 4


