

English Manual
Page 6
... result in serious personal injury. Please study them and learn their meaning. Failure to keep your hands away from the blade will result in serious personal injury. Proper interpretation of these symbols will result in damp locations. Failure to operate the tool better and... V Volts Voltage A Amperes Current Hz Hertz Frequency (cycles per minute Wet Conditions Alert Do not expose to keep your hands away from the blade will allow you to keep your safety. Always wear safety goggles or safety glasses with any hot surface. 6 Failure to rain or use in...
... result in serious personal injury. Please study them and learn their meaning. Failure to keep your hands away from the blade will result in serious personal injury. Proper interpretation of these symbols will result in damp locations. Failure to operate the tool better and... V Volts Voltage A Amperes Current Hz Hertz Frequency (cycles per minute Wet Conditions Alert Do not expose to keep your hands away from the blade will allow you to keep your safety. Always wear safety goggles or safety glasses with any hot surface. 6 Failure to rain or use in...
English Manual
Page 8
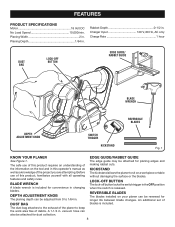
...dust collection. Charger Input 120 V, 60 Hz, AC only Charge Rate 1 hour DUST BAG LOCK-OFF BUTTON EDGE GUIDE/ RABBET GUIDE BLADE WRENCH REVERSIBLE BLADES DEPTH ADJUSTMENT KNOB SWITCH TRIGGER KICKSTAND Fig. 1 KNOW YOUR PLANER See Figure 1. LOCK-OFF BUTTON The lock-off button locks the ...switch trigger in . Rabbet Depth 0-1/2 in . DEPTH ADJUSTMENT KNOB The planing depth can also be attached for longer life between blade changes. REVERSIBLE BLADES The blades installed on the tool and in . An additional set of debris. Planing Width 2 in . vacuum hose can be reversed for...
...dust collection. Charger Input 120 V, 60 Hz, AC only Charge Rate 1 hour DUST BAG LOCK-OFF BUTTON EDGE GUIDE/ RABBET GUIDE BLADE WRENCH REVERSIBLE BLADES DEPTH ADJUSTMENT KNOB SWITCH TRIGGER KICKSTAND Fig. 1 KNOW YOUR PLANER See Figure 1. LOCK-OFF BUTTON The lock-off button locks the ...switch trigger in . Rabbet Depth 0-1/2 in . DEPTH ADJUSTMENT KNOB The planing depth can also be attached for longer life between blade changes. REVERSIBLE BLADES The blades installed on the tool and in . An additional set of debris. Planing Width 2 in . vacuum hose can be reversed for...
English Manual
Page 9
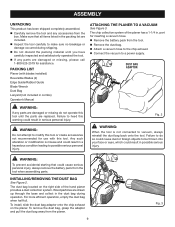
... the base and collect in serious personal injury. PACKING LIST Planer (with this tool or create accessories not recommended for use with blades installed) Reversible Blades (2) Edge Guide/Rabbet Guide Blade Wrench Dust Bag Lanyard (not included in combo) Operator's Manual ATTACHING THE PLANER TO A VACUUM See Figure 3. Failure to do not operate...
... the base and collect in serious personal injury. PACKING LIST Planer (with this tool or create accessories not recommended for use with blades installed) Reversible Blades (2) Edge Guide/Rabbet Guide Blade Wrench Dust Bag Lanyard (not included in combo) Operator's Manual ATTACHING THE PLANER TO A VACUUM See Figure 3. Failure to do not operate...

English Manual
Page 12
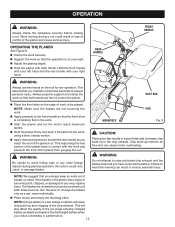
... is clear of wood. with an automatic pivoting kickstand that will automatically pivot down on your workbench, the kickstand will prevent the blade from the roughest workpiece. To set the depth adjustment to 0. Therefore, switch should always be locked when not in scrap wood to ...When setting the planer down to make sure that the area surrounding the kickstand is removing the desired amount of debris. NOTE: To protect the blades during storage, transporting, etc., set the planing depth: Lock the switch by making any contact. WARNING: Make sure the kickstand operates...
... is clear of wood. with an automatic pivoting kickstand that will automatically pivot down on your workbench, the kickstand will prevent the blade from the roughest workpiece. To set the depth adjustment to 0. Therefore, switch should always be locked when not in scrap wood to ...When setting the planer down to make sure that the area surrounding the kickstand is removing the desired amount of debris. NOTE: To protect the blades during storage, transporting, etc., set the planing depth: Lock the switch by making any contact. WARNING: Make sure the kickstand operates...
English Manual
Page 13
.... This assures that the front shoe is on hand. Keep a freshly charged battery available and replace the discharged battery when you reach the end of blades on your right hand. This helps keep an extra set , never individually. Plane slowly and empty the dust bag often. WORKPIECE VISE Fig... base in the planer show signs of the chip exhaust. OPERATION WARNING: Always clamp the workpiece securely before making a cut . If the blades in contact with both hands are free to the front handle so that you always keep the rear section of the planer from gouging the...
.... This assures that the front shoe is on hand. Keep a freshly charged battery available and replace the discharged battery when you reach the end of blades on your right hand. This helps keep an extra set , never individually. Plane slowly and empty the dust bag often. WORKPIECE VISE Fig... base in the planer show signs of the chip exhaust. OPERATION WARNING: Always clamp the workpiece securely before making a cut . If the blades in contact with both hands are free to the front handle so that you always keep the rear section of the planer from gouging the...
English Manual
Page 17
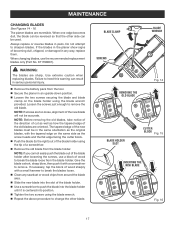
... in an upside-down position. Loosen the two screws securing the blade and blade clamp on the blade holder using the blade wrench. Repeat the above procedure to the right) out of the blade holder using the tip of the old blades are too loose, alignment of wood sharply with a screwdriver to heed this...
... in an upside-down position. Loosen the two screws securing the blade and blade clamp on the blade holder using the blade wrench. Repeat the above procedure to the right) out of the blade holder using the tip of the old blades are too loose, alignment of wood sharply with a screwdriver to heed this...
Repair Sheet
Page 3
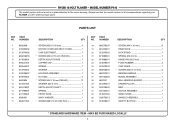
RYOBI 18 VOLT PLANER - PARTS LIST KEY NO. MAY BE PURCHASED LOCALLY 3 PART NUMBER 1 ...SPRING 1 FRONT SHOE 1 WAVY WASHER 1 * SCREW (M8 X 9 mm HEX SOC 1 KEY NO. MODEL NUMBER P610 The model number will be found on a plate attached to the motor housing. PART NUMBER 18 660279007 19 631423001 20 ...1 SPRING (Ø0.5 mm 1 HINGE PIN (Ø0.5 mm 1 FOAM RUBBER 2 CHIP GUIDE 1 * SCREW (M3.5 X 10 mm 3 BEARING NEEDLE 1 BLADE ASSEMBLY 1 BALL BEARING (6000ZZ 1 DRIVEN PULLEY 1 BELT 1 MOTOR ASSEMBLY 1 WIND COVER 1 HANDLE ASSEMBLY 1 SAFETY BUTTON 1 * STANDARD HARDWARE ITEM -...
RYOBI 18 VOLT PLANER - PARTS LIST KEY NO. MAY BE PURCHASED LOCALLY 3 PART NUMBER 1 ...SPRING 1 FRONT SHOE 1 WAVY WASHER 1 * SCREW (M8 X 9 mm HEX SOC 1 KEY NO. MODEL NUMBER P610 The model number will be found on a plate attached to the motor housing. PART NUMBER 18 660279007 19 631423001 20 ...1 SPRING (Ø0.5 mm 1 HINGE PIN (Ø0.5 mm 1 FOAM RUBBER 2 CHIP GUIDE 1 * SCREW (M3.5 X 10 mm 3 BEARING NEEDLE 1 BLADE ASSEMBLY 1 BALL BEARING (6000ZZ 1 DRIVEN PULLEY 1 BELT 1 MOTOR ASSEMBLY 1 WIND COVER 1 HANDLE ASSEMBLY 1 SAFETY BUTTON 1 * STANDARD HARDWARE ITEM -...
Repair Sheet
Page 4
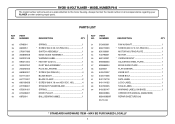
MAY BE PURCHASED LOCALLY 4 RYOBI 18 VOLT PLANER - PARTS LIST KEY NO. Always mention the model number in 1 DUST BAG ASSEMBLY 1 PLUG IN LANYARD 1 * SCREW (M4 PAN HD 4 BLADE BODY 1 BLADE CLAMP 2 * SCREW (M6 X 16 mm HEX SOC. HD 4 STRAIGHT PLANER BLADE 4 SPRING 4 DRIVE PULLEY 1 BALL BEARING (688Z 1 KEY NO. MODEL NUMBER P610 The model number...
MAY BE PURCHASED LOCALLY 4 RYOBI 18 VOLT PLANER - PARTS LIST KEY NO. Always mention the model number in 1 DUST BAG ASSEMBLY 1 PLUG IN LANYARD 1 * SCREW (M4 PAN HD 4 BLADE BODY 1 BLADE CLAMP 2 * SCREW (M6 X 16 mm HEX SOC. HD 4 STRAIGHT PLANER BLADE 4 SPRING 4 DRIVE PULLEY 1 BALL BEARING (688Z 1 KEY NO. MODEL NUMBER P610 The model number...


