Ryobi CSB143LZK Support and Manuals
Get Help and Manuals for this Ryobi item

View All Support Options Below
Free Ryobi CSB143LZK manuals!
Problems with Ryobi CSB143LZK?
Ask a Question
Free Ryobi CSB143LZK manuals!
Problems with Ryobi CSB143LZK?
Ask a Question
Popular Ryobi CSB143LZK Manual Pages
Operation Manual - Page 2
... the date of purchase. When you request warranty service, you may exchange any defective part, at One World Technologies, Inc., P.O. Box 1207, Anderson, SC 29622-1207, by calling 1-800-525-2579 or by returning the power tool to you may either repair or replace any RYOBI® power tool which does not work in a reasonable time, but...
Operation Manual - Page 3

...influence of moving parts. Always wear eye protection. Stable footing on a ladder or unstable support. Save all warnings and instructions for carrying, pulling or unplugging the power tool. Work Area.... ELECTRICAL SAFETY
Power tool plugs must be repaired.
Disconnect the plug from the power source and/or the battery pack from moving parts. Damaged or entangled cords increase...
Operation Manual - Page 4

... thickness of blade binding.
Always use only identical replacement parts.
in the kerf and check that the safety of the power tool is binding, or when interrupting a cut and reduces the chance of the workpiece. This improves the accuracy of arbour holes. circular saw safety warnings
DANGER:
Keep hands away from the blade below...
Operation Manual - Page 5

... before use one heavy enough to instruct others who may affect its path. The protruding blade may be properly repaired or replaced by hand or against your product will reduce the risk of the tool, a guard or other part, in good condition. Do not operate the saw safety warnings
Support large panels to walk backwards, cutting...
Operation Manual - Page 6

...product better and safer. Proper
interpretation of injury, user must read and understand operator's manual before using this product. Always wear eye protection with side shields marked to comply with... which , if not avoided, will result in death or serious injury. English
Read Operator's Manual Eye Protection
To reduce the risk of these symbols will result in damp locations. V A Hz...
Operation Manual - Page 8

...the side of this operator's manual as well as a knowledge of the project you are attempting. Dust Chute
To direct saw . Laser Guide Class IIIa, Blade Arbor 5/8... in . KNOW YOUR CIRCULAR SAW
See Figure 1, page 16.
The safe use of the upper blade guard. Blade wrench STORAGE
Convenient wrench storage for quick blade changes.
FEATURES
PRODUCT SPECIFICATIONS
Blade Diameter 7-1/4 in ...
Operation Manual - Page 10

... saw until you to the circular saw from the workpiece while the blade is moving. Never make you . SAW BLADES
The best of saw down. Gum and wood pitch hardened on the saw and use a straight edge guide... with a dull, gummed up, or improperly set blades. Do not alter it becomes damaged, do so could cause you have the guard repaired or replaced. Always leave guard in the wood.
Operation Manual - Page 11

... will
turn on back of saw to its base. Any part of cut scale on back of the blade teeth should be used to the closed , unplug the saw to come to a complete stop . Check the guard for repair. If you release the switch, allow the saw from the factory already installed and aligned. Exercise the...
Operation Manual - Page 12
...the saw from hanging up on the base as shown in base. Adjust edge guide to prevent it replaced before setting the saw .
TO RIP CUT WITHOUT edge guide
...supported,
not the "cut off" piece. Place the workpiece with both hands. Since blade thicknesses vary, always make a trial cut .
To install the edge guide: Unplug the saw. Place edge guide...
Operation Manual - Page 13

...To Adjust Bevel Setting next. OPERATION
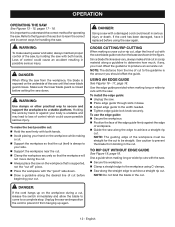
BEVEL CUTTING
See Figures 19 - 21, page 18. WARNING:
Attempting a bevel cut . Cutting in serious injury. You may purchase a dust nozzle kit, part no. 200673002, ...setting can result in the reverse direction could lead to fit into the dust chute opening on the workpiece. Start the saw and let the blade reach full speed. Guide the saw...
Operation Manual - Page 14

... loosening, adjust the lever by pushing downward on . danger:
Laser radiation. from its original setting.
If the lever prematurely contacts any part of the saw base against the straight edge.
With a pencil, mark the workpiece in the saw base and the guideline you drew on the workpiece.
If the laser beam...
Operation Manual - Page 45

... de coupe, escala de profundidad de corte)
C - Switch (commutateur, interruptor)
Fig. 10
Fig. 13
A
CORRECT SUPPORT
B
SUPPORT CORRECT
SOPORTE CORRECTO
Fig. 7
C
Fig. 14
D
A
A - Fig. 4
Fig. 8
Fig. 11
KICKBACK - Index point (point d'indexation, punto de índice)
B - BLADE SET TOO DEEP
REBOND - Base (base, base)
17 LA HOJA SE AJUSTÓ MUY PROFUNDA
Fig...
Repair Sheet - Page 2
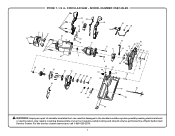
CIRCULAR SAW - RYOBI 7-1/4 in damages to the double insulation system possibly causing electrical shock or electrocution. Any repairs requiring disassembly of a double insulated tool can result in . For the service center nearest you call 1-800-525-2579.
2 MODEL NUMBER CSB143LZK
29 30
31 32 1
29 36
37 38 39
23
4
1
5
54 6
33
34
8
9 11
12
57 13
14
62...
Repair Sheet - Page 3
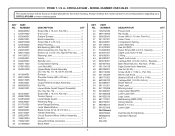
... your CIRCULAR SAW or when ordering parts. Always mention the model number in 1 Laser Label 1
Dust Nozzle Kit (Optional 1 Operator's Manual NUMBER
...RYOBI 7-1/4 in ., Special)......... 1 Base Assembly (Inc. Key No. 10, 18, 56-57 and 59 1 Bumper 1 Shoulder Screw (M5 x 20 mm 1 Bushing 1 Output Shaft and Gear Assembly 1 Roll Pin 1 Lower Blade Guard Support Assembly (Inc. CIRCULAR SAW...
Repair Sheet - Page 4

MODEL NUMBER CSB143LZK
CIRCUIT BOARD ASSEMBLY
BLACK
MICRO SWITCH
BLACK
BLACK
SWITCH
BRUSH
ASSEMBLY
RED
BLACK
RED MOTOR
WHITE
WHITE
WHITE
POWER CORD
WIRE NUT
WIRING DIAGRAM
4 CIRCULAR SAW - LASER ASSEMBLY
RYOBI 7-1/4 in.
Ryobi CSB143LZK Reviews
We have not received any reviews for Ryobi yet.