
English Manual
Page 1
SAVE THIS MANUAL FOR FUTURE REFERENCE Thank you for , it will give you years of rugged, trouble-free performance. When properly cared for your purchase. WARNING: To reduce the risk of operation, and operator safety. OPERATOR'S MANUAL 18 VOLT SPEED SAW™ P530 batterIES and chargers sold Separately ACCEPTS ALL one+ BATTERY PACKS Your speed saw has been engineered and manufactured to our high standard for dependability, ease of injury, the user must read and understand the operator's manual before using this product.
SAVE THIS MANUAL FOR FUTURE REFERENCE Thank you for , it will give you years of rugged, trouble-free performance. When properly cared for your purchase. WARNING: To reduce the risk of operation, and operator safety. OPERATOR'S MANUAL 18 VOLT SPEED SAW™ P530 batterIES and chargers sold Separately ACCEPTS ALL one+ BATTERY PACKS Your speed saw has been engineered and manufactured to our high standard for dependability, ease of injury, the user must read and understand the operator's manual before using this product.
English Manual
Page 2
... in any RYOBI® power tool which it easy to maintain and operate. TABLE OF CONTENTS Introduction...2 Warranty...2 General Safety Rules...3-4 Specific Safety Rules...4 Safety Rules for Charger...5 Symbols...6-7 Features...8 Assembly...9-10 Operation...10-13 Adjustments...14 Maintenance...15 Parts Ordering / Service...16 INTRODUCTION This tool has many...
... in any RYOBI® power tool which it easy to maintain and operate. TABLE OF CONTENTS Introduction...2 Warranty...2 General Safety Rules...3-4 Specific Safety Rules...4 Safety Rules for Charger...5 Symbols...6-7 Features...8 Assembly...9-10 Operation...10-13 Adjustments...14 Maintenance...15 Parts Ordering / Service...16 INTRODUCTION This tool has many...
English Manual
Page 3
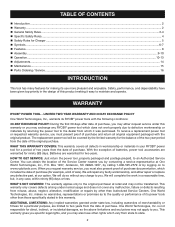
... WARNING! Failure to follow all instructions listed below, may cause sparks, burns, or a fire. Maintain tools with care. ELECTRICAL SAFETY A battery operated tool with integral batteries or a separate battery pack must be recharged only with the switch on invites accidents. Remove adjusting keys or wrenches before inserting battery pack. Do not use common sense when operating a power tool. A moment of drugs, alcohol, or medication. Loose clothes, jewelry, or...
... WARNING! Failure to follow all instructions listed below, may cause sparks, burns, or a fire. Maintain tools with care. ELECTRICAL SAFETY A battery operated tool with integral batteries or a separate battery pack must be recharged only with the switch on invites accidents. Remove adjusting keys or wrenches before inserting battery pack. Do not use common sense when operating a power tool. A moment of drugs, alcohol, or medication. Loose clothes, jewelry, or...

English Manual
Page 4
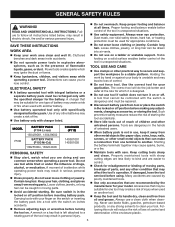
... hazards when not using your eyes, flush them with a "live " and shock the operator. Secure work when practical. SPECIFIC SAFETY RULES Hold tool by insulated gripping surfaces when performing an operation where the cutting tool may create a risk of electric shock. For best results, your battery tool should be plugged into your hand and frees both hands to follow Maintenance Instructions may contact hidden...
... hazards when not using your eyes, flush them with a "live " and shock the operator. Secure work when practical. SPECIFIC SAFETY RULES Hold tool by insulated gripping surfaces when performing an operation where the cutting tool may create a risk of electric shock. For best results, your battery tool should be plugged into your hand and frees both hands to follow Maintenance Instructions may contact hidden...
English Manual
Page 5
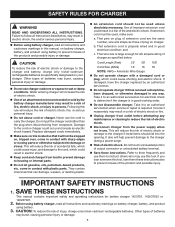
... = American Wire Gauge Do not operate charger with plastic parts. If extension cord must be used , make sure: a. and c. It also will reduce the risk of fire and electric shock. Failure to an authorized serviceman when service or repair is in a risk of electric shock, fire, or serious personal injury. Do not abuse cord or charger. Other types of batteries may use this rule...
... = American Wire Gauge Do not operate charger with plastic parts. If extension cord must be used , make sure: a. and c. It also will reduce the risk of fire and electric shock. Failure to an authorized serviceman when service or repair is in a risk of electric shock, fire, or serious personal injury. Do not abuse cord or charger. Other types of batteries may use this rule...
English Manual
Page 6
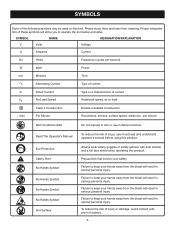
... to keep your safety. Failure to keep your hands away from the blade will result in serious personal injury. SYMBOL NAME DESIGNATION/EXPLANATION V Volts Voltage A Amperes Current Hz Hertz Frequency (cycles per second) W Watt Power min Minutes Time Alternating Current Type of current Direct Current no load Double-insulated construction .../min Per Minute Revolutions, strokes, surface speed, orbits etc...
... to keep your safety. Failure to keep your hands away from the blade will result in serious personal injury. SYMBOL NAME DESIGNATION/EXPLANATION V Volts Voltage A Amperes Current Hz Hertz Frequency (cycles per second) W Watt Power min Minutes Time Alternating Current Type of current Direct Current no load Double-insulated construction .../min Per Minute Revolutions, strokes, surface speed, orbits etc...
English Manual
Page 7
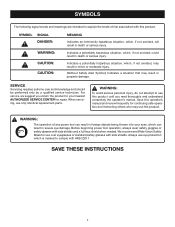
... signal words and meanings are intended to explain the levels of any power tool can result in foreign objects being thrown into your nearest AUTHORIZED SERVICE CENTER for repair. Save this operator's manual and review frequently for use this product. Before beginning power tool operation, always wear safety goggles or safety glasses with side shields. SYMBOL SIGNAL DANGER: WARNING: CAUTION: CAUTION: MEANING Indicates...
... signal words and meanings are intended to explain the levels of any power tool can result in foreign objects being thrown into your nearest AUTHORIZED SERVICE CENTER for repair. Save this operator's manual and review frequently for use this product. Before beginning power tool operation, always wear safety goggles or safety glasses with side shields. SYMBOL SIGNAL DANGER: WARNING: CAUTION: CAUTION: MEANING Indicates...
English Manual
Page 8
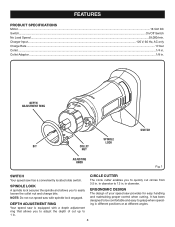
... you to quickly cut up to 1 in . DEPTH ADJUSTMENT RING SWITCH SPINDLE LOCK BIT COLLET NUT aDJUSTING KNOB Fig. 1 SWITCH Your speed saw provides for easy handling and maintaining proper control when cutting. It has been designed to be comfortable and easy to 12 in . SPINDLE LOCK A spindle lock secures the spindle and allows you to easily loosen the collet nut and change bits. FEATURES PRODUCT SPECIFICATIONS Motor...18 Volt DC Switch...On/Off Switch No Load Speed...29,000...
... you to quickly cut up to 1 in . DEPTH ADJUSTMENT RING SWITCH SPINDLE LOCK BIT COLLET NUT aDJUSTING KNOB Fig. 1 SWITCH Your speed saw provides for easy handling and maintaining proper control when cutting. It has been designed to be comfortable and easy to 12 in . SPINDLE LOCK A spindle lock secures the spindle and allows you to easily loosen the collet nut and change bits. FEATURES PRODUCT SPECIFICATIONS Motor...18 Volt DC Switch...On/Off Switch No Load Speed...29,000...
English Manual
Page 9
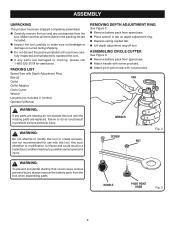
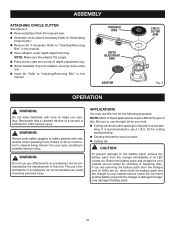
... for use with nut provided. WRENCH SCREW NUT Fig. 2 WARNING: To prevent accidental starting that all items listed in possible serious personal injury. ASSEMBLING CIRCLE CUTTER See Figure 3. Remove battery pack from the tool when assembling parts. TAB WARNING: If any parts are missing do so could cause serious personal injury, always remove the battery pack from speed saw . Place wrench in tab on depth adjustment ring. Depress spring-loaded...
... for use with nut provided. WRENCH SCREW NUT Fig. 2 WARNING: To prevent accidental starting that all items listed in possible serious personal injury. ASSEMBLING CIRCLE CUTTER See Figure 3. Remove battery pack from the tool when assembling parts. TAB WARNING: If any parts are missing do so could cause serious personal injury, always remove the battery pack from speed saw . Place wrench in tab on depth adjustment ring. Depress spring-loaded...
English Manual
Page 10
... depth adjustment ring. Screw threaded ring onto adaptor, securing circle cutter arm. Insert bit. Return the battery pack and charger to "Inserting/Removing Bits" in this tool for checking or replacing. Refer to your tool. Cutting electrical outlet openings in objects being thrown into the charger. WARNING: Always wear safety goggles or safety glasses with tools to "Inserting/Removing Bits" in this tool. A damaged charger may use this manual. Place adaptor under depth adjustment...
... depth adjustment ring. Screw threaded ring onto adaptor, securing circle cutter arm. Insert bit. Return the battery pack and charger to "Inserting/Removing Bits" in this tool for checking or replacing. Refer to your tool. Cutting electrical outlet openings in objects being thrown into the charger. WARNING: Always wear safety goggles or safety glasses with tools to "Inserting/Removing Bits" in this tool. A damaged charger may use this manual. Place adaptor under depth adjustment...
English Manual
Page 11
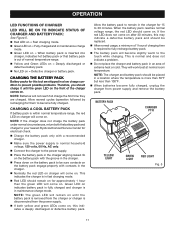
...tool are charged. This is normal household voltage, 120 volts, 60 Hz, AC only. Connect the charger to the power supply. Place the battery pack in the charger aligning raised rib on the battery pack with the groove in the charger. Press down on the battery pack to be replaced... to prevent possible problems. Therefore, you should charge it until the battery pack is removed from the power supply. If both the battery pack and charger to your nearest Ryobi Authorized Service Center for electrical check. Charge the battery pack only with ...
...tool are charged. This is normal household voltage, 120 volts, 60 Hz, AC only. Connect the charger to the power supply. Place the battery pack in the charger aligning raised rib on the battery pack with the groove in the charger. Press down on the battery pack to be replaced... to prevent possible problems. Therefore, you should charge it until the battery pack is removed from the power supply. If both the battery pack and charger to your nearest Ryobi Authorized Service Center for electrical check. Charge the battery pack only with ...
English Manual
Page 12
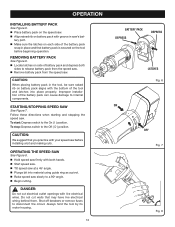
... angle. Plunge bit into place properly. CAUTION: When placing battery pack in saw's bat- Do not cut electrical outlet openings with groove in the tool, be sure raised rib on side of the tool and latches into material using guide ring as a pivot. Raise speed saw slowly to disconnect the circuit. OPERATing the SPEED SAW See Figure 8. Hold speed saw before beginning operation. STARTING/STOPPING SPEED SAW See Figure 7. REMOVing BATTERY...
... angle. Plunge bit into place properly. CAUTION: When placing battery pack in saw's bat- Do not cut electrical outlet openings with groove in the tool, be sure raised rib on side of the tool and latches into material using guide ring as a pivot. Raise speed saw slowly to disconnect the circuit. OPERATing the SPEED SAW See Figure 8. Hold speed saw before beginning operation. STARTING/STOPPING SPEED SAW See Figure 7. REMOVing BATTERY...
English Manual
Page 13
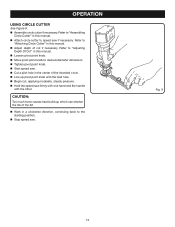
... cut , applying moderate, steady pressure. Hold the speed saw . Refer to "Adjusting Depth Of Cut" in this manual. Loosen pivot point knob. Move pivot point knob to desired diameter dimension. Tighten pivot point knob. Start speed saw. Cut a pilot hole in this manual. Adjust depth of the bit. Work in this manual. Attach circle cutter to the starting position. Stop speed saw firmly with one hand and the handle...
... cut , applying moderate, steady pressure. Hold the speed saw . Refer to "Adjusting Depth Of Cut" in this manual. Loosen pivot point knob. Move pivot point knob to desired diameter dimension. Tighten pivot point knob. Start speed saw. Cut a pilot hole in this manual. Adjust depth of the bit. Work in this manual. Attach circle cutter to the starting position. Stop speed saw firmly with one hand and the handle...
English Manual
Page 14
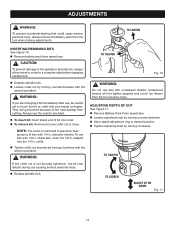
... you are changing a bit immediately after use the wrench provided. To insert bit: Insert shank end of the heat buildup from cutting. adaptor into collet. To remove bit: Remove bit once collet nut is loose. ADJUSTING DEPTH OF CUT See Figure 11. Remove Battery Pack From speed saw . TO TIGHTEN TO LOOSEN ADJUST UP OR DOWN Fig. 11 14 CAUTION: To prevent damage to the spindle or spindle lock, always allow motor to...
... you are changing a bit immediately after use the wrench provided. To insert bit: Insert shank end of the heat buildup from cutting. adaptor into collet. To remove bit: Remove bit once collet nut is loose. ADJUSTING DEPTH OF CUT See Figure 11. Remove Battery Pack From speed saw . TO TIGHTEN TO LOOSEN ADJUST UP OR DOWN Fig. 11 14 CAUTION: To prevent damage to the spindle or spindle lock, always allow motor to...
English Manual
Page 15
... and ready for use . To do so, simply remove collet nut and collet from the charger once it also becomes necessary to remove dirt, dust, oil, grease, etc. Tighten collet nut on the parts list are susceptible to provide maximum trouble-free life. The batteries in contact with side shields during power tool operation or when blowing dust. However, like all accumulated build-up from bits after each charging...
... and ready for use . To do so, simply remove collet nut and collet from the charger once it also becomes necessary to remove dirt, dust, oil, grease, etc. Tighten collet nut on the parts list are susceptible to provide maximum trouble-free life. The batteries in contact with side shields during power tool operation or when blowing dust. However, like all accumulated build-up from bits after each charging...

English Manual
Page 16
... call 1-800-525-2579 for a complete list of Ryobi Limited used under license. AND SERIAL NO. You can also check our web site at www.ryobitools.com for your exposure to these exposures varies, depending on a plate attached to the motor housing. OPERATOR'S MANUAL 18 VOLT SPEED SAW™ P530 WARNING: Some dust created by power sanding, sawing, grinding, drilling, and other construction activities contains chemicals known...
... call 1-800-525-2579 for a complete list of Ryobi Limited used under license. AND SERIAL NO. You can also check our web site at www.ryobitools.com for your exposure to these exposures varies, depending on a plate attached to the motor housing. OPERATOR'S MANUAL 18 VOLT SPEED SAW™ P530 WARNING: Some dust created by power sanding, sawing, grinding, drilling, and other construction activities contains chemicals known...
Repair Sheet
Page 2
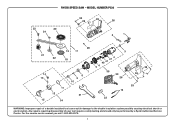
MODEL NUMBER P530 23 20 24 30 39 29 37 26 2 1 28 19 17 3 21 22 18 4 27 40 41 56 38 14 13 7 8 9 10 35 33 36 26 11 12 31 15 34 25 16 32 WARNING: Improper repair of your tool requires safety testing and should only be performed by a Ryobi Authorized Service Center. For the service center nearest you call 1-800-525-2579. 2 RYOBI SPEED SAW - Any repairs requiring disassembly of a double insulated tool can result in damage to the double insulation system possibly causing electrical shock or electrocution.
MODEL NUMBER P530 23 20 24 30 39 29 37 26 2 1 28 19 17 3 21 22 18 4 27 40 41 56 38 14 13 7 8 9 10 35 33 36 26 11 12 31 15 34 25 16 32 WARNING: Improper repair of your tool requires safety testing and should only be performed by a Ryobi Authorized Service Center. For the service center nearest you call 1-800-525-2579. 2 RYOBI SPEED SAW - Any repairs requiring disassembly of a double insulated tool can result in damage to the double insulation system possibly causing electrical shock or electrocution.
Repair Sheet
Page 3
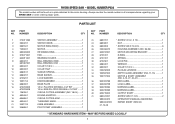
... REPAIR SHEET (REV:02) 07-14-05 * STANDARD HARDWARE ITEM - X 12 1 24 6633801 NUT 1 25 6620805 * SCREW (M4 X 16 mm 6 26 200006012 HOUSING ASSEMBLY (INC. 36-39 1 27 640912001 MOTOR MOUNTING BRACKET 1 28 6725101 E-RING 1 29 6723101 SPRING 1 30 6722901 LOCK PIN 1 31 6960401 WRENCH 1 32 6904501 COLLET (1/4 in . RYOBI SPEED SAW - MODEL NUMBER P530 The model number will be found on a plate attached to the motor housing. PART NUMBER DESCRIPTION QTY SWITCH ASSEMBLY 1 SWITCH KNOB 1 MOTOR RING...
... REPAIR SHEET (REV:02) 07-14-05 * STANDARD HARDWARE ITEM - X 12 1 24 6633801 NUT 1 25 6620805 * SCREW (M4 X 16 mm 6 26 200006012 HOUSING ASSEMBLY (INC. 36-39 1 27 640912001 MOTOR MOUNTING BRACKET 1 28 6725101 E-RING 1 29 6723101 SPRING 1 30 6722901 LOCK PIN 1 31 6960401 WRENCH 1 32 6904501 COLLET (1/4 in . RYOBI SPEED SAW - MODEL NUMBER P530 The model number will be found on a plate attached to the motor housing. PART NUMBER DESCRIPTION QTY SWITCH ASSEMBLY 1 SWITCH KNOB 1 MOTOR RING...
Repair Sheet
Page 4
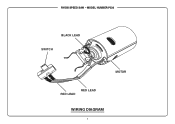
MODEL NUMBER P530 BLACK LEAD SWITCH MOTOR RED LEAD RED LEAD WIRING DIAGRAM 4 RYOBI SPEED SAW -
MODEL NUMBER P530 BLACK LEAD SWITCH MOTOR RED LEAD RED LEAD WIRING DIAGRAM 4 RYOBI SPEED SAW -


