English Manual
Page 6
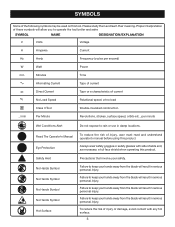
...the following symbols may be used on this tool. Please study them and learn their meaning. Failure to keep your hands away from the blade will result in serious personal injury. Failure to rain or use in damp locations. SYMBOL NAME DESIGNATION/EXPLANATION V Volts Voltage A Amperes ... Minute Revolutions, strokes, surface speed, orbits etc., per minute Wet Conditions Alert Do not expose to keep your hands away from the blade will result in serious personal injury. Failure to operate the tool better and safer. Always wear safety goggles or safety glasses with any ...
...the following symbols may be used on this tool. Please study them and learn their meaning. Failure to keep your hands away from the blade will result in serious personal injury. Failure to rain or use in damp locations. SYMBOL NAME DESIGNATION/EXPLANATION V Volts Voltage A Amperes ... Minute Revolutions, strokes, surface speed, orbits etc., per minute Wet Conditions Alert Do not expose to keep your hands away from the blade will result in serious personal injury. Failure to operate the tool better and safer. Always wear safety goggles or safety glasses with any ...
English Manual
Page 8
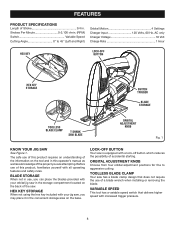
... features and safety rules. VARIABLE SPEED This tool has a variable speed switch that does not require the use , you can place the blades provided with your orbital jig saw in the convenient storage area on the base. Before use of accidental starting. LOCK-OFF BUTTON Your saw...Volts, 60 Hz, AC only Charger Voltage 18 Volt Charge Rate 1 Hour HEX KEY LOCK-OFF BUTTON HEX KEY STORAGE SWITCH TRIGGER BLADE STORAGE TOOLLESS BLADE CLAMP T-SHANK SAW BLADE ORBITAL ADJUSTMENT KNOB Fig. 1 KNOW YOUR JIG SAW See Figure 1. Strokes Per Minute 0-2,100 r/min. (RPM) Switch Variable Speed ...
... features and safety rules. VARIABLE SPEED This tool has a variable speed switch that does not require the use , you can place the blades provided with your orbital jig saw in the convenient storage area on the base. Before use of accidental starting. LOCK-OFF BUTTON Your saw...Volts, 60 Hz, AC only Charger Voltage 18 Volt Charge Rate 1 Hour HEX KEY LOCK-OFF BUTTON HEX KEY STORAGE SWITCH TRIGGER BLADE STORAGE TOOLLESS BLADE CLAMP T-SHANK SAW BLADE ORBITAL ADJUSTMENT KNOB Fig. 1 KNOW YOUR JIG SAW See Figure 1. Strokes Per Minute 0-2,100 r/min. (RPM) Switch Variable Speed ...
English Manual
Page 9
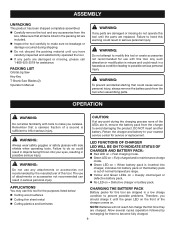
... attachments or accessories not recommended can result in a low charge condition to avoid damaging the product. PACKING LIST Orbital Jig Saw Hey Key T-Shank Saw Blades (2) Operator's Manual WARNING: If any parts are lit, remove the battery pack from the charger to prevent possible problems. Therefore, you should charge it until...
... attachments or accessories not recommended can result in a low charge condition to avoid damaging the product. PACKING LIST Orbital Jig Saw Hey Key T-Shank Saw Blades (2) Operator's Manual WARNING: If any parts are lit, remove the battery pack from the charger to prevent possible problems. Therefore, you should charge it until...

English Manual
Page 11
... See Figure 5. You must depress the lock-off button, then depress the switch trigger. SWITCH TRIGGER See Figure 5. To turn the saw . BLADE STORAGE See Figure 4. NOTE: You can cause damage to pull the switch trigger. To turn it OFF, release the switch trigger. DEPRESS LATCHES TO... RELEASE BATTERY PACK LATCHES BATTERY PACK Fig. 3 T-SHANK SAW BLADE BLADE STORAGE Fig. 4 LOCK-OFF BUTTON SWITCH TRIGGER Fig. 5 11 The lock resets each side of battery pack. Remove the battery pack ...
... See Figure 5. You must depress the lock-off button, then depress the switch trigger. SWITCH TRIGGER See Figure 5. To turn the saw . BLADE STORAGE See Figure 4. NOTE: You can cause damage to pull the switch trigger. To turn it OFF, release the switch trigger. DEPRESS LATCHES TO... RELEASE BATTERY PACK LATCHES BATTERY PACK Fig. 3 T-SHANK SAW BLADE BLADE STORAGE Fig. 4 LOCK-OFF BUTTON SWITCH TRIGGER Fig. 5 11 The lock resets each side of battery pack. Remove the battery pack ...

English Manual
Page 12
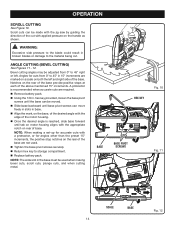
...: This tool is adjustable and provides faster, more resistance. Do not force the saw and move it forward on the work with T-shank blades. ORBITAL MOTION See Figure 7. don't cut halfway and complete the cut from one direction only; GENERAL CUTTING See Figure 7. Start the saw . ... when cutting materials with the line on the workpiece and align cutting edge of saw. Insert saw blade between blade clamp and saw blades are not guaranteed to keep the blade cutting. The higher settings should be made by clamping a piece of wood or straightedge to the workpiece and ...
...: This tool is adjustable and provides faster, more resistance. Do not force the saw and move it forward on the work with T-shank blades. ORBITAL MOTION See Figure 7. don't cut halfway and complete the cut from one direction only; GENERAL CUTTING See Figure 7. Start the saw . ... when cutting materials with the line on the workpiece and align cutting edge of saw. Insert saw blade between blade clamp and saw blades are not guaranteed to keep the blade cutting. The higher settings should be made by clamping a piece of wood or straightedge to the workpiece and ...
English Manual
Page 14
... can be adjusted from 0° to 45° in 15° increments are required. Remove battery pack. Using the 1/8 in broken blades or damage to the blade could result in . NOTE: The wide slot in base. Align the mark, on the base, of the motor housing. Once the...
... can be adjusted from 0° to 45° in 15° increments are required. Remove battery pack. Using the 1/8 in broken blades or damage to the blade could result in . NOTE: The wide slot in base. Align the mark, on the base, of the motor housing. Once the...
English Manual
Page 15
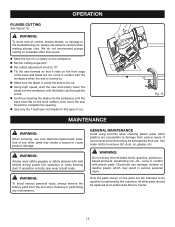
... plunge cuts. WARNING: Always wear safety goggles or safety glasses with the workpiece when the saw is turned on. Make sure the blade is dusty, also wear a dust mask. Chemicals can damage, weaken or destroy plastic which may result in contact with plastic parts. We do... at any maintenance. GENERAL MAINTENANCE Avoid using solvents when cleaning plastic parts. Only the parts shown on the front edge of the base and blade will not come in serious personal injury. WARNING: To avoid loss of commercial solvents and may create a hazard or cause product damage. WARNING...
... plunge cuts. WARNING: Always wear safety goggles or safety glasses with the workpiece when the saw is turned on. Make sure the blade is dusty, also wear a dust mask. Chemicals can damage, weaken or destroy plastic which may result in contact with plastic parts. We do... at any maintenance. GENERAL MAINTENANCE Avoid using solvents when cleaning plastic parts. Only the parts shown on the front edge of the base and blade will not come in serious personal injury. WARNING: To avoid loss of commercial solvents and may create a hazard or cause product damage. WARNING...
Repair Sheet
Page 3
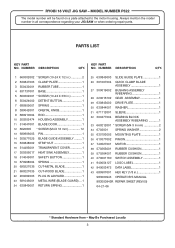
...in 1 6 550424002 DETENT BUTTON 1 7 680909001 SPRING 1 8 380042001 ORBITAL KNOB 1 9 680910004 ROD 1 10 200202474 HOUSING ASSEMBLY 1 11 514047001 BLADE DOOR 1 12 6620805 * SCREW (M4 X 16 mm 12 13 680906003 PIN 1 14 300577025 BLADE GUIDE ASSEMBLY ......... 1 15 630848002 STRIP NUT 1 16 514495001 TRANSPARENT COVER 1 17 300306017 HEAT SINK ASSEMBLY 1 18 514045001 SAFETY BUTTON...940054127 LOGO LABEL 1 42 940003472 DATA LABEL 1 43 680907001 HEX KEY (1/8 in all correspondence regarding your JIG SAW or when ordering repair parts. RYOBI 18 VOLT JIG SAW - May Be Purchased Locally 3
...in 1 6 550424002 DETENT BUTTON 1 7 680909001 SPRING 1 8 380042001 ORBITAL KNOB 1 9 680910004 ROD 1 10 200202474 HOUSING ASSEMBLY 1 11 514047001 BLADE DOOR 1 12 6620805 * SCREW (M4 X 16 mm 12 13 680906003 PIN 1 14 300577025 BLADE GUIDE ASSEMBLY ......... 1 15 630848002 STRIP NUT 1 16 514495001 TRANSPARENT COVER 1 17 300306017 HEAT SINK ASSEMBLY 1 18 514045001 SAFETY BUTTON...940054127 LOGO LABEL 1 42 940003472 DATA LABEL 1 43 680907001 HEX KEY (1/8 in all correspondence regarding your JIG SAW or when ordering repair parts. RYOBI 18 VOLT JIG SAW - May Be Purchased Locally 3


