
English Manual
Page 1
Thank you for , it will give you years of rugged, trouble-free performance. SAVE THIS MANUAL FOR FUTURE REFERENCE OPERATOR'S MANUAL 18 VOLT JIG SAW P522 BATTERIES AND CHARGERS SOLD SEPARATELY Your jig saw has been engineered and manufactured to our high standard for dependability, ease of injury, the user must read and understand the operator's manual before using this product. WARNING: To reduce the risk of operation, and operator safety. When properly cared for your purchase.
Thank you for , it will give you years of rugged, trouble-free performance. SAVE THIS MANUAL FOR FUTURE REFERENCE OPERATOR'S MANUAL 18 VOLT JIG SAW P522 BATTERIES AND CHARGERS SOLD SEPARATELY Your jig saw has been engineered and manufactured to our high standard for dependability, ease of injury, the user must read and understand the operator's manual before using this product. WARNING: To reduce the risk of operation, and operator safety. When properly cared for your purchase.

English Manual
Page 2
...; Introduction ...2 � Warranty ...2 General Safety Rules ...3-4 � Specific Safety Rules...4 Safety Rules for Charger ...5 � Symbols...6-7 � Features...8 � Assembly ...9 � Operation...9-15 � Maintenance ...15-16 � Accessories ...16 Parts Ordering / Service ...18 INTRODUCTION This tool has many features for making it was purchased. To receive a replacement power tool or requested warranty service, you by logging...
...; Introduction ...2 � Warranty ...2 General Safety Rules ...3-4 � Specific Safety Rules...4 Safety Rules for Charger ...5 � Symbols...6-7 � Features...8 � Assembly ...9 � Operation...9-15 � Maintenance ...15-16 � Accessories ...16 Parts Ordering / Service ...18 INTRODUCTION This tool has many features for making it was purchased. To receive a replacement power tool or requested warranty service, you by logging...
English Manual
Page 3
... use any adjustments, changing accessories, or storing power tools. ELECTRICAL SAFETY Power tool plugs must be drawn into air vents. Do not use a power tool while you are dangerous in all times. Never modify the plug in . MODEL BATTERY PACK (P100) CHARGER (P110) P522 130255004 1423701, 140237021, or 130224028 or 140237023 PERSONAL SAFETY Stay alert, watch what you to your mains-operated (corded) power tool or battery-operated (cordless) power tool. Safety equipment such as dust...
... use any adjustments, changing accessories, or storing power tools. ELECTRICAL SAFETY Power tool plugs must be drawn into air vents. Do not use a power tool while you are dangerous in all times. Never modify the plug in . MODEL BATTERY PACK (P100) CHARGER (P110) P522 130255004 1423701, 140237021, or 130224028 or 140237023 PERSONAL SAFETY Stay alert, watch what you to your mains-operated (corded) power tool or battery-operated (cordless) power tool. Safety equipment such as dust...

English Manual
Page 4
..., coins, keys, nails, screws, or other battery packs may contact hidden wiring or its applications and limitations, as well as a pilot light. Properly dispose of a dropped or damaged battery immediately. Batteries vent hydrogen gas and can propel debris and chemicals. GENERAL SAFETY RULES Use the power tool, accessories and tool bits etc., in accordance with these instructions and in the manner intended for operations different...
..., coins, keys, nails, screws, or other battery packs may contact hidden wiring or its applications and limitations, as well as a pilot light. Properly dispose of a dropped or damaged battery immediately. Batteries vent hydrogen gas and can propel debris and chemicals. GENERAL SAFETY RULES Use the power tool, accessories and tool bits etc., in accordance with these instructions and in the manner intended for operations different...
English Manual
Page 5
... using battery charger, read all instructions listed below : Cord Length (Feet) 25' 50' 100' Cord Size (AWG) 16 16 16 NOTE: AWG = American Wire Gauge Do not operate charger with sharp edges or moving parts or otherwise subjected to the charger if metal items should not be used unless absolutely necessary. It also will reduce the risk of electric shock. SAVE THESE INSTRUCTIONS This manual contains important safety and operating instructions...
... using battery charger, read all instructions listed below : Cord Length (Feet) 25' 50' 100' Cord Size (AWG) 16 16 16 NOTE: AWG = American Wire Gauge Do not operate charger with sharp edges or moving parts or otherwise subjected to the charger if metal items should not be used unless absolutely necessary. It also will reduce the risk of electric shock. SAVE THESE INSTRUCTIONS This manual contains important safety and operating instructions...
English Manual
Page 6
... Type of current Direct Current no No Load Speed Type or a characteristic of current Rotational speed, at no load Class II Tool Double-insulated construction .../min Per Minute Revolutions, strokes, surface speed, orbits etc., per minute Wet Conditions Alert Do not expose to keep your safety. Failure to rain or use in serious personal injury. Read The Operator's Manual Eye Protection Safety Alert No Hands...
... Type of current Direct Current no No Load Speed Type or a characteristic of current Rotational speed, at no load Class II Tool Double-insulated construction .../min Per Minute Revolutions, strokes, surface speed, orbits etc., per minute Wet Conditions Alert Do not expose to keep your safety. Failure to rain or use in serious personal injury. Read The Operator's Manual Eye Protection Safety Alert No Hands...

English Manual
Page 7
... shields. Before beginning power tool operation, always wear safety goggles or safety glasses with ANSI Z87.1. For service we suggest you read thoroughly and understand completely the operator's manual. WARNING: To avoid serious personal injury, do not understand the warnings and instructions in death or serious injury. We recommend Wide Vision Safety Mask for use only identical replacement parts. Always use eye protection which...
... shields. Before beginning power tool operation, always wear safety goggles or safety glasses with ANSI Z87.1. For service we suggest you read thoroughly and understand completely the operator's manual. WARNING: To avoid serious personal injury, do not understand the warnings and instructions in death or serious injury. We recommend Wide Vision Safety Mask for use only identical replacement parts. Always use eye protection which...
English Manual
Page 8
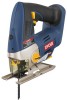
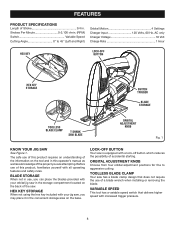
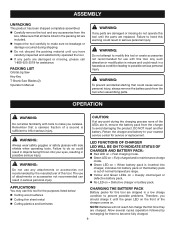
... operating features and safety rules. LOCK-OFF BUTTON Your saw . ORBITAL ADJUSTMENT KNOB Choose from four orbital adjustment positions for fine to 45° (Left and Right) Orbital Motion 4 Settings Charger Input 120 Volts, 60 Hz, AC only Charger Voltage 18 Volt Charge Rate 1 Hour HEX KEY LOCK-OFF BUTTON HEX KEY STORAGE SWITCH TRIGGER BLADE STORAGE TOOLLESS BLADE CLAMP T-SHANK SAW BLADE ORBITAL ADJUSTMENT KNOB Fig. 1 KNOW YOUR JIG SAW See Figure 1. Before use of a blade wrench when installing or removing...
... operating features and safety rules. LOCK-OFF BUTTON Your saw . ORBITAL ADJUSTMENT KNOB Choose from four orbital adjustment positions for fine to 45° (Left and Right) Orbital Motion 4 Settings Charger Input 120 Volts, 60 Hz, AC only Charger Voltage 18 Volt Charge Rate 1 Hour HEX KEY LOCK-OFF BUTTON HEX KEY STORAGE SWITCH TRIGGER BLADE STORAGE TOOLLESS BLADE CLAMP T-SHANK SAW BLADE ORBITAL ADJUSTMENT KNOB Fig. 1 KNOW YOUR JIG SAW See Figure 1. Before use of a blade wrench when installing or removing...
English Manual
Page 9
... charge it until the parts are lit, remove the battery pack from the box. Allow several cycles (operation followed by the manufacturer of the charger comes on the front of this tool for service or replacement. PACKING LIST Orbital Jig Saw Hey Key T-Shank Saw Blades (2) Operator's Manual WARNING: If any attachments or accessories not recommended by recharging) for assistance. The use any parts are charged. Failure to...
... charge it until the parts are lit, remove the battery pack from the box. Allow several cycles (operation followed by the manufacturer of the charger comes on the front of this tool for service or replacement. PACKING LIST Orbital Jig Saw Hey Key T-Shank Saw Blades (2) Operator's Manual WARNING: If any attachments or accessories not recommended by recharging) for assistance. The use any parts are charged. Failure to...

English Manual
Page 10
...defective battery pack. NOTE: The charger and battery pack should be replaced. After normal usage, a minimum of 1 hour of extreme heat or cold. You should remain on for electrical check. Charge the battery pack only with the groove in the battery pack will work best... come on the battery pack with the charger provided. Make sure the power supply is disconnected from power supply and remove the battery pack. NOTE: This situation only occurs when continuous use of the tool causes the batteries to your nearest Authorized Service Center for approximately ...
...defective battery pack. NOTE: The charger and battery pack should be replaced. After normal usage, a minimum of 1 hour of extreme heat or cold. You should remain on for electrical check. Charge the battery pack only with the groove in the battery pack will work best... come on the battery pack with the charger provided. Make sure the power supply is disconnected from power supply and remove the battery pack. NOTE: This situation only occurs when continuous use of the tool causes the batteries to your nearest Authorized Service Center for approximately ...

English Manual
Page 11
... TO RELEASE BATTERY PACK LATCHES BATTERY PACK Fig. 3 T-SHANK SAW BLADE BLADE STORAGE Fig. 4 LOCK-OFF BUTTON SWITCH TRIGGER Fig. 5 11 Improper installation of the saw ON, depress and hold lock-off button in use . To open: Push the door down with your thumb or finger. BLADE STORAGE See Figure 4. It is secured on the handle above the switch trigger. The lock resets each side of battery pack. Remove the battery pack...
... TO RELEASE BATTERY PACK LATCHES BATTERY PACK Fig. 3 T-SHANK SAW BLADE BLADE STORAGE Fig. 4 LOCK-OFF BUTTON SWITCH TRIGGER Fig. 5 11 Improper installation of the saw ON, depress and hold lock-off button in use . To open: Push the door down with your thumb or finger. BLADE STORAGE See Figure 4. It is secured on the handle above the switch trigger. The lock resets each side of battery pack. Remove the battery pack...

English Manual
Page 12
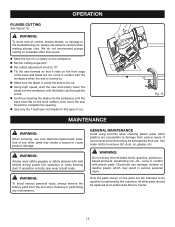
... saw steady and only enough forward pressure to select a specific blade for the particular application and type of saw blades. Make the cut from one direction only; BLADE CLAMP LOCK LOCK-OFF BUTTON ORBITAL ADJUSTMENT KNOB TO INCREASE ORBITAL SETTING 12 BLADE CLAMP T-SHANK SAW BLADE Fig. 6 SWITCH TRIGGER TO DECREASE ORBITAL SETTING Fig. 7 Use with non-T-shank blades may overheat the motor and break saw blades are not guaranteed to keep the blade cutting. INSTALLING BLADES See Figure 6. Remove battery pack. Lift blade clamp lock...
... saw steady and only enough forward pressure to select a specific blade for the particular application and type of saw blades. Make the cut from one direction only; BLADE CLAMP LOCK LOCK-OFF BUTTON ORBITAL ADJUSTMENT KNOB TO INCREASE ORBITAL SETTING 12 BLADE CLAMP T-SHANK SAW BLADE Fig. 6 SWITCH TRIGGER TO DECREASE ORBITAL SETTING Fig. 7 Use with non-T-shank blades may overheat the motor and break saw blades are not guaranteed to keep the blade cutting. INSTALLING BLADES See Figure 6. Remove battery pack. Lift blade clamp lock...
English Manual
Page 13
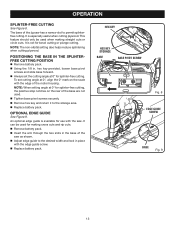
... width and lock in . hex key provided, loosen base pivot screws and slide base forward. Always set cutting angle at 0°, align the 0° mark on the rear of the base are not used when making cross cuts and rip cuts. Remove battery pack. Insert the arm through the two slots in the base of the jig saw as shown. Adjust edge guide to permit splinterfree cutting. This feature...
... width and lock in . hex key provided, loosen base pivot screws and slide base forward. Always set cutting angle at 0°, align the 0° mark on the rear of the base are not used when making cross cuts and rip cuts. Remove battery pack. Insert the arm through the two slots in the base of the jig saw as shown. Adjust edge guide to permit splinterfree cutting. This feature...
English Manual
Page 14
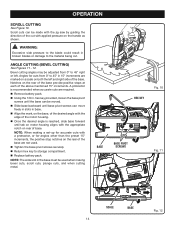
... angle is recommended when accurate cuts are required. Remove battery pack. Using the 1/8 in broken blades or damage to the blade could result in . BASE HEX KEY Fig. 10 BASE PIVOT SCREWS Fig. 11 45 30 SCALE BASE 14 Fig. 12 hex key provided, loosen the base pivot screws until the base can be made with the edge of the cut . ANGLE CUTTING (BEVEL CUTTING) See Figures 11 - 12. Angles for angles...
... angle is recommended when accurate cuts are required. Remove battery pack. Using the 1/8 in broken blades or damage to the blade could result in . BASE HEX KEY Fig. 10 BASE PIVOT SCREWS Fig. 11 45 30 SCALE BASE 14 Fig. 12 hex key provided, loosen the base pivot screws until the base can be made with the edge of the cut . ANGLE CUTTING (BEVEL CUTTING) See Figures 11 - 12. Angles for angles...
English Manual
Page 15
... the parts list are susceptible to complete the opening. Use only the 7 teeth per inch blade for this type of commercial solvents and may be cut. Using high speed, start the saw forward to damage from the tool when cleaning or performing any maintenance. If operation is inside the area to "0". Tilt the saw is turned on the front edge of control, broken blades, or...
... the parts list are susceptible to complete the opening. Use only the 7 teeth per inch blade for this type of commercial solvents and may be cut. Using high speed, start the saw forward to damage from the tool when cleaning or performing any maintenance. If operation is inside the area to "0". Tilt the saw is turned on the front edge of control, broken blades, or...
English Manual
Page 16
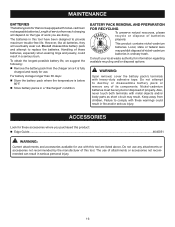
.... Do not disassemble battery pack and attempt to provide maximum trouble-free life. Local, state or federal laws may result. Do not use . MAINTENANCE BATTERIES The battery pack for this tool is equipped with this tool are doing. Nickel-cadmium batteries must be recycled or disposed of batteries properly. The use with nickel-cadmium rechargeable batteries. Handling of this tool. BATTERY PACK REMOVAL AND PREPARATION FOR RECYCLING...
.... Do not disassemble battery pack and attempt to provide maximum trouble-free life. Local, state or federal laws may result. Do not use . MAINTENANCE BATTERIES The battery pack for this tool is equipped with this tool are doing. Nickel-cadmium batteries must be recycled or disposed of batteries properly. The use with nickel-cadmium rechargeable batteries. Handling of this tool. BATTERY PACK REMOVAL AND PREPARATION FOR RECYCLING...
English Manual
Page 18
... on a plate attached to the motor housing. Your risk from these chemicals: work in the space provided below. • HOW TO ORDER REPAIR PARTS When ordering repair parts, always give the following information: • MODEL NUMBER P522 • SERIAL NUMBER Ryobi® is a registered trademark of work with approved safety equipment, such as those dust masks that you call 1-800-525-2579 for a complete list of...
... on a plate attached to the motor housing. Your risk from these chemicals: work in the space provided below. • HOW TO ORDER REPAIR PARTS When ordering repair parts, always give the following information: • MODEL NUMBER P522 • SERIAL NUMBER Ryobi® is a registered trademark of work with approved safety equipment, such as those dust masks that you call 1-800-525-2579 for a complete list of...
Repair Sheet
Page 3
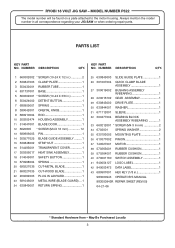
... SAFETY BUTTON 1 19 670998004 SPRING 1 20 690227036 CUT-METAL BLADE 1 21 690227035 CUT-WOOD BLADE 1 22 200292003 PLUG IN LANYARD 1 23 681046001 METAL WIRE (BLADE GUARD) ... 1 24 630849001 RETURN SPRING 1 25 630845003 SLIDE GUIDE PLATE 1 26 301007004 QUICK CLAMP BLADE ASSEMBLY 1 27 300019002 BUSHING ASSEMBLY W/BEARING 1 28 220016102 GEAR ASSEMBLY 1 29 630843002 DRIVE PLATE 1 30 630844001 WASHER 1 31 671112001 SLEEVE 1 32 300477004 BEARING BLOCK ASSEMBLY W/BEARING 1 33 660212001 * SCREW (M4 X 6 mm 2 34 6703001 SPRING WASHER 2 35 630193002 MOUNTING PLATE...
... SAFETY BUTTON 1 19 670998004 SPRING 1 20 690227036 CUT-METAL BLADE 1 21 690227035 CUT-WOOD BLADE 1 22 200292003 PLUG IN LANYARD 1 23 681046001 METAL WIRE (BLADE GUARD) ... 1 24 630849001 RETURN SPRING 1 25 630845003 SLIDE GUIDE PLATE 1 26 301007004 QUICK CLAMP BLADE ASSEMBLY 1 27 300019002 BUSHING ASSEMBLY W/BEARING 1 28 220016102 GEAR ASSEMBLY 1 29 630843002 DRIVE PLATE 1 30 630844001 WASHER 1 31 671112001 SLEEVE 1 32 300477004 BEARING BLOCK ASSEMBLY W/BEARING 1 33 660212001 * SCREW (M4 X 6 mm 2 34 6703001 SPRING WASHER 2 35 630193002 MOUNTING PLATE...

Repair Sheet
Page 4
MODEL NUMBER P522 MOTOR BLACK LEAD SWITCH BLACK LEAD RED LEAD CONTACT PLATE HOLDER YELLOW LEAD BLUE LEAD BLACK LEAD WIRING DIAGRAM 4 RYOBI 18 VOLT JIG SAW -
MODEL NUMBER P522 MOTOR BLACK LEAD SWITCH BLACK LEAD RED LEAD CONTACT PLATE HOLDER YELLOW LEAD BLUE LEAD BLACK LEAD WIRING DIAGRAM 4 RYOBI 18 VOLT JIG SAW -


