
Operation Manual
Page 6
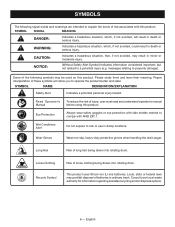
...heavy-duty protective gloves when handling the drain auger. Loose Clothing Recycle Symbol Risk of injury, user must read and understand operator's manual before using this product. Consult your local waste authority for information regarding available recycling and/or disposal options. 6 - Please... study them and learn their meaning. Read Operator's Manual To reduce the risk of loose clothing being drawn into rotating drum. Wet Conditions Alert Do not expose to comply with this product...
...heavy-duty protective gloves when handling the drain auger. Loose Clothing Recycle Symbol Risk of injury, user must read and understand operator's manual before using this product. Consult your local waste authority for information regarding available recycling and/or disposal options. 6 - Please... study them and learn their meaning. Read Operator's Manual To reduce the risk of loose clothing being drawn into rotating drum. Wet Conditions Alert Do not expose to comply with this product...
Operation Manual
Page 8
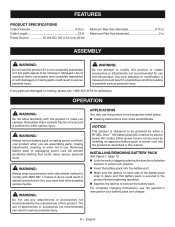
...or missing parts could result in serious personal injury. WARNING: Always wear eye protection with side shields marked to be powered by either a RYOBI™ One+™ 18V battery pack (DC mode) or by placing the direction of rotation selector in center lock position. ... See Figure 1, page 13. Lock the switch trigger by electric power (AC mode). For complete charging instructions, see the operator's manuals for use this product if it is not properly and completely assembled or with ANSI Z87.1. FEATURES PRODUCT SPECIFICATIONS Cable Diameter 0.25 in . Either...
...or missing parts could result in serious personal injury. WARNING: Always wear eye protection with side shields marked to be powered by either a RYOBI™ One+™ 18V battery pack (DC mode) or by placing the direction of rotation selector in center lock position. ... See Figure 1, page 13. Lock the switch trigger by electric power (AC mode). For complete charging instructions, see the operator's manuals for use this product if it is not properly and completely assembled or with ANSI Z87.1. FEATURES PRODUCT SPECIFICATIONS Cable Diameter 0.25 in . Either...
Operation Manual
Page 9
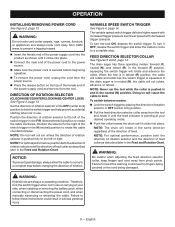
... could result in use or carrying at your side, when installing or removing the battery pack, when connecting or disconnecting the power cord, and when manually advancing or retracting the cable. VARIABLE SPEED SWITCH TRIGGER See Figure 4, page 14. OPERATION INSTALLING/REMOVING POWER CORD See Figure 2, page 13.
... could result in use or carrying at your side, when installing or removing the battery pack, when connecting or disconnecting the power cord, and when manually advancing or retracting the cable. VARIABLE SPEED SWITCH TRIGGER See Figure 4, page 14. OPERATION INSTALLING/REMOVING POWER CORD See Figure 2, page 13.
Operation Manual
Page 10
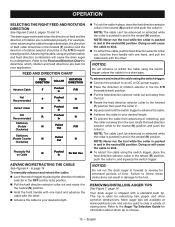
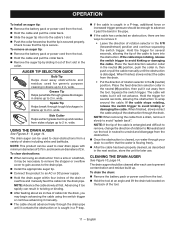
... front handle with one hand, and pull the cable back with a standard bulb tip. Refer to the Feed and Direction Chart to your application. To manually advance and retract the cable: Lock the switch trigger by placing the direction of rotation selector should be used to the forward (F) position then...
... front handle with one hand, and pull the cable back with a standard bulb tip. Refer to the Feed and Direction Chart to your application. To manually advance and retract the cable: Lock the switch trigger by placing the direction of rotation selector should be used to the forward (F) position then...
Operation Manual
Page 11
... allowing the tip of the cable to unwind and disengage from the drain. • Put the direction of the drain or overflow and manually feed the cable into the obstruction. If the cable stops rotating, release the switch trigger to avoid kinking or damaging the cable. NOTE...too rapidly can result in twisting or binding. After feeding about six inches of the t-slot in the N (neutral) position. Advancing it manually. The cable should advance freely through the drain. and maximum diameters of the tool. 11 - To clear obstructions: When removing an...
... allowing the tip of the cable to unwind and disengage from the drain. • Put the direction of the drain or overflow and manually feed the cable into the obstruction. If the cable stops rotating, release the switch trigger to avoid kinking or damaging the cable. NOTE...too rapidly can result in twisting or binding. After feeding about six inches of the t-slot in the N (neutral) position. Advancing it manually. The cable should advance freely through the drain. and maximum diameters of the tool. 11 - To clear obstructions: When removing an...
Operation Manual
Page 12
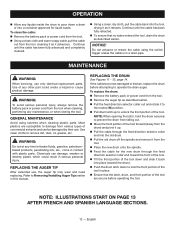
... FRENCH AND SPANISH LANGUAGE SECTIONS. 12 - Refer to remove dirt, dust, oil, grease, etc. Use clean cloths to Removing/Installing Auger Tips earlier in this manual. If the cable becomes damaged or broken, replace the drum before operating the tool. Most plastics are secure before attempting to damage from the tool...
... FRENCH AND SPANISH LANGUAGE SECTIONS. 12 - Refer to remove dirt, dust, oil, grease, etc. Use clean cloths to Removing/Installing Auger Tips earlier in this manual. If the cable becomes damaged or broken, replace the drum before operating the tool. Most plastics are secure before attempting to damage from the tool...
Operation Manual 1
Page 1
...supply block is damaged, have read thoroughly and understand completely this operator's manual and the operator's manual for details): Input AC 120 V, 60Hz, 130W (1.1 A) Output 18V DC, 6A For use only with the P4002 Drain Auger. This will not be connected to a GFCI power supply that...61550; Conserver ces instructions. Si l'produit ne fonctionne pas une fois branché, vérifier l'alimentation électrique. OPERATOR'S MANUAL POWER SUPPLY FOR THE P4002 DRAIN AUGER P4002PS WARNING: To reduce the risk of injury, do not attempt to use this product until it to cool and ...
...supply block is damaged, have read thoroughly and understand completely this operator's manual and the operator's manual for details): Input AC 120 V, 60Hz, 130W (1.1 A) Output 18V DC, 6A For use only with the P4002 Drain Auger. This will not be connected to a GFCI power supply that...61550; Conserver ces instructions. Si l'produit ne fonctionne pas une fois branché, vérifier l'alimentation électrique. OPERATOR'S MANUAL POWER SUPPLY FOR THE P4002 DRAIN AUGER P4002PS WARNING: To reduce the risk of injury, do not attempt to use this product until it to cool and ...
Parts Diagram
Page 3
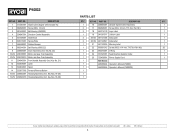
... 1 23 563915001 O-Ring 1 1 24 351591001 Feed Direction Selector Collar 1 1 25 720409001 Power Supply Cord 1 1 Not Shown: 1 995000294 Operator's Manual (P4002) 1 995000295 Operator's Manual (P4002PS) 1 1 1 If a key number has multiple part numbers, please order the part that corresponds with the country of origin shown on the product... 5 531595001 Slide Block 6 636773001 Spring Plate 7 564596001 Rubber Bumper 8 682014001 Ball Bearing (6005 2Z) 9 204846001 Drum Assembly (Incl. P4002 PARTS LIST KEY NO. PART NO. Key Nos. 18-20) 15-VN 204843016 Housing Assembly (Incl.
... 1 23 563915001 O-Ring 1 1 24 351591001 Feed Direction Selector Collar 1 1 25 720409001 Power Supply Cord 1 1 Not Shown: 1 995000294 Operator's Manual (P4002) 1 995000295 Operator's Manual (P4002PS) 1 1 1 If a key number has multiple part numbers, please order the part that corresponds with the country of origin shown on the product... 5 531595001 Slide Block 6 636773001 Spring Plate 7 564596001 Rubber Bumper 8 682014001 Ball Bearing (6005 2Z) 9 204846001 Drum Assembly (Incl. P4002 PARTS LIST KEY NO. PART NO. Key Nos. 18-20) 15-VN 204843016 Housing Assembly (Incl.
Operation Manual 2
Page 1
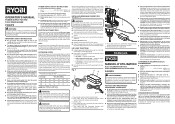
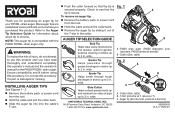
NOTE: This auger tip is compatible with the P4002 RYOBI™ drain auger only. Ensure compatibility and fit before using this operator's manual and the operator's manual for your RYOBI™ drain auger. Cable (câble, cable) Fig. 2 A B C A - WARNING: To ... sides of the T-slot in drains up to see that the tip is secured properly. P4002 drain auger (P4002 dégorgeoir pour tuyauterie, P4002 barrena de drenaje) B - Side Cutter Helps extract grease build-up and residue from the...com or where you for purchasing an auger tip for the P4002 RYOBI™ drain auger.
NOTE: This auger tip is compatible with the P4002 RYOBI™ drain auger only. Ensure compatibility and fit before using this operator's manual and the operator's manual for your RYOBI™ drain auger. Cable (câble, cable) Fig. 2 A B C A - WARNING: To ... sides of the T-slot in drains up to see that the tip is secured properly. P4002 drain auger (P4002 dégorgeoir pour tuyauterie, P4002 barrena de drenaje) B - Side Cutter Helps extract grease build-up and residue from the...com or where you for purchasing an auger tip for the P4002 RYOBI™ drain auger.


