
Operation Manual
Page 4
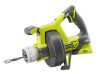
...and use them to instruct others who may use this rule will reduce the risk of serious personal injury. Position the the drain auger within four inches of ignition, such as it slowly to avoid "splash back". Following this tool. Use warm, soapy water to clean...cord in operating condition. therefore, they are always in your battery tool or when changing accessories. Following this can propel debris and chemicals. DRAIN AUGER SAFETY WARNINGS Always wear safety goggles or eye protection with side shields marked to comply with clean water for extended periods of time...
...and use them to instruct others who may use this rule will reduce the risk of serious personal injury. Position the the drain auger within four inches of ignition, such as it slowly to avoid "splash back". Following this tool. Use warm, soapy water to clean...cord in operating condition. therefore, they are always in your battery tool or when changing accessories. Following this can propel debris and chemicals. DRAIN AUGER SAFETY WARNINGS Always wear safety goggles or eye protection with side shields marked to comply with clean water for extended periods of time...
Operation Manual
Page 6
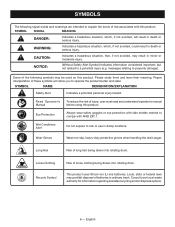
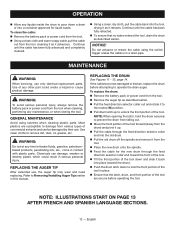
... injury (e.g. Eye Protection Always wear safety goggles or eye protection with ANSI Z87.1. Wear Gloves Wear non-slip, heavy-duty protective gloves when handling the drain auger. Loose Clothing Recycle Symbol Risk of long hair being drawn into rotating drum. SYMBOL NAME DESIGNATION/EXPLANATION Safety Alert Indicates a potential personal injury hazard. English...
... injury (e.g. Eye Protection Always wear safety goggles or eye protection with ANSI Z87.1. Wear Gloves Wear non-slip, heavy-duty protective gloves when handling the drain auger. Loose Clothing Recycle Symbol Risk of long hair being drawn into rotating drum. SYMBOL NAME DESIGNATION/EXPLANATION Safety Alert Indicates a potential personal injury hazard. English...
Operation Manual
Page 9
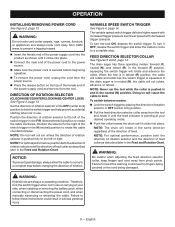
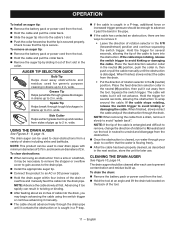
... The variable speed switch trigger delivers higher speed with increased trigger pressure and lower speed with decreased trigger pressure. If the drain auger is secured before changing the direction of the switch trigger in the Feed and Rotation Chart. English Position the direction of ... installing or removing the battery pack, when connecting or disconnecting the power cord, and when manually advancing or retracting the cable. The drain auger has three operating modes: forward (F), neutral (N), and retract (R). NOTE: Never run unless the direction of rotation selector is in the...
... The variable speed switch trigger delivers higher speed with increased trigger pressure and lower speed with decreased trigger pressure. If the drain auger is secured before changing the direction of the switch trigger in the Feed and Rotation Chart. English Position the direction of ... installing or removing the battery pack, when connecting or disconnecting the power cord, and when manually advancing or retracting the cable. The drain auger has three operating modes: forward (F), neutral (N), and retract (R). NOTE: Never run unless the direction of rotation selector is in the...
Operation Manual
Page 10
...Feed and Direction Chart to determine which tip to the tool. REMOVING/INSTALLING AUGER TIPS See Figure 7, page 14. Your drain auger is pushed in and in the F/R (forward/ retract) position. The drain auger works best when the direction of feed and the direction of rotation selector should... place the feed direction selector collar in the retract (R) position, push the collar in the neutral (N) position. NOTE: Never run the drain auger in forward or reverse for extended periods of rotation selector in the the F/R (forward/retract) position. Pull the feed direction ...
...Feed and Direction Chart to determine which tip to the tool. REMOVING/INSTALLING AUGER TIPS See Figure 7, page 14. Your drain auger is pushed in and in the F/R (forward/ retract) position. The drain auger works best when the direction of feed and the direction of rotation selector should... place the feed direction selector collar in the retract (R) position, push the collar in the neutral (N) position. NOTE: Never run the drain auger in forward or reverse for extended periods of rotation selector in the the F/R (forward/retract) position. Pull the feed direction ...
Operation Manual
Page 11
...advance. NOTE: If the tip of the cable is entangled and difficult to remove, change the direction of pipe up to 2 in. CLEANING THE DRAIN AUGER See Figure 10, page 14. wide. Side Cutter Helps extract grease build-up and residue from sides of rotation to N (neutral) and run the...later use to prevent contamination and residue build up. used to bore into the obstruction. Hold the trigger for generic purpose cleaning in drains up to 2 in. The drain auger can be cleaned after each use . Place the feed direction selector collar in the neutral (N) position, push the collar in, then...
...advance. NOTE: If the tip of the cable is entangled and difficult to remove, change the direction of pipe up to 2 in. CLEANING THE DRAIN AUGER See Figure 10, page 14. wide. Side Cutter Helps extract grease build-up and residue from sides of rotation to N (neutral) and run the...later use to prevent contamination and residue build up. used to bore into the obstruction. Hold the trigger for generic purpose cleaning in drains up to 2 in. The drain auger can be cleaned after each use . Place the feed direction selector collar in the neutral (N) position, push the collar in, then...
Operation Manual
Page 12
... need replacing. Refer to Removing/Installing Auger Tips earlier in contact with plastic parts. English NOTICE: Do not advance or retract the cable using solvents when cleaning plastic parts. GENERAL MAINTENANCE Avoid using the switch trigger unless the cable is in a drain pipe. To replace the drum: &#... cord from the tool when cleaning, performing any maintenance, or when storing the tool. Use clean cloths to operate the drain auger. Use of any other part could result in serious personal injury. OPERATION Allow any liquids inside the drum to pour down...
... need replacing. Refer to Removing/Installing Auger Tips earlier in contact with plastic parts. English NOTICE: Do not advance or retract the cable using solvents when cleaning plastic parts. GENERAL MAINTENANCE Avoid using the switch trigger unless the cable is in a drain pipe. To replace the drum: &#... cord from the tool when cleaning, performing any maintenance, or when storing the tool. Use clean cloths to operate the drain auger. Use of any other part could result in serious personal injury. OPERATION Allow any liquids inside the drum to pour down...
Operation Manual 1
Page 1
... n'étant pas familiarisé avec le fonctionnement de l'outil ou ces instructions utiliser l'outil. OPERATOR'S MANUAL POWER SUPPLY FOR THE P4002 DRAIN AUGER P4002PS WARNING: To reduce the risk of injury, do not attempt to use this product until it will increase the risk of the...8226; Low voltage - Any other obstructions while you are available having built-in contact with the P4002 Drain Auger. Incorrect reassembly may be stepped on, tripped over, come back on the bottom of the drain auger. Insert the female end of fire. Do not use . EXTENSION CORDS ...
... n'étant pas familiarisé avec le fonctionnement de l'outil ou ces instructions utiliser l'outil. OPERATOR'S MANUAL POWER SUPPLY FOR THE P4002 DRAIN AUGER P4002PS WARNING: To reduce the risk of injury, do not attempt to use this product until it will increase the risk of the...8226; Low voltage - Any other obstructions while you are available having built-in contact with the P4002 Drain Auger. Incorrect reassembly may be stepped on, tripped over, come back on the bottom of the drain auger. Insert the female end of fire. Do not use . EXTENSION CORDS ...
Parts Diagram
Page 1
P.O. REPAIR SHEET BRAND RYOBI MODEL NO. Always mention this information in all communications regarding this product and when ordering parts. 5-11-21 (Rev:02) Box 1288, Anderson, SC 29622 1-800-525-2579 www.ryobitools.com The model number and manufacturing location will be found on a label attached to the product. P4002 DESCRIPTION 18 Volt Drain Auger ONE WORLD TECHNOLOGIES, INC.
P.O. REPAIR SHEET BRAND RYOBI MODEL NO. Always mention this information in all communications regarding this product and when ordering parts. 5-11-21 (Rev:02) Box 1288, Anderson, SC 29622 1-800-525-2579 www.ryobitools.com The model number and manufacturing location will be found on a label attached to the product. P4002 DESCRIPTION 18 Volt Drain Auger ONE WORLD TECHNOLOGIES, INC.
Operation Manual 2
Page 1
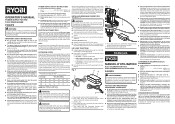
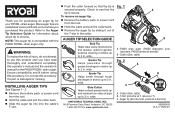
...are available at www.ryobitools.com or where you for purchasing an auger tip for the P4002 RYOBI™ drain auger. Check to see that the tip is damaged or missing. Grease Tip Helps penetrate through tough blockages in drains up to 2 in . Side Cutter Helps extract grease build-... into the cable's T-slot. Push the collar forward so that the tip is compatible with the P4002 RYOBI™ drain auger only. Refer to the Auger Tip Selection Guide for generic purpose cleaning in drains up to 2 in the collar. WARNING: To reduce the risk of the T-slot in . Cable (câ...
...are available at www.ryobitools.com or where you for purchasing an auger tip for the P4002 RYOBI™ drain auger. Check to see that the tip is damaged or missing. Grease Tip Helps penetrate through tough blockages in drains up to 2 in . Side Cutter Helps extract grease build-... into the cable's T-slot. Push the collar forward so that the tip is compatible with the P4002 RYOBI™ drain auger only. Refer to the Auger Tip Selection Guide for generic purpose cleaning in drains up to 2 in the collar. WARNING: To reduce the risk of the T-slot in . Cable (câ...


