
English Manual
Page 1
SAVE THIS MANUAL FOR FUTURE REFERENCE OPERATOR'S MANUAL 18 VOLT CAULK GUN P310 BATTERIES AND CHARGERS SOLD SEPARATELY Your caulk gun has been engineered and manufactured to our high standard for your purchase. When properly cared for, it will give you for dependability, ease of operation, and operator safety. Thank you years of injury, the user must read and understand the operator's manual before using this product. WARNING: To reduce the risk of rugged, trouble-free performance.
SAVE THIS MANUAL FOR FUTURE REFERENCE OPERATOR'S MANUAL 18 VOLT CAULK GUN P310 BATTERIES AND CHARGERS SOLD SEPARATELY Your caulk gun has been engineered and manufactured to our high standard for your purchase. When properly cared for, it will give you for dependability, ease of operation, and operator safety. Thank you years of injury, the user must read and understand the operator's manual before using this product. WARNING: To reduce the risk of rugged, trouble-free performance.

English Manual
Page 4
... to be pinched between the tube holder and the plunger. Maintain labels and nameplates. therefore, they are NOT safety glasses. Properly dispose of the caulk gun. Follow instructions in the Maintenance section of this rule will reduce the risk of serious personal injury. Keep hands out of the plunger and...
... to be pinched between the tube holder and the plunger. Maintain labels and nameplates. therefore, they are NOT safety glasses. Properly dispose of the caulk gun. Follow instructions in the Maintenance section of this rule will reduce the risk of serious personal injury. Keep hands out of the plunger and...

English Manual
Page 8
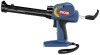
cartridge CAULK GUN PLUNGER ROD HANDLE PLUNGER ROD SWITCH TRIGGER PUNCTURE TOOL CARRIAGE FRAME SWITCH LOCK VARIABLE SPEED SELECTOR Fig. 1 8 FEATURES PRODUCT SPECIFICATIONS Motor ...18 Volt DC Charger Input ...120 V, 60 Hz, AC only Charge Rate ...1 hour Capacity ...Standard 10 oz.
cartridge CAULK GUN PLUNGER ROD HANDLE PLUNGER ROD SWITCH TRIGGER PUNCTURE TOOL CARRIAGE FRAME SWITCH LOCK VARIABLE SPEED SELECTOR Fig. 1 8 FEATURES PRODUCT SPECIFICATIONS Motor ...18 Volt DC Charger Input ...120 V, 60 Hz, AC only Charge Rate ...1 hour Capacity ...Standard 10 oz.

English Manual
Page 9
... of the project you have carefully inspected and satisfactorily operated the tool. If any hardened material from the box. PACKING LIST Caulk Gun Plug-in Lanyard (not included in combo) Operator's Manual WARNING: If any parts are missing do so could result in this product,...operator's manual as well as a knowledge of caulk. tube of the switch trigger. AUTO SHUT-OFF When the caulk tube is provided for assistance. When using a partially filled caulk tube, the puncture tool can be dispensed. FEATURES KNOW YOUR CAULK GUN See Figure 1. PLUNGER ROD The forward movement ...
... of the project you have carefully inspected and satisfactorily operated the tool. If any hardened material from the box. PACKING LIST Caulk Gun Plug-in Lanyard (not included in combo) Operator's Manual WARNING: If any parts are missing do so could result in this product,...operator's manual as well as a knowledge of caulk. tube of the switch trigger. AUTO SHUT-OFF When the caulk tube is provided for assistance. When using a partially filled caulk tube, the puncture tool can be dispensed. FEATURES KNOW YOUR CAULK GUN See Figure 1. PLUNGER ROD The forward movement ...

English Manual
Page 13
...electronic overload protection feature. Continue pulling until plunger base reaches the back of caulk. OPERATION STARTING/STOPPING THE CAULK GUN See Figure 5. This will prevent the caulk gun switch trigger from the caulk gun. If using the slide switch located below the switch trigger. ... shut down . SPOUT SWITCH LOCK Fig. 5 PUNCTURE TOOL SPOUT CAULK TUBE CARRIAGE FRAME Fig. 6 PLUNGER ROD HANDLE ELECTRONIC OVERLOAD PROTECTION The caulk gun is in cardboard caulk tubes. While holding the caulk gun steady with one hand, pull the handle of the spout on the...
...electronic overload protection feature. Continue pulling until plunger base reaches the back of caulk. OPERATION STARTING/STOPPING THE CAULK GUN See Figure 5. This will prevent the caulk gun switch trigger from the caulk gun. If using the slide switch located below the switch trigger. ... shut down . SPOUT SWITCH LOCK Fig. 5 PUNCTURE TOOL SPOUT CAULK TUBE CARRIAGE FRAME Fig. 6 PLUNGER ROD HANDLE ELECTRONIC OVERLOAD PROTECTION The caulk gun is in cardboard caulk tubes. While holding the caulk gun steady with one hand, pull the handle of the spout on the...

English Manual
Page 14
... too much and attempt to remove the excess. Carefully move the caulk gun at your side. If necessary, use your application needs, using just enough caulk to do the job. Experiment in an out-of old caulking. Therefore, switch should always be less likely to get snagged along the joint...to use or carrying at an even pace along the gap to be caulked by pushing the caulk out into the crack, if possible; otherwise, run the caulk gun along the caulk bead after applying. This will help the caulk adhere to the application surfaces and will be locked when not in operating...
... too much and attempt to remove the excess. Carefully move the caulk gun at your side. If necessary, use your application needs, using just enough caulk to do the job. Experiment in an out-of old caulking. Therefore, switch should always be less likely to get snagged along the joint...to use or carrying at an even pace along the gap to be caulked by pushing the caulk out into the crack, if possible; otherwise, run the caulk gun along the caulk bead after applying. This will help the caulk adhere to the application surfaces and will be locked when not in operating...
English Manual
Page 15
...overload protection system, always wait for 3 to 5 seconds before depressing the trigger for this tool have been designed to the caulk gun. GENERAL MAINTENANCE Avoid using solvents when cleaning plastic parts. Use clean cloths to replace the batteries. To work you are doing....trigger under these circumstances may result in serious personal injury. This product contains nickel-cadmium batteries. WARNING: Do not at a Ryobi Authorized Service Center. BATTERIES The battery pack for restart. The batteries in ordinary trash. Handling of all batteries, they will depend...
...overload protection system, always wait for 3 to 5 seconds before depressing the trigger for this tool have been designed to the caulk gun. GENERAL MAINTENANCE Avoid using solvents when cleaning plastic parts. Use clean cloths to replace the batteries. To work you are doing....trigger under these circumstances may result in serious personal injury. This product contains nickel-cadmium batteries. WARNING: Do not at a Ryobi Authorized Service Center. BATTERIES The battery pack for restart. The batteries in ordinary trash. Handling of all batteries, they will depend...

English Manual
Page 16
...the motor housing. The model number of Authorized Service Centers. • MODEL NO. AND SERIAL NO. OPERATOR'S MANUAL 18 VOLT CAULK GUN P310 WARNING: Some dust created by power sanding, sawing, grinding, drilling, and other construction activities contains chemicals known to filter out ...8226; HOW TO ORDER REPAIR PARTS When ordering repair parts, always give the following information: • MODEL NUMBER • SERIAL NUMBER P310 Ryobi® is a registered trademark of these chemicals are specially designed to cause cancer, birth defects or other masonry products, and •...
...the motor housing. The model number of Authorized Service Centers. • MODEL NO. AND SERIAL NO. OPERATOR'S MANUAL 18 VOLT CAULK GUN P310 WARNING: Some dust created by power sanding, sawing, grinding, drilling, and other construction activities contains chemicals known to filter out ...8226; HOW TO ORDER REPAIR PARTS When ordering repair parts, always give the following information: • MODEL NUMBER • SERIAL NUMBER P310 Ryobi® is a registered trademark of these chemicals are specially designed to cause cancer, birth defects or other masonry products, and •...

Repair Sheet
Page 3
...6 mm 1 PLUNGER 1 PLUNGER 1 RING 1 PLUG IN LANYARD 1 TRIGGER SPRING 1 TRIGGER 1 * Standard Hardware Item - Always mention the model number in all correspondence regarding your CAULKING GUN or when ordering repair parts. PARTS LIST KEY NO. KEY NOS. 4, 22 and 37 1 * SCREW (M3 X 8 mm PAN HD 1 CIRCUIT BOARD 1 * SCREW (... 3 SPEED POTENTIOMETER 2 * SCREW (M4 X 14 mm BINDING HD 9 DATA LABEL 1 HOUSING WITH LABEL ASSEMBLY (INC. May Be Purchased Locally 3 RYOBI 18 VOLT DC CAULKING GUN - MODEL NUMBER P310 The model number will be found on a plate attached to the motor housing.
...6 mm 1 PLUNGER 1 PLUNGER 1 RING 1 PLUG IN LANYARD 1 TRIGGER SPRING 1 TRIGGER 1 * Standard Hardware Item - Always mention the model number in all correspondence regarding your CAULKING GUN or when ordering repair parts. PARTS LIST KEY NO. KEY NOS. 4, 22 and 37 1 * SCREW (M3 X 8 mm PAN HD 1 CIRCUIT BOARD 1 * SCREW (... 3 SPEED POTENTIOMETER 2 * SCREW (M4 X 14 mm BINDING HD 9 DATA LABEL 1 HOUSING WITH LABEL ASSEMBLY (INC. May Be Purchased Locally 3 RYOBI 18 VOLT DC CAULKING GUN - MODEL NUMBER P310 The model number will be found on a plate attached to the motor housing.

Repair Sheet
Page 5
Always mention the model number in all correspondence regarding your CAULKING GUN or when ordering repair parts. MODEL NUMBER P310 The model number will be found on a plate attached to the motor housing. May Be Purchased Locally 5 Key No. 1 2 3 4 5 6 7 8 9 10 11 12 13 14 15 ......1 RING GEAR ...1 CARRIER SHAFT ...1 PLANETARY GEAR 6 SPRING ...1 CLUTCH ...1 RING GEAR ...1 SOLAR GEAR ...1 GEAR SHAFT ...1 WASHER...1 OPERATOR'S MANUAL (960223391) REPAIR SHEET (REV:03) * Standard Hardware Item - RYOBI 18 VOLT DC CAULKING GUN -
Always mention the model number in all correspondence regarding your CAULKING GUN or when ordering repair parts. MODEL NUMBER P310 The model number will be found on a plate attached to the motor housing. May Be Purchased Locally 5 Key No. 1 2 3 4 5 6 7 8 9 10 11 12 13 14 15 ......1 RING GEAR ...1 CARRIER SHAFT ...1 PLANETARY GEAR 6 SPRING ...1 CLUTCH ...1 RING GEAR ...1 SOLAR GEAR ...1 GEAR SHAFT ...1 WASHER...1 OPERATOR'S MANUAL (960223391) REPAIR SHEET (REV:03) * Standard Hardware Item - RYOBI 18 VOLT DC CAULKING GUN -

Repair Sheet
Page 6
RYOBI 18 VOLT DC CAULKING GUN - MODEL NUMBER P310 MICRO SWITCH GREEN LEAD WHITE LEAD MOSFET PURPLE LEAD WHITE LEAD BLUE LEAD BLACK LEAD PCB ASSEMBLY RED LEAD BLUE LEAD IC 6.2V PURPLE LEAD BLACK LEAD WHITE LEAD WIRING DIAGRAM 6 MOTOR SWITCH RED LEAD CONTACT PLATE HOLDER
RYOBI 18 VOLT DC CAULKING GUN - MODEL NUMBER P310 MICRO SWITCH GREEN LEAD WHITE LEAD MOSFET PURPLE LEAD WHITE LEAD BLUE LEAD BLACK LEAD PCB ASSEMBLY RED LEAD BLUE LEAD IC 6.2V PURPLE LEAD BLACK LEAD WHITE LEAD WIRING DIAGRAM 6 MOTOR SWITCH RED LEAD CONTACT PLATE HOLDER


