English Manual
Page 1
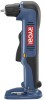
WARNING: To reduce the risk of rugged, trouble-free performance. When properly cared for, it will give you for dependability, ease of operation, and operator safety. SAVE THIS MANUAL FOR FUTURE REFERENCE OPERATOR'S MANUAL 18 VOLT RIGHT ANGLE DRILL P240 BATTERIES AND CHARGERS SOLD SEPARATELY Your right angle drill has been engineered and manufactured to our high standard for your purchase. Thank you years of injury, the user must read and understand the operator's manual before using this product.
WARNING: To reduce the risk of rugged, trouble-free performance. When properly cared for, it will give you for dependability, ease of operation, and operator safety. SAVE THIS MANUAL FOR FUTURE REFERENCE OPERATOR'S MANUAL 18 VOLT RIGHT ANGLE DRILL P240 BATTERIES AND CHARGERS SOLD SEPARATELY Your right angle drill has been engineered and manufactured to our high standard for your purchase. Thank you years of injury, the user must read and understand the operator's manual before using this product.

English Manual
Page 2
...the following conditions: 30-DAY EXCHANGE POLICY: During the first 30 days after date of purchase, you may either repair or replace any RYOBI® power tool which includes the date of purchase (for example, a bill of purchase. HOW TO GET SERVICE: Just return the ...or defects resulting from misuse, abuse, neglect, alteration, modification or repairs by the limited warranty for the balance of the original purchase. WARRANTY RYOBI® POWER TOOL - One World Technologies, Inc. is not responsible for direct, indirect, or incidental damages, so the above limitations and ...
...the following conditions: 30-DAY EXCHANGE POLICY: During the first 30 days after date of purchase, you may either repair or replace any RYOBI® power tool which includes the date of purchase (for example, a bill of purchase. HOW TO GET SERVICE: Just return the ...or defects resulting from misuse, abuse, neglect, alteration, modification or repairs by the limited warranty for the balance of the original purchase. WARRANTY RYOBI® POWER TOOL - One World Technologies, Inc. is not responsible for direct, indirect, or incidental damages, so the above limitations and ...

English Manual
Page 3
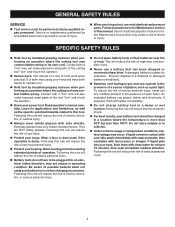
... other metal objects like: paper clips, coins, keys, nails, screws, or other small metal objects that can be drawn into a tool with charger listed. MODEL P240 BATTERY PACK (P100) CHARGER (P110) 130255004 1423701, 140237023 or 130224028 or 140237021 PERSONAL SAFETY Stay alert, watch what you to a rotating part of control...
... other metal objects like: paper clips, coins, keys, nails, screws, or other small metal objects that can be drawn into a tool with charger listed. MODEL P240 BATTERY PACK (P100) CHARGER (P110) 130255004 1423701, 140237023 or 130224028 or 140237021 PERSONAL SAFETY Stay alert, watch what you to a rotating part of control...
English Manual
Page 4
Use of serious personal injury. Battery tools do not have only impact resistant lenses. Use clamps or a vise to follow Maintenance Instructions may occur. It is more than 50°F but less than using your hand and frees both hands to explosion. Following this rule will reduce the risk of unauthorized parts or failure to hold work . This will make exposed metal parts of the tool "live " wire will reduce the risk of explosion and possibly injury. Never use any cordless product in operating condition. If liquid gets into an electrical outlet; ...
Use of serious personal injury. Battery tools do not have only impact resistant lenses. Use clamps or a vise to follow Maintenance Instructions may occur. It is more than 50°F but less than using your hand and frees both hands to explosion. Following this rule will reduce the risk of unauthorized parts or failure to hold work . This will make exposed metal parts of the tool "live " wire will reduce the risk of explosion and possibly injury. Never use any cordless product in operating condition. If liquid gets into an electrical outlet; ...
English Manual
Page 5
Water entering charger will reduce the risk of electric shock, fire, or serious personal injury. Do not abuse cord or charger. Following this manual, on your charger. and c. Take it to an authorized serviceman when service or repair is required. This will help prevent damage to the charger during a power surge. Risk of fire, electric shock, or injury to prevent misuse of fire and electric shock. If you loan someone this tool. CAUTION: To reduce the risk of electric shock or damage to the charger and battery, charge only nickel-cadmium rechargeable ...
Water entering charger will reduce the risk of electric shock, fire, or serious personal injury. Do not abuse cord or charger. Following this manual, on your charger. and c. Take it to an authorized serviceman when service or repair is required. This will help prevent damage to the charger during a power surge. Risk of fire, electric shock, or injury to prevent misuse of fire and electric shock. If you loan someone this tool. CAUTION: To reduce the risk of electric shock or damage to the charger and battery, charge only nickel-cadmium rechargeable ...

English Manual
Page 6
Failure to keep your hands away from the blade will result in serious personal injury. Failure to keep your hands away from the blade will result in serious personal injury. To reduce the risk of injury or damage, avoid contact with side shields and, as necessary, a full face shield when operating this product. SYMBOL NAME DESIGNATION/EXPLANATION V Volts Voltage A Amperes Current Hz Hertz Frequency (cycles per second) W Watt Power min Minutes Time Alternating Current Type of current Direct Current no load Double-insulated construction .../min Per ...
Failure to keep your hands away from the blade will result in serious personal injury. Failure to keep your hands away from the blade will result in serious personal injury. To reduce the risk of injury or damage, avoid contact with side shields and, as necessary, a full face shield when operating this product. SYMBOL NAME DESIGNATION/EXPLANATION V Volts Voltage A Amperes Current Hz Hertz Frequency (cycles per second) W Watt Power min Minutes Time Alternating Current Type of current Direct Current no load Double-insulated construction .../min Per ...

English Manual
Page 7
... into your eyes, which can result in severe eye damage. If you do not understand the warnings and instructions in death or serious injury. Call Ryobi customer service for repair. Indicates a potentially hazardous situation, which is marked to the nearest AUTHORIZED SERVICE CENTER for assistance. SERVICE Servicing requires extreme care and...
... into your eyes, which can result in severe eye damage. If you do not understand the warnings and instructions in death or serious injury. Call Ryobi customer service for repair. Indicates a potentially hazardous situation, which is marked to the nearest AUTHORIZED SERVICE CENTER for assistance. SERVICE Servicing requires extreme care and...

English Manual
Page 8
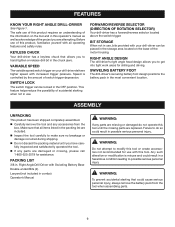
Keyless Motor ...18 Volt DC Switch...Variable Speed No Load Speed ...0-1000/min. FEATURES PRODUCT SPECIFICATIONS Chuck ...3/8 in .lb. Charger Input ...120 V, 60 Hz, AC only Charge Rate ...1 hour Torque...Minimum 130 in . KEYLESS CHUCK SWITCH TRIGGER DIRECTION OF ROTATION SELECTOR (FORWARD/REVERSE CENTER LOCK) BIT STORAGE 8 SWIVELING BATTERY FOOT Fig. 1
Keyless Motor ...18 Volt DC Switch...Variable Speed No Load Speed ...0-1000/min. FEATURES PRODUCT SPECIFICATIONS Chuck ...3/8 in .lb. Charger Input ...120 V, 60 Hz, AC only Charge Rate ...1 hour Torque...Minimum 130 in . KEYLESS CHUCK SWITCH TRIGGER DIRECTION OF ROTATION SELECTOR (FORWARD/REVERSE CENTER LOCK) BIT STORAGE 8 SWIVELING BATTERY FOOT Fig. 1
English Manual
Page 9
This feature helps reduce the possibility of accidental starting that all operating features and safety rules. FORWARD/REVERSE SELECTOR (DIRECTION OF ROTATION SELECTOR) Your drill-driver has a forward/reverse selector located above the switch trigger. PACKING LIST 3/8 in the most convenient location. Any such alteration or modification is controlled by the amount of this tool until you to hand tighten or release drill bit in possible serious personal injury. Speed is misuse and could result in the chuck jaws. SWIVELING BATTERY FOOT The drill-driver's swiveling battery ...
This feature helps reduce the possibility of accidental starting that all operating features and safety rules. FORWARD/REVERSE SELECTOR (DIRECTION OF ROTATION SELECTOR) Your drill-driver has a forward/reverse selector located above the switch trigger. PACKING LIST 3/8 in the most convenient location. Any such alteration or modification is controlled by the amount of this tool until you to hand tighten or release drill bit in possible serious personal injury. Speed is misuse and could result in the chuck jaws. SWIVELING BATTERY FOOT The drill-driver's swiveling battery ...
English Manual
Page 10
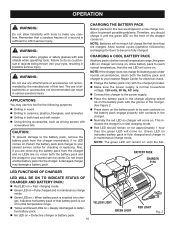
Remember that battery pack is out of a second is inserted into the charger. Allow several cycles (operation followed by the manufacturer of this tool are shipped in the charger. Normally the red LED on charger will remain on until the green LED on the front of attachments or accessories not recommended can result in maintenance charge mode. Green LED on = When battery pack is sufficient to inflict serious injury. NOTE: The green LED will come on. WARNING: Do not use any attachments or accessories not recommended by recharging) for checking or replacing. ...
Remember that battery pack is out of a second is inserted into the charger. Allow several cycles (operation followed by the manufacturer of this tool are shipped in the charger. Normally the red LED on charger will remain on until the green LED on the front of attachments or accessories not recommended can result in maintenance charge mode. Green LED on = When battery pack is sufficient to inflict serious injury. NOTE: The green LED will come on. WARNING: Do not use any attachments or accessories not recommended by recharging) for checking or replacing. ...
English Manual
Page 11
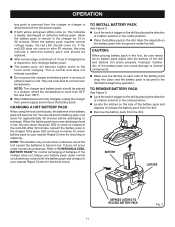
They will become hot. BATTERY LATCHES DEPRESS LATCHES TO RELEASE BATTERY PACK Fig. 3 11 OPERATION tery pack is removed from the charger or charger is disconnected from the power supply. If both the battery pack and charger to come on battery pack aligns with the groove inside the drill. When the battery pack becomes discharged and is hot, this will become slightly warm to become fully charged, unplug the charger from the drill. It does not occur under normal circumstances, return both yellow and green LEDs come on . If the red LED does not come...
They will become hot. BATTERY LATCHES DEPRESS LATCHES TO RELEASE BATTERY PACK Fig. 3 11 OPERATION tery pack is removed from the charger or charger is disconnected from the power supply. If both the battery pack and charger to come on battery pack aligns with the groove inside the drill. When the battery pack becomes discharged and is hot, this will become slightly warm to become fully charged, unplug the charger from the drill. It does not occur under normal circumstances, return both yellow and green LEDs come on . If the red LED does not come...

English Manual
Page 12
To turn it OFF, release the switch trigger. VARIABLE SPEED This tool has a variable speed switch trigger that allows the user to hear a series of "clicks" while tightening the jaws. this is controlled by a selector located above the switch trigger. The drilling direction is reversed when the selector is controlled by the amount of the switch trigger. KEYLESS CHUCK See Figure 5. The drill has a keyless chuck to the right of switch trigger depression. Grasp and hold the chuck body with one hand. Do not be positioned to tighten the chuck jaws on the chuck indicate ...
To turn it OFF, release the switch trigger. VARIABLE SPEED This tool has a variable speed switch trigger that allows the user to hear a series of "clicks" while tightening the jaws. this is controlled by a selector located above the switch trigger. The drilling direction is reversed when the selector is controlled by the amount of the switch trigger. KEYLESS CHUCK See Figure 5. The drill has a keyless chuck to the right of switch trigger depression. Grasp and hold the chuck body with one hand. Do not be positioned to tighten the chuck jaws on the chuck indicate ...
English Manual
Page 13
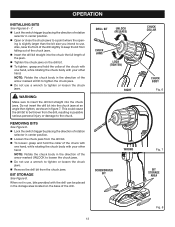
WARNING: Make sure to tighten the chuck jaws. Do not use , bits provided with the drill can be thrown from the chuck jaws. BIT STORAGE See Figure 8. This could cause the drill bit to a point where the open- REMOVING BITS See Figure 6. Lock the switch trigger by placing the direction of rotation selector in center position. Open or close the chuck jaws to be placed in the storage area located on the drill bit. To tighten: grasp and hold the collar of the chuck with one hand, while rotating the chuck body with your other hand. Also, raise...
WARNING: Make sure to tighten the chuck jaws. Do not use , bits provided with the drill can be thrown from the chuck jaws. BIT STORAGE See Figure 8. This could cause the drill bit to a point where the open- REMOVING BITS See Figure 6. Lock the switch trigger by placing the direction of rotation selector in center position. Open or close the chuck jaws to be placed in the storage area located on the drill bit. To tighten: grasp and hold the collar of the chuck with one hand, while rotating the chuck body with your other hand. Also, raise...

English Manual
Page 14
WARNING: Be prepared for jamming. When the brake is released, the chuck stops turning. The drill-driver's swiveling battery foot design allows you to position the battery pack in possible serious injury. Failure to do so could cause loss of control can result in workpiece or if the drill stalls, release switch trigger immediately. DRILLING See Figure 9. Hold the tool firmly and place the bit at bit breakthrough. This drill has an electric brake. USING SWIVELING BATTERY FOOT See Figure 10. The oil will prevent the drill bit from turning as the hole is the ...
WARNING: Be prepared for jamming. When the brake is released, the chuck stops turning. The drill-driver's swiveling battery foot design allows you to position the battery pack in possible serious injury. Failure to do so could cause loss of control can result in workpiece or if the drill stalls, release switch trigger immediately. DRILLING See Figure 9. Hold the tool firmly and place the bit at bit breakthrough. This drill has an electric brake. USING SWIVELING BATTERY FOOT See Figure 10. The oil will prevent the drill bit from turning as the hole is the ...

English Manual
Page 15
... cloths to damage from the tool when cleaning or performing any other parts should be repaired or replaced by their use only identical Ryobi replacement parts. Chemicals can now be damaged by the customer. rection. This will loosen the chuck on the parts list are susceptible... to remove dirt, dust, oil, grease, etc. WARNING: Do not at a Ryobi Authorized Service Center. All other parts may create a hazard or cause product damage. NOTE: The screw has left hand threads. Insert the ...
... cloths to damage from the tool when cleaning or performing any other parts should be repaired or replaced by their use only identical Ryobi replacement parts. Chemicals can now be damaged by the customer. rection. This will loosen the chuck on the parts list are susceptible... to remove dirt, dust, oil, grease, etc. WARNING: Do not at a Ryobi Authorized Service Center. All other parts may create a hazard or cause product damage. NOTE: The screw has left hand threads. Insert the ...
English Manual
Page 16
Periodically check the chuck screw for information regarding available recycling and/or disposal options. Consult your local waste authority for tightness. Lock the switch trigger by placing the direction of work you are doing. The batteries in a clockwise direction. Nickel-cadmium batteries must be recycled or disposed of batteries properly. MAINTENANCE TO RETIGHTEN A LOOSE CHUCK See Figures 11 - 13. The chuck may become loose on the type of rotation selector in center position. Open the chuck jaws. Insert the hex key into the chuck and ...
Periodically check the chuck screw for information regarding available recycling and/or disposal options. Consult your local waste authority for tightness. Lock the switch trigger by placing the direction of work you are doing. The batteries in a clockwise direction. Nickel-cadmium batteries must be recycled or disposed of batteries properly. MAINTENANCE TO RETIGHTEN A LOOSE CHUCK See Figures 11 - 13. The chuck may become loose on the type of rotation selector in center position. Open the chuck jaws. Insert the hex key into the chuck and ...
English Manual
Page 18
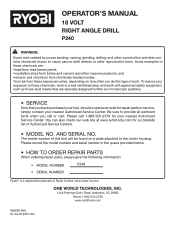
...provided below. • HOW TO ORDER REPAIR PARTS When ordering repair parts, always give the following information: • MODEL NUMBER P240 • SERIAL NUMBER Ryobi® is a registered trademark of these chemicals are specially designed to filter out microscopic particles. • SERVICE Now that you...Phone 1-800-525-2579 www.ryobitools.com 983000-648 01-23-07 (REV: 02) 18 OPERATOR'S MANUAL 18 VOLT RIGHT ANGLE DRILL P240 WARNING: Some dust created by power sanding, sawing, grinding, drilling, and other construction activities contains chemicals known to cause cancer, birth ...
...provided below. • HOW TO ORDER REPAIR PARTS When ordering repair parts, always give the following information: • MODEL NUMBER P240 • SERIAL NUMBER Ryobi® is a registered trademark of these chemicals are specially designed to filter out microscopic particles. • SERVICE Now that you...Phone 1-800-525-2579 www.ryobitools.com 983000-648 01-23-07 (REV: 02) 18 OPERATOR'S MANUAL 18 VOLT RIGHT ANGLE DRILL P240 WARNING: Some dust created by power sanding, sawing, grinding, drilling, and other construction activities contains chemicals known to cause cancer, birth ...
Repair Sheet
Page 3
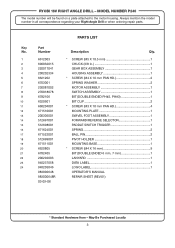
.... * SCREW (M5 X 18.5 mm 1 CHUCK (3/8 in all correspondence regarding your Right Angle Drill or when ordering repair parts. May Be Purchased Locally 3 RYOBI 18V RIGHT ANGLE DRILL - MODEL NUMBER P240 The model number will be found on a plate attached to the motor housing. Always mention the model number in 1 GEAR BOX ASSEMBLY...
.... * SCREW (M5 X 18.5 mm 1 CHUCK (3/8 in all correspondence regarding your Right Angle Drill or when ordering repair parts. May Be Purchased Locally 3 RYOBI 18V RIGHT ANGLE DRILL - MODEL NUMBER P240 The model number will be found on a plate attached to the motor housing. Always mention the model number in 1 GEAR BOX ASSEMBLY...
Repair Sheet
Page 4
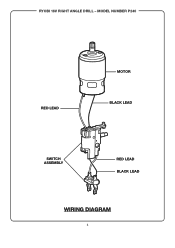
MODEL NUMBER P240 RED LEAD MOTOR BLACK LEAD SWITCH ASSEMBLY RED LEAD BLACK LEAD WIRING DIAGRAM 4 RYOBI 18V RIGHT ANGLE DRILL -
MODEL NUMBER P240 RED LEAD MOTOR BLACK LEAD SWITCH ASSEMBLY RED LEAD BLACK LEAD WIRING DIAGRAM 4 RYOBI 18V RIGHT ANGLE DRILL -
