

Operation Manual 1
Page 2
... battery charger PCG002. 2. This manual contains important safety and operating instructions for AC ampere rating of charger as those of output connector or uninsulated battery terminal. Save these instructions also to follow all instructions listed below : Cord Length (Feet) 25' 50' 100' Cord Size (AWG) 16 16 16 NOTE: AWG = American Wire Gauge Do not operate charger with plastic parts. English That wire size is located...
... battery charger PCG002. 2. This manual contains important safety and operating instructions for AC ampere rating of charger as those of output connector or uninsulated battery terminal. Save these instructions also to follow all instructions listed below : Cord Length (Feet) 25' 50' 100' Cord Size (AWG) 16 16 16 NOTE: AWG = American Wire Gauge Do not operate charger with plastic parts. English That wire size is located...
Operation Manual 1
Page 3
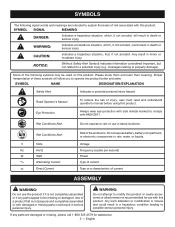
... attachments not recommended for aasistance. 3 - Please study them and learn their meaning. WARNING: Do not attempt to rain or use this product. Voltage Frequency (cycles per second) Power Type of current Type or a characteristic of risk associated with this product if it is not properly and completely assembled or with ANSI Z87.1. messages relating to explain the levels...
... attachments not recommended for aasistance. 3 - Please study them and learn their meaning. WARNING: Do not attempt to rain or use this product. Voltage Frequency (cycles per second) Power Type of current Type or a characteristic of risk associated with this product if it is not properly and completely assembled or with ANSI Z87.1. messages relating to explain the levels...
Operation Manual 1
Page 4
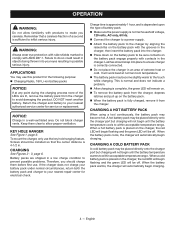
... properly with contacts in a well-ventilated area. CHARGING A HOT BATTERY PACK When using a tool continuously, the battery pack may use this product for electrical check. WARNING: Always wear eye protection with side shields marked to avoid damaging the product. Keep them before first use the key hole hanging feature. OPERATION WARNING: Do not allow familiarity with products to allow...
... properly with contacts in a well-ventilated area. CHARGING A HOT BATTERY PACK When using a tool continuously, the battery pack may use this product for electrical check. WARNING: Always wear eye protection with side shields marked to avoid damaging the product. Keep them before first use the key hole hanging feature. OPERATION WARNING: Do not allow familiarity with products to allow...
Operation Manual 1
Page 5
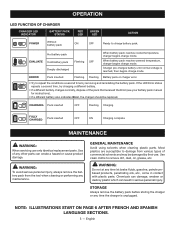
... to remove dirt, dust, oil, grease, etc. English If the LED Error status repeats a second time, try charging a different battery. • If a different battery charges normally, dispose of commercial solvents and may be replaced. Hot battery pack EVALUATE Cold battery pack Flashing OFF Deeply discharged When battery pack reaches cooled temperature, charger begins charge mode. GENERAL MAINTENANCE Avoid using solvents when cleaning plastic parts. WARNING...
... to remove dirt, dust, oil, grease, etc. English If the LED Error status repeats a second time, try charging a different battery. • If a different battery charges normally, dispose of commercial solvents and may be replaced. Hot battery pack EVALUATE Cold battery pack Flashing OFF Deeply discharged When battery pack reaches cooled temperature, charger begins charge mode. GENERAL MAINTENANCE Avoid using solvents when cleaning plastic parts. WARNING...

Operation Manual
Page 2
...;rieur, extremo inferior) B - Lock-out button (bouton de verrouillage, botón de seguro de seguro) C - Battery pack (bloc-piles, paquete de baterías) B - Line cut-off blade (lame de sectionnement de ligne, cuchilla de corte del hilo) C - Fig. 1 See this fold-out section for all the figures referenced in the operator's manual. Grass deflector (déflecteur...
...;rieur, extremo inferior) B - Lock-out button (bouton de verrouillage, botón de seguro de seguro) C - Battery pack (bloc-piles, paquete de baterías) B - Line cut-off blade (lame de sectionnement de ligne, cuchilla de corte del hilo) C - Fig. 1 See this fold-out section for all the figures referenced in the operator's manual. Grass deflector (déflecteur...

Operation Manual
Page 4
... ground. 2 - Wear a face or dust mask if the operation is properly installed and securely fastened. Power tools create sparks which can be followed to follow all safety instructions. Keep handles dry, clean and free from the appliance before each use any moving part. Do not operate power tools in moving parts. or more above shoulder level to use this rule will do the job better and...
... ground. 2 - Wear a face or dust mask if the operation is properly installed and securely fastened. Power tools create sparks which can be followed to follow all safety instructions. Keep handles dry, clean and free from the appliance before each use any moving part. Do not operate power tools in moving parts. or more above shoulder level to use this rule will do the job better and...

Operation Manual
Page 5
... glass, nails, wire, string, etc.) which can be cut. Clean after each use and care. Save these instructions also. 3 - therefore, they are always in use water or any buildup of dirt and debris by wiping the product clean with a dry cloth occasionally. Remove or disconnect battery when not charging, and before servicing, cleaning, removing material from one type of battery pack may create...
... glass, nails, wire, string, etc.) which can be cut. Clean after each use and care. Save these instructions also. 3 - therefore, they are always in use water or any buildup of dirt and debris by wiping the product clean with a dry cloth occasionally. Remove or disconnect battery when not charging, and before servicing, cleaning, removing material from one type of battery pack may create...
Operation Manual
Page 6
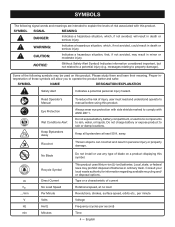
... V Hz min No Blade Recycle Symbol Direct Current No Load Speed Per Minute Volts Hertz Minutes Do not install or use any type of batteries in ordinary trash. This product uses lithium-ion (Li-ion) batteries. English SYMBOL SIGNAL MEANING...speed, at least 50 ft. no load Revolutions, strokes, surface speed, orbits etc., per minute Voltage Frequency (cycles per second) Time 4 - Consult your local waste authority for information regarding available recycling and/ or disposal options. Type or a characteristic of injury, user must read and understand operator's manual before using...
... V Hz min No Blade Recycle Symbol Direct Current No Load Speed Per Minute Volts Hertz Minutes Do not install or use any type of batteries in ordinary trash. This product uses lithium-ion (Li-ion) batteries. English SYMBOL SIGNAL MEANING...speed, at least 50 ft. no load Revolutions, strokes, surface speed, orbits etc., per minute Voltage Frequency (cycles per second) Time 4 - Consult your local waste authority for information regarding available recycling and/ or disposal options. Type or a characteristic of injury, user must read and understand operator's manual before using...
Operation Manual
Page 7
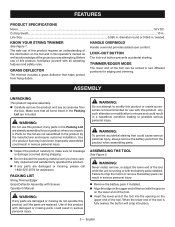
... possible serious personal injury. English LOCK-OUT BUTTON The lock-out button prevents accidental starting that all operating features and safety rules. Parts on the upper end of the tool into place. 5 - FEATURES PRODUCT SPECIFICATIONS Motor...18 V DC Cutting Swath...10 in . twisted KNOW YOUR STRING TRIMMER See Figure 1. ASSEMBLY UNPACKING This product requires assembly. PACKING LIST String Trimmer/Edger Grass Deflector Assembly with this operator's manual as well as a knowledge...
... possible serious personal injury. English LOCK-OUT BUTTON The lock-out button prevents accidental starting that all operating features and safety rules. Parts on the upper end of the tool into place. 5 - FEATURES PRODUCT SPECIFICATIONS Motor...18 V DC Cutting Swath...10 in . twisted KNOW YOUR STRING TRIMMER See Figure 1. ASSEMBLY UNPACKING This product requires assembly. PACKING LIST String Trimmer/Edger Grass Deflector Assembly with this operator's manual as well as a knowledge...
Operation Manual
Page 8
... product as screws, nuts, bolts, caps, etc. WARNING: Failure to properly assemble the tool as describe above steps if pieces can result in serious personal injury. Remove supplied screws with a Phillips screwdriver from the trimmer head. Line up the screw holes in the trimmer battery port before beginning operation. ATTACHING GRASS DEFLECTOR See Figure 3 - 4. The use , inspect the entire product for damaged, missing, or loose parts such...
... product as screws, nuts, bolts, caps, etc. WARNING: Failure to properly assemble the tool as describe above steps if pieces can result in serious personal injury. Remove supplied screws with a Phillips screwdriver from the trimmer head. Line up the screw holes in the trimmer battery port before beginning operation. ATTACHING GRASS DEFLECTOR See Figure 3 - 4. The use , inspect the entire product for damaged, missing, or loose parts such...
Operation Manual
Page 9
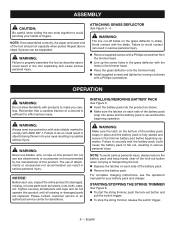
.... 7 - ADVANCING THE LINE MANUALLY See Figure 9. Remove the battery pack. Push the black button located on the string head while pulling on line to the edging position. Make sure the button snaps into place and the boom is equipped with a line cut -off blade. Advance line whenever you hear the motor running , release the switch trigger. Wait two seconds, and press the switch trigger. EDGING See...
.... 7 - ADVANCING THE LINE MANUALLY See Figure 9. Remove the battery pack. Push the black button located on the string head while pulling on line to the edging position. Make sure the button snaps into place and the boom is equipped with a line cut -off blade. Advance line whenever you hear the motor running , release the switch trigger. Wait two seconds, and press the switch trigger. EDGING See...
Operation Manual
Page 10
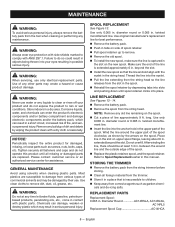
... screws, nuts, bolts, caps, etc. beyond the slot. STORING THE TRIMMER Remove the battery pack from various types of commercial solvents and may be at any other parts may result in the spool. Reinstall the spool retainer by their use only identical replacement parts. Place line in the slot on side of spool retainer. Pull spool retainer up to damage from the string trimmer before storing. Clean...
... screws, nuts, bolts, caps, etc. beyond the slot. STORING THE TRIMMER Remove the battery pack from various types of commercial solvents and may be at any other parts may result in the spool. Reinstall the spool retainer by their use only identical replacement parts. Place line in the slot on side of spool retainer. Pull spool retainer up to damage from the string trimmer before storing. Clean...

Operation Manual
Page 11
... on spool. Charge the battery pack according to the instructions included with silicone spray. English Install more line. Remove line from the top down to prevent wrapping. TROUBLESHOOTING PROBLEM Line will not advance when using the auto-feed head Grass wraps around boom housing and string head Motor fails to start when switch trigger is tangled on spool. Line is depressed. Battery is welded to itself. Refer to ensure your product, call (toll free...
... on spool. Charge the battery pack according to the instructions included with silicone spray. English Install more line. Remove line from the top down to prevent wrapping. TROUBLESHOOTING PROBLEM Line will not advance when using the auto-feed head Grass wraps around boom housing and string head Motor fails to start when switch trigger is tangled on spool. Line is depressed. Battery is welded to itself. Refer to ensure your product, call (toll free...

Parts Diagram
Page 1
REPAIR SHEET BRAND DESCRIPTION RYOBI MODEL NO. Always mention this information in all communications regarding this product and when ordering parts. Box 1288, Anderson, SC 29622 1-800-525-2579 www.ryobitools.com 10-7-21 (Rev:06) The model number and manufacturing location will be found on a label attached to the product. P20103 107890024 P20103VNM 107890101 18 Volt String Trimmer/Edger TECHTRONIC INDUSTRIES POWER EQUIPMENT P.O. MFG. NO.
REPAIR SHEET BRAND DESCRIPTION RYOBI MODEL NO. Always mention this information in all communications regarding this product and when ordering parts. Box 1288, Anderson, SC 29622 1-800-525-2579 www.ryobitools.com 10-7-21 (Rev:06) The model number and manufacturing location will be found on a label attached to the product. P20103 107890024 P20103VNM 107890101 18 Volt String Trimmer/Edger TECHTRONIC INDUSTRIES POWER EQUIPMENT P.O. MFG. NO.
Parts Diagram
Page 2
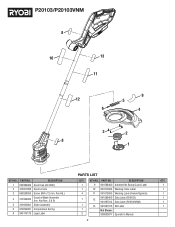
P20103/P20103VNM 8 10 13 11 9 12 5 6 4 3 2 8 1 PARTS LIST KEY NO. DESCRIPTION 1 522994006 Spool Cap (AC14HC) 2 310917009 Spool w/Line 3 660208055 Screw (M4 x 12 mm, Pan Hd.) 4 313564002 Guard w/Blade Assembly (Inc. PART NO. KEY NO. Key Nos. 3 & 9) 5 310920001 Slider Assembly 6 679034001 Compression Spring 8 940114179 Logo Label QTY. DESCRIPTION QTY. 1 9 941588460 Autofeed No Bump Guard Label 1 1 10 941013004 Warning Icons Label 1 4 11 941013005 Warning Label (French/Spanish...
P20103/P20103VNM 8 10 13 11 9 12 5 6 4 3 2 8 1 PARTS LIST KEY NO. DESCRIPTION 1 522994006 Spool Cap (AC14HC) 2 310917009 Spool w/Line 3 660208055 Screw (M4 x 12 mm, Pan Hd.) 4 313564002 Guard w/Blade Assembly (Inc. PART NO. KEY NO. Key Nos. 3 & 9) 5 310920001 Slider Assembly 6 679034001 Compression Spring 8 940114179 Logo Label QTY. DESCRIPTION QTY. 1 9 941588460 Autofeed No Bump Guard Label 1 1 10 941013004 Warning Icons Label 1 4 11 941013005 Warning Label (French/Spanish...


