
English Manual
Page 1
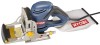
Thank you years of rugged, trouble-free performance. WARNING: To reduce the risk of operation, and operator safety. SAVE THIS MANUAL FOR FUTURE REFERENCE OPERATOR'S MANUAL BISCUIT JOINER DOUBLE INSULATED JM82 Your biscuit joiner has been engineered and manufactured to our high standard for your purchase. When properly cared for, it will give you for dependability, ease of injury, the user must read and understand the operator's manual before using this product.
Thank you years of rugged, trouble-free performance. WARNING: To reduce the risk of operation, and operator safety. SAVE THIS MANUAL FOR FUTURE REFERENCE OPERATOR'S MANUAL BISCUIT JOINER DOUBLE INSULATED JM82 Your biscuit joiner has been engineered and manufactured to our high standard for your purchase. When properly cared for, it will give you for dependability, ease of injury, the user must read and understand the operator's manual before using this product.

English Manual
Page 9
... tunnel in the base and collect in the dust bag during use this product, familiarize yourself with positive stop settings in .) This biscuit joiner is packaged with water-based woodworking glues. ANGLE SETTING SCALE The adjustable fence on each side of the fence indicates the height of 45°... Before attempting to 135°. DUAL GRIP HANDLE The dual grip handle offers a choice of operation and maintaining control. ADJUSTABLE FENCE The biscuit joiner has an adjustable fence for three standard size biscuits. x 1-13/16 in.) #10 (13/16 in . HEIGHT SETTING SCALE A scale on the...
... tunnel in the base and collect in the dust bag during use this product, familiarize yourself with positive stop settings in .) This biscuit joiner is packaged with water-based woodworking glues. ANGLE SETTING SCALE The adjustable fence on each side of the fence indicates the height of 45°... Before attempting to 135°. DUAL GRIP HANDLE The dual grip handle offers a choice of operation and maintaining control. ADJUSTABLE FENCE The biscuit joiner has an adjustable fence for three standard size biscuits. x 1-13/16 in.) #10 (13/16 in . HEIGHT SETTING SCALE A scale on the...
English Manual
Page 10
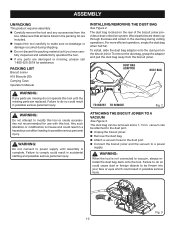
...call 1-800-525-2579 for use with this tool until you have carefully inspected and satisfactorily operated the tool. PACKING LIST Biscuit Joiner #10 Biscuits (20) Carrying Case Operator's Manual INSTALLING/REMOVING THE DUST BAG See Figure 2. For more efficient operation, empty ... collect in . n Attach a vacuum hose to make sure no breakage or damage occurred during cutting operations. n Unplug the biscuit joiner. ASSEMBLY UNPACKING This product requires assembly. vacuum can be attached to power supply until assembly is misuse and could result in possible serious...
...call 1-800-525-2579 for use with this tool until you have carefully inspected and satisfactorily operated the tool. PACKING LIST Biscuit Joiner #10 Biscuits (20) Carrying Case Operator's Manual INSTALLING/REMOVING THE DUST BAG See Figure 2. For more efficient operation, empty ... collect in . n Attach a vacuum hose to make sure no breakage or damage occurred during cutting operations. n Unplug the biscuit joiner. ASSEMBLY UNPACKING This product requires assembly. vacuum can be attached to power supply until assembly is misuse and could result in possible serious...
English Manual
Page 11
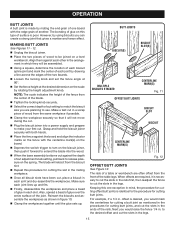
... thin strips of the joint. When joining 1-1/2 in . the more comfortable. When glue is one above each joint depends on the biscuit joiner, depress the switch trigger. This forms a strong joint. thick materials, stack two biscuits, one of the strongest methods of the glue. ... objects being connected, a large surface area receives the adhesion properties of joinery used to connect butt, miter, and T-joints. This biscuit joiner is sufficient to -edge joints for each other pressed woods. However, with the use this tool for miter cuts in 3/4 in hard...
... thin strips of the joint. When joining 1-1/2 in . the more comfortable. When glue is one above each joint depends on the biscuit joiner, depress the switch trigger. This forms a strong joint. thick materials, stack two biscuits, one of the strongest methods of the glue. ... objects being connected, a large surface area receives the adhesion properties of joinery used to connect butt, miter, and T-joints. This biscuit joiner is sufficient to -edge joints for each other pressed woods. However, with the use this tool for miter cuts in 3/4 in hard...
English Manual
Page 12
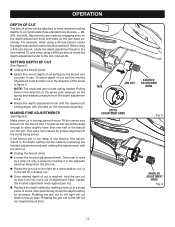
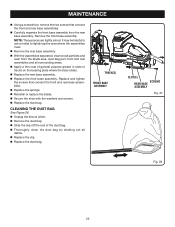
... puts pressure on the rear base assembly. Next, tighten the knurled adjustment knob against jam nut. MAKING FINE ADJUSTMENTS See Figure 6. n Unplug the biscuit joiner. TABS JAM NUT KNURLED ADJUSTMENT KNOB DEPTH ADJUSTMENT KNOB Fig. 5 KNURLED ADJUSTMENT KNOB Fig. 6 12 OPERATION DEPTH OF CUT The biscuit... joiner can be made by engaging slots on the depth adjustment knob with tabs on the spring and releases pressure from the jam nut. To ...
... puts pressure on the rear base assembly. Next, tighten the knurled adjustment knob against jam nut. MAKING FINE ADJUSTMENTS See Figure 6. n Unplug the biscuit joiner. TABS JAM NUT KNURLED ADJUSTMENT KNOB DEPTH ADJUSTMENT KNOB Fig. 5 KNURLED ADJUSTMENT KNOB Fig. 6 12 OPERATION DEPTH OF CUT The biscuit... joiner can be made by engaging slots on the depth adjustment knob with tabs on the spring and releases pressure from the jam nut. To ...
English Manual
Page 13
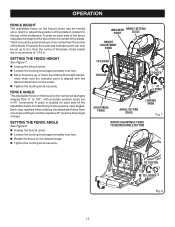
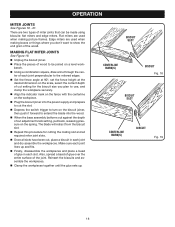
...HEIGHT See Figure 7. n Tighten the locking knob securely. SETTING THE FENCE ANGLE See Figure 8. OPERATION FENCE HEIGHT The adjustable fence on the biscuit joiner can be moved up to 2 in. Each stop reached when rotating the adjustable fence from one turn . n Tighten the locking knob securely. Scale marks...and indicator point can be set up or down by rotating the height adjustment knob until the indicator point is located on the biscuit joiner can be positioned up or down to adjust the position of the blade in increments of the blade. n Loosen the locking knob ...
...HEIGHT See Figure 7. n Tighten the locking knob securely. SETTING THE FENCE ANGLE See Figure 8. OPERATION FENCE HEIGHT The adjustable fence on the biscuit joiner can be moved up to 2 in. Each stop reached when rotating the adjustable fence from one turn . n Tighten the locking knob securely. Scale marks...and indicator point can be set up or down by rotating the height adjustment knob until the indicator point is located on the biscuit joiner can be positioned up or down to adjust the position of the blade in increments of the blade. n Loosen the locking knob ...
English Manual
Page 14
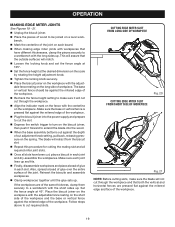
...height of the fence from the ends of the blade. Make a test cut setting to match the biscuit size you use . n Plug the biscuit joiner into the wood. n Clamp workpieces together until the glue sets up and fits. n Tighten the locking knob securely. Also, spread a bead of glue... over the entire surface of each joint by side on the biscuit joiner, then push it will retract from the same workpiece if possible. n Unplug the biscuit joiner. n Select the correct depth of wood from the biscuit slot. Grasp and hold the biscuit...
...height of the fence from the ends of the blade. Make a test cut setting to match the biscuit size you use . n Plug the biscuit joiner into the wood. n Clamp workpieces together until the glue sets up and fits. n Tighten the locking knob securely. Also, spread a bead of glue... over the entire surface of each joint by side on the biscuit joiner, then push it will retract from the same workpiece if possible. n Unplug the biscuit joiner. n Select the correct depth of wood from the biscuit slot. Grasp and hold the biscuit...
English Manual
Page 15
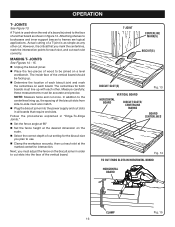
... the location of each biscuit spline joint and mark the center of the two boards. n Tighten the locking knob securely. Grasp and hold the biscuit joiner securely with the centerline mark(s) on a level workbench. n Place the fence against the depth of glue in . n Finally, disassemble the workpieces and place a bead ... type of one exception in the legs. 15 n Loosen the locking knob and set the fence angle at the desired dimension on the biscuit joiner, then push it is necessary to cut the slots in the rails first, then readjust the fence to cut the slots in which they will...
... the location of each biscuit spline joint and mark the center of the two boards. n Tighten the locking knob securely. Grasp and hold the biscuit joiner securely with the centerline mark(s) on a level workbench. n Place the fence against the depth of glue in . n Finally, disassemble the workpieces and place a bead ... type of one exception in the legs. 15 n Loosen the locking knob and set the fence angle at the desired dimension on the biscuit joiner, then push it is necessary to cut the slots in the rails first, then readjust the fence to cut the slots in which they will...
English Manual
Page 16
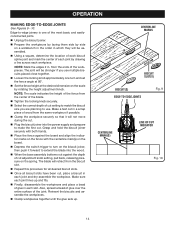
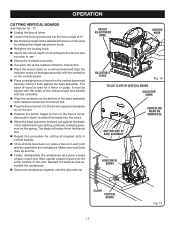
n Unplug the biscuit joiner. n Plug the biscuit joiner into the face of cut setting for each slot, and cut each other cut each board. T-JOINT CENTERLINE MARK(S) BISCUIT(S) BISCUIT SLOT(S) Fig. 13 VERTICAL ... board should be facing up , the spacing of each biscuit joint and mark the centerlines on each slot at the desired dimension on the biscuit joiner in figure 12.
n Unplug the biscuit joiner. n Plug the biscuit joiner into the face of cut setting for each slot, and cut each other cut each board. T-JOINT CENTERLINE MARK(S) BISCUIT(S) BISCUIT SLOT(S) Fig. 13 VERTICAL ... board should be facing up , the spacing of each biscuit joint and mark the centerlines on each slot at the desired dimension on the biscuit joiner in figure 12.
English Manual
Page 17
... board. n Finally, disassemble the workpieces and place a bead of cut adjustment knob setting, pull back, releasing pressure on the biscuit joiner, then push it flush against the depth of the base assembly with the centerline. n Clamp the workpieces together until the glue sets ... of glue in each joint lines up . n Depress the switch trigger to cut , place a biscuit in vertical boards. n Unplug the biscuit joiner. n Loosen the locking knob and set the fence angle at the marked centerline intersection. n Cut each joint and dry-assemble the workpieces. Reinsert ...
... board. n Finally, disassemble the workpieces and place a bead of cut adjustment knob setting, pull back, releasing pressure on the biscuit joiner, then push it flush against the depth of the base assembly with the centerline. n Clamp the workpieces together until the glue sets ... of glue in each joint lines up . n Depress the switch trigger to cut , place a biscuit in vertical boards. n Unplug the biscuit joiner. n Loosen the locking knob and set the fence angle at the marked centerline intersection. n Cut each joint and dry-assemble the workpieces. Reinsert ...
English Manual
Page 18
...'t want to cut , place a biscuit in each joint perpendicular to the mitered edges. Make sure each joint and dry assemble the workpieces. n Unplug the biscuit joiner. n Once all required miter joint slots. n Clamp the workpieces together until the glue sets up and fits. n Plug the biscuit... the blade into the power supply and prepare to show the end grain of cut adjustment knob setting, pull back, releasing pressure on the biscuit joiner, then push it forward to use, and clamp the workpiece securely. n Set the fence angle at 90°, set the fence height at the desired...
...'t want to cut , place a biscuit in each joint perpendicular to the mitered edges. Make sure each joint and dry assemble the workpieces. n Unplug the biscuit joiner. n Once all required miter joint slots. n Clamp the workpieces together until the glue sets up and fits. n Plug the biscuit... the blade into the power supply and prepare to show the end grain of cut adjustment knob setting, pull back, releasing pressure on the biscuit joiner, then push it forward to use, and clamp the workpiece securely. n Set the fence angle at 90°, set the fence height at the desired...
English Manual
Page 19
...the workpieces are pressed flat against the mitered edge and face of the workpiece. n Tighten the locking knob securely. n Place the biscuit joiner on the workpiece with the centerline on the short side of the workpiece and the base or vertical fence against the depth of wood to... to a workbench with the adjustable fence resting on the workpiece. OPERATION MAKING EDGE MITER JOINTS See Figures 19 - 21. n Unplug the biscuit joiner. n Recheck the fence height setting to make sure the blade will assure that both the vertical and horizontal fences are of the same thickness, ...
...the workpieces are pressed flat against the mitered edge and face of the workpiece. n Tighten the locking knob securely. n Place the biscuit joiner on the workpiece with the centerline on the short side of the workpiece and the base or vertical fence against the depth of wood to... to a workbench with the adjustable fence resting on the workpiece. OPERATION MAKING EDGE MITER JOINTS See Figures 19 - 21. n Unplug the biscuit joiner. n Recheck the fence height setting to make sure the blade will assure that both the vertical and horizontal fences are of the same thickness, ...
English Manual
Page 20
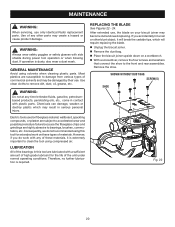
...contact with side shields during power tool operation or when blowing dust. After extended use, the blade on a workbench. n Unplug the biscuit joiner. Use of these types of commercial solvents and may create a hazard or cause product damage. However, if you accidentally hit a nail or... other parts may be damaged by their use only identical Ryobi replacement parts. Use clean cloths to clean the tool using solvents when cleaning plastic parts. LUBRICATION All of the bearings in serious ...
...contact with side shields during power tool operation or when blowing dust. After extended use, the blade on a workbench. n Unplug the biscuit joiner. Use of these types of commercial solvents and may create a hazard or cause product damage. However, if you accidentally hit a nail or... other parts may be damaged by their use only identical Ryobi replacement parts. Use clean cloths to clean the tool using solvents when cleaning plastic parts. LUBRICATION All of the bearings in serious ...

English Manual
Page 21
... area, base assembly, and all surrounding parts. NOTE: Turn the blade screw counterclockwise to prevent it from rotating. n Place the inner blade washer on the joiner blade. n Replace the shoe. DO NOT lock the blade against the screwdriver or pin and lock the blade to remove the blade. n Clean wood particles...
... area, base assembly, and all surrounding parts. NOTE: Turn the blade screw counterclockwise to prevent it from rotating. n Place the inner blade washer on the joiner blade. n Replace the shoe. DO NOT lock the blade against the screwdriver or pin and lock the blade to remove the blade. n Clean wood particles...
English Manual
Page 22
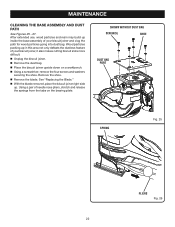
... down on the bearing plate. Wood particles packing up in this area not only defeats the dustless feature of your biscuit joiner and clog the path for wood particles going into dust bag. SHOWN WITHOUT DUST BAG SCREW(S) SHOE DUST BAG PORT SPRING Fig. 25 PLIERS Fig. ...26 22 n Remove the dust bag. See "Replacing the Blade." n With the blade removed, place the biscuit joiner right side up inside the base assembly of needle nose pliers, stretch and release the springs from the tabs on a workbench. n Remove the blade. Remove...
... down on the bearing plate. Wood particles packing up in this area not only defeats the dustless feature of your biscuit joiner and clog the path for wood particles going into dust bag. SHOWN WITHOUT DUST BAG SCREW(S) SHOE DUST BAG PORT SPRING Fig. 25 PLIERS Fig. ...26 22 n Remove the dust bag. See "Replacing the Blade." n With the blade removed, place the biscuit joiner right side up inside the base assembly of needle nose pliers, stretch and release the springs from the tabs on a workbench. n Remove the blade. Remove...
English Manual
Page 23
...: These pieces are tightly joined. Replace and tighten the screws that connect the front and rear base assemblies. n Replace the dust bag. n Unplug the biscuit joiner. MAINTENANCE n Using a screwdriver, remove the two screws that connect the front and rear base assemblies. n Replace the clip. n Replace the front base assembly. n Reinstall or...
...: These pieces are tightly joined. Replace and tighten the screws that connect the front and rear base assemblies. n Replace the dust bag. n Unplug the biscuit joiner. MAINTENANCE n Using a screwdriver, remove the two screws that connect the front and rear base assemblies. n Replace the clip. n Replace the front base assembly. n Reinstall or...

English Manual
Page 26
.... • HOW TO ORDER REPAIR PARTS When ordering repair parts, always give the following information: • MODEL NUMBER JM82 • SERIAL NUMBER Ryobi® is a registered trademark of this tool will be found on a plate attached to provide all pertinent facts when you have purchased your tool,...or visit. You can also check our web site at www.ryobitools.com for your nearest Authorized Service Center. OPERATOR'S MANUAL BISCUIT JOINER DOUBLE INSULATED JM82 • SERVICE Now that you call 1-800-525-2579 for a complete list of Authorized Service Centers. • MODEL NO....
.... • HOW TO ORDER REPAIR PARTS When ordering repair parts, always give the following information: • MODEL NUMBER JM82 • SERIAL NUMBER Ryobi® is a registered trademark of this tool will be found on a plate attached to provide all pertinent facts when you have purchased your tool,...or visit. You can also check our web site at www.ryobitools.com for your nearest Authorized Service Center. OPERATOR'S MANUAL BISCUIT JOINER DOUBLE INSULATED JM82 • SERVICE Now that you call 1-800-525-2579 for a complete list of Authorized Service Centers. • MODEL NO....
Repair Sheet
Page 3
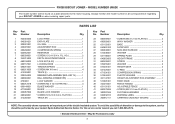
...Be Purchased Locally 3 Always mention the model number in all correspondence regarding your nearest Ryobi Authorized Service Center. MODEL NUMBER JM82K The model number will be performed by your BISCUIT JOINER or when ordering repair parts. Number 1 940304063 2 940301021 3 900501001 4 630070001 5...LOGO PIATE 1 DATA PLATE 1 OIL SEAL 1 ADJUSTMENT ROD 1 COMPRESSION SPRING 1 REAR BASE 1 * SCREW (10-24 X 3/4 in . RYOBI BISCUIT JOINER - Key Part No. FLAT HD 1 TRACK (R 1 23 660569001 24 690903001 25 631152001 26 640851003 27 900949001 28 512338001 29 631168001 30 640853003 ...
...Be Purchased Locally 3 Always mention the model number in all correspondence regarding your nearest Ryobi Authorized Service Center. MODEL NUMBER JM82K The model number will be performed by your BISCUIT JOINER or when ordering repair parts. Number 1 940304063 2 940301021 3 900501001 4 630070001 5...LOGO PIATE 1 DATA PLATE 1 OIL SEAL 1 ADJUSTMENT ROD 1 COMPRESSION SPRING 1 REAR BASE 1 * SCREW (10-24 X 3/4 in . RYOBI BISCUIT JOINER - Key Part No. FLAT HD 1 TRACK (R 1 23 660569001 24 690903001 25 631152001 26 640851003 27 900949001 28 512338001 29 631168001 30 640853003 ...
Repair Sheet
Page 5
... CORD LABEL ...1 BISCUIT ACCESSORY KIT, #10 (NOT SHOWN 1 OPERATOR'S MANUAL (960223252 1 REPAIR SHEET WARNING: Improper repair of your BISCUIT JOINER or when ordering repair parts. Any repairs requiring disassembly of a double insulated tool can result in all correspondence regarding your tool requires safety testing...and should only be found on a plate attached to the double insulation system possibly causing electrical shock or electrocution. MODEL NUMBER JM82K The model number will be performed by a Ryobi Authorized Service Center. Key No. 1 2 3 4 5 6 7 8 9 10 11 12 13 14 15 16 ...
... CORD LABEL ...1 BISCUIT ACCESSORY KIT, #10 (NOT SHOWN 1 OPERATOR'S MANUAL (960223252 1 REPAIR SHEET WARNING: Improper repair of your BISCUIT JOINER or when ordering repair parts. Any repairs requiring disassembly of a double insulated tool can result in all correspondence regarding your tool requires safety testing...and should only be found on a plate attached to the double insulation system possibly causing electrical shock or electrocution. MODEL NUMBER JM82K The model number will be performed by a Ryobi Authorized Service Center. Key No. 1 2 3 4 5 6 7 8 9 10 11 12 13 14 15 16 ...
Repair Sheet
Page 6
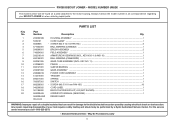
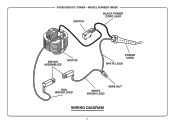
RYOBI BISCUIT JOINER - MODEL NUMBER JM82K SWITCH BLACK POWER CORD LEAD BRUSH ASSEMBLIES MOTOR POWER CORD WHITE LEAD RED BRUSH LEAD WHITE BRUSH LEAD WIRE NUT WIRING DIAGRAM 6
RYOBI BISCUIT JOINER - MODEL NUMBER JM82K SWITCH BLACK POWER CORD LEAD BRUSH ASSEMBLIES MOTOR POWER CORD WHITE LEAD RED BRUSH LEAD WHITE BRUSH LEAD WIRE NUT WIRING DIAGRAM 6