

User Manual
Page 1
WARNING: To reduce the risk of operation, and operator safety. OPERATOR'S MANUAL 18 VOLT SPEED SAW™ P530 ACCEPTS ALL ONE+ BATTERY PACKS BATTERIES AND CHARGERS SOLD SEPARATELY Your speed saw has been engineered and manufactured to our high standard for your purchase. Thank you years of rugged, trouble-free performance. SAVE THIS MANUAL FOR FUTURE REFERENCE When properly cared for, it will give you for dependability, ease of injury, the user must read and understand the operator's manual before using this product.
WARNING: To reduce the risk of operation, and operator safety. OPERATOR'S MANUAL 18 VOLT SPEED SAW™ P530 ACCEPTS ALL ONE+ BATTERY PACKS BATTERIES AND CHARGERS SOLD SEPARATELY Your speed saw has been engineered and manufactured to our high standard for your purchase. Thank you years of rugged, trouble-free performance. SAVE THIS MANUAL FOR FUTURE REFERENCE When properly cared for, it will give you for dependability, ease of injury, the user must read and understand the operator's manual before using this product.
User Manual
Page 2
.... HOW TO GET SERVICE: Just return the power tool, properly packaged and postage prepaid, to you . TABLE OF CONTENTS Introduction...2 Warranty...2 General Safety Rules...3-4 Specific Safety Rules...4 Symbols...5-6 Features...7 Assembly...8-9 Operation...9-11 Adjustments...12 Maintenance...13 Parts Ordering / Service...14 INTRODUCTION This tool has many features...
.... HOW TO GET SERVICE: Just return the power tool, properly packaged and postage prepaid, to you . TABLE OF CONTENTS Introduction...2 Warranty...2 General Safety Rules...3-4 Specific Safety Rules...4 Symbols...5-6 Features...7 Assembly...8-9 Operation...9-11 Adjustments...12 Maintenance...13 Parts Ordering / Service...14 INTRODUCTION This tool has many features...
User Manual
Page 3
GENERAL SAFETY RULES WARNING! ELECTRICAL SAFETY A battery operated tool with integral batteries or a separate battery pack must be drawn into a tool with your finger on the switch or inserting the battery pack into air vents. Do not use tool if switch does not turn it is not in use, keep it away from other metal objects like: paper clips, coins, keys, nails, screws, or other small metal objects that can...
GENERAL SAFETY RULES WARNING! ELECTRICAL SAFETY A battery operated tool with integral batteries or a separate battery pack must be drawn into a tool with your finger on the switch or inserting the battery pack into air vents. Do not use tool if switch does not turn it is not in use, keep it away from other metal objects like: paper clips, coins, keys, nails, screws, or other small metal objects that can...

User Manual
Page 4
... wear safety glasses with a "live" wire will reduce the risk of eye injury. Protect your lungs. Following this rule will make exposed metal parts of serious personal injury. Battery tools do not have only impact resistant lenses. This will reduce the risk of the cutting tool "live " and shock the operator. Know your power tool. Following this manual. Follow instructions...
... wear safety glasses with a "live" wire will reduce the risk of eye injury. Protect your lungs. Following this rule will make exposed metal parts of serious personal injury. Battery tools do not have only impact resistant lenses. This will reduce the risk of the cutting tool "live " and shock the operator. Know your power tool. Following this manual. Follow instructions...
User Manual
Page 5
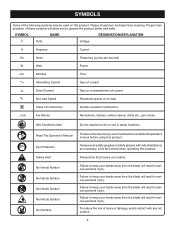
... your hands away from the blade will result in damp locations. Failure to rain or use in serious personal injury. To reduce the risk of current Rotational speed, at no load Class II Construction Double-insulated construction .../min Per Minute Revolutions, strokes, surface speed, orbits etc., per second) W Watt Power min Minutes Time Alternating Current Type of current Direct...
... your hands away from the blade will result in damp locations. Failure to rain or use in serious personal injury. To reduce the risk of current Rotational speed, at no load Class II Construction Double-insulated construction .../min Per Minute Revolutions, strokes, surface speed, orbits etc., per second) W Watt Power min Minutes Time Alternating Current Type of current Direct...
User Manual
Page 6
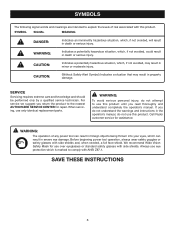
... product to the nearest AUTHORIZED SERVICE CENTER for repair. SAVE THESE INSTRUCTIONS 6 When servicing, use over eyeglasses or standard safety glasses with this product. WARNING: The operation of risk associated with side shields. If you do not understand the warnings and instructions in death or serious injury. Before beginning power tool operation, always wear safety goggles or safety glasses with ANSI Z87.1. CAUTION...
... product to the nearest AUTHORIZED SERVICE CENTER for repair. SAVE THESE INSTRUCTIONS 6 When servicing, use over eyeglasses or standard safety glasses with this product. WARNING: The operation of risk associated with side shields. If you do not understand the warnings and instructions in death or serious injury. Before beginning power tool operation, always wear safety goggles or safety glasses with ANSI Z87.1. CAUTION...
User Manual
Page 7
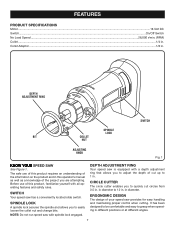
Before use of this product, familiarize yourself with spindle lock engaged. FEATURES PRODUCT SPECIFICATIONS Motor...18 Volt DC Switch...On/Off Switch No Load Speed...26,000 r/min. (RPM) Collet...1/4 in . DEPTH ADJUSTMENT RING Your speed saw has a conveniently located slide switch. in diameter to easily loosen the collet nut and change bits. Collet Adaptor...1/8 in . DEPTH ADJUSTMENT RING SWITCH SPINDLE LOCK BIT COLLET NUT ADJUSTING KNOB Fig. 1 KNOW YOUR SPEED SAW See Figure 1. SWITCH Your speed saw is equipped with a depth adjustment ring that allows...
Before use of this product, familiarize yourself with spindle lock engaged. FEATURES PRODUCT SPECIFICATIONS Motor...18 Volt DC Switch...On/Off Switch No Load Speed...26,000 r/min. (RPM) Collet...1/4 in . DEPTH ADJUSTMENT RING Your speed saw has a conveniently located slide switch. in diameter to easily loosen the collet nut and change bits. Collet Adaptor...1/8 in . DEPTH ADJUSTMENT RING SWITCH SPINDLE LOCK BIT COLLET NUT ADJUSTING KNOB Fig. 1 KNOW YOUR SPEED SAW See Figure 1. SWITCH Your speed saw is equipped with a depth adjustment ring that allows...
User Manual
Page 8
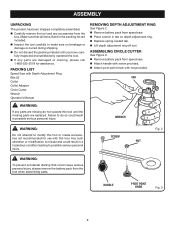
... battery pack from speed saw . Attach handle with screw provided. Attach pivot point knob with nut provided. n If any parts are damaged or missing, please call 1-800-525-2579 for use with Depth Adjustment Ring Bits (2) Collet Collet Adaptor Circle Cutter Wrench Operator's Manual REMOVING DEPTH ADJUSTMENT RING See Figure 2. Remove battery pack from the tool when assembling parts. PACKING LIST Speed Saw with this tool until you have carefully inspected and satisfactorily operated the tool. ASSEMBLING...
... battery pack from speed saw . Attach handle with screw provided. Attach pivot point knob with nut provided. n If any parts are damaged or missing, please call 1-800-525-2579 for use with Depth Adjustment Ring Bits (2) Collet Collet Adaptor Circle Cutter Wrench Operator's Manual REMOVING DEPTH ADJUSTMENT RING See Figure 2. Remove battery pack from the tool when assembling parts. PACKING LIST Speed Saw with this tool until you have carefully inspected and satisfactorily operated the tool. ASSEMBLING...
User Manual
Page 9
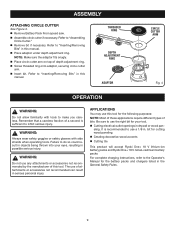
... speed saw. Assemble circle cutter if necessary. Be sure to use any attachments or accessories not recommended by the manufacturer of this tool for cutting wood paneling. Creating decorative wood accents Cutting tile This product will accept Ryobi One+ 18 V lithium-ion battery packs and Ryobi One+ 18 V nickel-cadmium battery packs. Refer to inflict serious injury. It is sufficient to "Inserting/Removing Bits...
... speed saw. Assemble circle cutter if necessary. Be sure to use any attachments or accessories not recommended by the manufacturer of this tool for cutting wood paneling. Creating decorative wood accents Cutting tile This product will accept Ryobi One+ 18 V lithium-ion battery packs and Ryobi One+ 18 V nickel-cadmium battery packs. Refer to inflict serious injury. It is sufficient to "Inserting/Removing Bits...
User Manual
Page 10
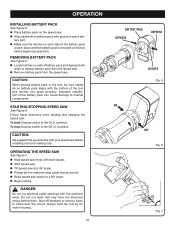
... have live electrical wires. OPERATING THE SPEED SAW See Figure 7. Hold speed saw firmly with both sides to release battery pack from the speed saw. Remove battery pack from the speed saw. To stop: Depress switch to the Off ( O ) position. REMOVING BATTERY PACK See Figure 5. Locate latches on side of the tool and latches into material using guide ring as a pivot. Raise speed saw slowly to a 90o angle. Begin cutting. OPERATION INSTALLING BATTERY PACK...
... have live electrical wires. OPERATING THE SPEED SAW See Figure 7. Hold speed saw firmly with both sides to release battery pack from the speed saw. Remove battery pack from the speed saw. To stop: Depress switch to the Off ( O ) position. REMOVING BATTERY PACK See Figure 5. Locate latches on side of the tool and latches into material using guide ring as a pivot. Raise speed saw slowly to a 90o angle. Begin cutting. OPERATION INSTALLING BATTERY PACK...
User Manual
Page 11
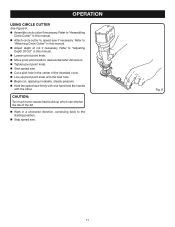
... this manual. Adjust depth of the intended circle. Line up , which can shorten the life of the bit. Work in a clockwise direction, continuing back to desired diameter dimension. Tighten pivot point knob. Start speed saw . Fig. 8 11 Refer to speed saw firmly with one hand and the handle with the lead hole. Begin cut if necessary. OPERATION USING CIRCLE CUTTER See Figure 8. Assemble...
... this manual. Adjust depth of the intended circle. Line up , which can shorten the life of the bit. Work in a clockwise direction, continuing back to desired diameter dimension. Tighten pivot point knob. Start speed saw . Fig. 8 11 Refer to speed saw firmly with one hand and the handle with the lead hole. Begin cut if necessary. OPERATION USING CIRCLE CUTTER See Figure 8. Assemble...

User Manual
Page 12
... injury. Release spindle lock. TO LOOSEN INSERTING/REMOVING BITS See Figure 9. Remove battery pack from cutting. adaptor into collet. To remove bit: Remove bit once collet nut is not securely tightened, tthe bit may detach during use bits with the wrench provided. CAUTION: To prevent damage to the spindle or spindle lock, always allow motor to come to desired position. Tighten adjusting knob by turning clockwise. ADJUSTING DEPTH OF CUT See Figure 10. Remove Battery Pack From speed saw .
... injury. Release spindle lock. TO LOOSEN INSERTING/REMOVING BITS See Figure 9. Remove battery pack from cutting. adaptor into collet. To remove bit: Remove bit once collet nut is not securely tightened, tthe bit may detach during use bits with the wrench provided. CAUTION: To prevent damage to the spindle or spindle lock, always allow motor to come to desired position. Tighten adjusting knob by turning clockwise. ADJUSTING DEPTH OF CUT See Figure 10. Remove Battery Pack From speed saw .
User Manual
Page 13
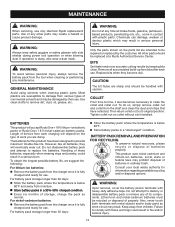
... removal, cover the battery pack's terminals with side shields during power tool operation or when blowing dust. Keep away from moisture. Store battery packs in a 30%-50% charged condition. Every six months of work you are sharp and should be handled with plastic parts. Failure to damage from bits after each charging will accept Ryobi One+ 18 V lithium-ion batteriy packs or Ryobi...
... removal, cover the battery pack's terminals with side shields during power tool operation or when blowing dust. Keep away from moisture. Store battery packs in a 30%-50% charged condition. Every six months of work you are sharp and should be handled with plastic parts. Failure to damage from bits after each charging will accept Ryobi One+ 18 V lithium-ion batteriy packs or Ryobi...
User Manual
Page 14
... to the motor housing. Some examples of work with approved safety equipment, such as those dust masks that you do this type of these chemicals: work in the space provided below. • HOW TO ORDER REPAIR PARTS When ordering repair parts, always give the following information: • MODEL NUMBER • SERIAL NUMBER P530 Ryobi® is a registered trademark of Authorized Service Centers. • MODEL NO. The model number of...
... to the motor housing. Some examples of work with approved safety equipment, such as those dust masks that you do this type of these chemicals: work in the space provided below. • HOW TO ORDER REPAIR PARTS When ordering repair parts, always give the following information: • MODEL NUMBER • SERIAL NUMBER P530 Ryobi® is a registered trademark of Authorized Service Centers. • MODEL NO. The model number of...
User Manual 2
Page 3
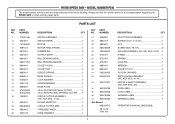
... 690469002 19 5924401 20 3031703 PARTS LIST DESCRIPTION QTY KEY NO. x 12 mm 1 NUT 1 SCREW (M4 x 16 mm 6 HOUSING ASSEMBLY (INC. Always mention the model number in . PART NUMBER SWITCH ASSEMBLY 1 SWITCH KNOB 1 MOTOR 1 MOTOR RING (FRONT 1 RUBBER PIN 3 OUTPUT SHAFT 1 BALL BEARING (NSK 1 BALL BEARING (6002ZZ 1 COLLET (1/8 in 1 COLLET NUT 1 SLEEVE SPRING 1 BASE SLEEVE 1 LOCK WASHER 1 KNOB ASSEMBLY 1 BASE PLATE 1 1/8 in all correspondence regarding your SPEED SAW or when ordering repair parts. PILOTED DRYWALL CUT BIT 1 1/8 in. KEY NOS. 3-9 1 DATA LABEL 1 LOGO...
... 690469002 19 5924401 20 3031703 PARTS LIST DESCRIPTION QTY KEY NO. x 12 mm 1 NUT 1 SCREW (M4 x 16 mm 6 HOUSING ASSEMBLY (INC. Always mention the model number in . PART NUMBER SWITCH ASSEMBLY 1 SWITCH KNOB 1 MOTOR 1 MOTOR RING (FRONT 1 RUBBER PIN 3 OUTPUT SHAFT 1 BALL BEARING (NSK 1 BALL BEARING (6002ZZ 1 COLLET (1/8 in 1 COLLET NUT 1 SLEEVE SPRING 1 BASE SLEEVE 1 LOCK WASHER 1 KNOB ASSEMBLY 1 BASE PLATE 1 1/8 in all correspondence regarding your SPEED SAW or when ordering repair parts. PILOTED DRYWALL CUT BIT 1 1/8 in. KEY NOS. 3-9 1 DATA LABEL 1 LOGO...
User Manual 2
Page 4
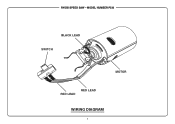
MODEL NUMBER P530 BLACK LEAD SWITCH MOTOR RED LEAD RED LEAD WIRING DIAGRAM 4 RYOBI SPEED SAW -
MODEL NUMBER P530 BLACK LEAD SWITCH MOTOR RED LEAD RED LEAD WIRING DIAGRAM 4 RYOBI SPEED SAW -


