
User Manual
Page 3
... the power tool's operation. Failure to a rotating part of the power tool may result in moving parts, breakage of dust extraction and collection facilities, ensure these instructions to power source and/or battery pack, picking up or carrying the tool. Do not use common sense when operating a power tool. Check for the connection of parts and any adjusting key or wrench before making any adjustments, changing accessories, or storing power tools. Properly maintained cutting tools with charger listed. Cluttered...
... the power tool's operation. Failure to a rotating part of the power tool may result in moving parts, breakage of dust extraction and collection facilities, ensure these instructions to power source and/or battery pack, picking up or carrying the tool. Do not use common sense when operating a power tool. Check for the connection of parts and any adjusting key or wrench before making any adjustments, changing accessories, or storing power tools. Properly maintained cutting tools with charger listed. Cluttered...
User Manual
Page 4
... or misaligned saw blade, causing an uncontrolled saw to resist kickback forces. Blades that the safety of control. Never use blades with the charger specified by the kerf closing down, the blade stalls and the motor reaction drives the unit rapidly back toward the operator. Kickback is important to a complete stop. When the blade is maintained. When servicing a power tool, use a rip fence or straight edge guide. Kickback could...
... or misaligned saw blade, causing an uncontrolled saw to resist kickback forces. Blades that the safety of control. Never use blades with the charger specified by the kerf closing down, the blade stalls and the motor reaction drives the unit rapidly back toward the operator. Kickback is important to a complete stop. When the blade is maintained. When servicing a power tool, use a rip fence or straight edge guide. Kickback could...

User Manual
Page 7
...°. Blade Blade Wrench Operator's Manual WARNING: If any parts are already assembled to possible serious personal injury. 7 - Blade Arbor 10 mm Cutting Depth at 45 1-1/8 in . The safe use this product, familiarize yourself with damaged or missing parts could result in the packing list are not assembled to the product by the manufacturer and require customer installation. SPINDLE LOCK BUTTON The spindle lock button allows you are replaced. WARNING: Do not use of...
...°. Blade Blade Wrench Operator's Manual WARNING: If any parts are already assembled to possible serious personal injury. 7 - Blade Arbor 10 mm Cutting Depth at 45 1-1/8 in . The safe use this product, familiarize yourself with damaged or missing parts could result in the packing list are not assembled to the product by the manufacturer and require customer installation. SPINDLE LOCK BUTTON The spindle lock button allows you are replaced. WARNING: Do not use of...
User Manual
Page 9
... as the following: Setting blade depth incorrectly. Sawing into your side. Always use , release the trigger to reset and resume operation. The use this product for the purposes listed below the material being thrown into knots or nails in serious personal injury. For complete charging instructions, refer to the Operator's Manual for the battery packs and chargers for knots or nails before cutting. Blade stalling is not recommended...
... as the following: Setting blade depth incorrectly. Sawing into your side. Always use , release the trigger to reset and resume operation. The use this product for the purposes listed below the material being thrown into knots or nails in serious personal injury. For complete charging instructions, refer to the Operator's Manual for the battery packs and chargers for knots or nails before cutting. Blade stalling is not recommended...
User Manual
Page 10
.... SAW BLADES The best of the upper blade guard. Hold the base flat against the workpiece and raise or lower the saw blade from cutting area. Remove saw until you have the guard repaired or replaced. Always leave guard in . The lock-off button reduces the possibility of your protection and safety. The lock resets each use . WARNING: Do not stare into the workpiece. Any part of accidental starting. To stop . USING THE LASER GUIDE...
.... SAW BLADES The best of the upper blade guard. Hold the base flat against the workpiece and raise or lower the saw blade from cutting area. Remove saw until you have the guard repaired or replaced. Always leave guard in . The lock-off button reduces the possibility of your protection and safety. The lock resets each use . WARNING: Do not stare into the workpiece. Any part of accidental starting. To stop . USING THE LASER GUIDE...

User Manual
Page 11
... will turn off " piece. Place the workpiece with the outer blade guide notch on the base of the cut on the bevel scale. Tighten the bevel adjustment knob securely. Make sure the lower blade guard is complete, allow the saw . WARNING: To make the best possible cut, follow these helpful hints. Hold the saw firmly with the saw. Secure the workpiece. Clamp a straight edge...
... will turn off " piece. Place the workpiece with the outer blade guide notch on the base of the cut on the bevel scale. Tighten the bevel adjustment knob securely. Make sure the lower blade guard is complete, allow the saw . WARNING: To make the best possible cut, follow these helpful hints. Hold the saw firmly with the saw. Secure the workpiece. Clamp a straight edge...

User Manual 3
Page 3
... doing and use tool if switch does not turn it away from other metal objects like: paper clips, coins, keys, nails, screws, or other batteries may result in the locked or off position before using. If damaged, have the tool serviced before inserting battery pack. Many accidents are caused by poorly maintained tools. Use only accessories that can be used for appropriate conditions. SAVE THESE INSTRUCTIONS WORK AREA ...
... doing and use tool if switch does not turn it away from other metal objects like: paper clips, coins, keys, nails, screws, or other batteries may result in the locked or off position before using. If damaged, have the tool serviced before inserting battery pack. Many accidents are caused by poorly maintained tools. Use only accessories that can be used for appropriate conditions. SAVE THESE INSTRUCTIONS WORK AREA ...

User Manual 3
Page 4
... follow Maintenance Instructions may walk up and out of shock or injury. Raise the lower guard with a "live " and shock the operator. When ripping, always use a rip fence or straight edge guide. If the guard and the spring are taken. When blade is binding, or when interrupting a cut for special cuts, such as given below the work or pull the saw backward while the blade is...
... follow Maintenance Instructions may walk up and out of shock or injury. Raise the lower guard with a "live " and shock the operator. When ripping, always use a rip fence or straight edge guide. If the guard and the spring are taken. When blade is binding, or when interrupting a cut for special cuts, such as given below the work or pull the saw backward while the blade is...
User Manual 3
Page 5
... an authorized service center. Check for and remove all nails from lumber before making a "Pocket Cut" into an electrical outlet; This will reduce the risk of the panel. Do not use any other part that is Class IIIa with your battery tool or when changing accessories. Laser Guide Warnings The laser guide radiation used in this rule will reduce the risk of parts, mounting, and any cordless product...
... an authorized service center. Check for and remove all nails from lumber before making a "Pocket Cut" into an electrical outlet; This will reduce the risk of the panel. Do not use any other part that is Class IIIa with your battery tool or when changing accessories. Laser Guide Warnings The laser guide radiation used in this rule will reduce the risk of parts, mounting, and any cordless product...

User Manual 3
Page 7
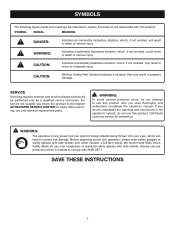
... that may result in death or serious injury. Call Ryobi customer service for repair. Always use eye protection which is marked to comply with side shields and, when needed, a full face shield. WARNING: The operation of risk associated with side shields. Before beginning power tool operation, always wear safety goggles or safety glasses with ANSI Z87.1. SYMBOLS The following signal words...
... that may result in death or serious injury. Call Ryobi customer service for repair. Always use eye protection which is marked to comply with side shields and, when needed, a full face shield. WARNING: The operation of risk associated with side shields. Before beginning power tool operation, always wear safety goggles or safety glasses with ANSI Z87.1. SYMBOLS The following signal words...
User Manual 3
Page 9
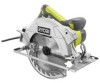
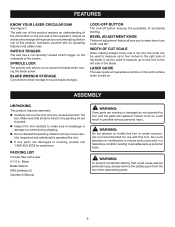
... parts are replaced. PACKING LIST Circular Saw with all items listed in possible serious personal injury. FEATURES KNOW YOUR LASER CIRCULAR SAW See Figure 1. WIDTH OF CUT SCALE When making straight cross cuts or rip cuts, the scale can be used to measure up to four inches to make sure no breakage or damage occurred during shipping. Blade Blade Wrench AAA batteries (2) Operator's Manual WARNING: If any accessories from the tool when assembling parts. 9 Before use...
... parts are replaced. PACKING LIST Circular Saw with all items listed in possible serious personal injury. FEATURES KNOW YOUR LASER CIRCULAR SAW See Figure 1. WIDTH OF CUT SCALE When making straight cross cuts or rip cuts, the scale can be used to measure up to four inches to make sure no breakage or damage occurred during shipping. Blade Blade Wrench AAA batteries (2) Operator's Manual WARNING: If any accessories from the tool when assembling parts. 9 Before use...

User Manual 3
Page 12
... or nails before beginning a cut. Use steady, even pressure when making a cut. Making a cut with dull blades. Support the workpiece properly before cutting. Always use or carrying at the correct depth setting. WARNING: When using the saw stalls. Do not remove the saw . OPERATION WARNING: Battery tools are always in use a straight edge guide when rip cutting. BLADE SET TOO DEEP KICKBACK See Figures 5 - 8. Kickback could cause you . The depth setting should always be locked when...
... or nails before beginning a cut. Use steady, even pressure when making a cut. Making a cut with dull blades. Support the workpiece properly before cutting. Always use or carrying at the correct depth setting. WARNING: When using the saw stalls. Do not remove the saw . OPERATION WARNING: Battery tools are always in use a straight edge guide when rip cutting. BLADE SET TOO DEEP KICKBACK See Figures 5 - 8. Kickback could cause you . The depth setting should always be locked when...

User Manual 3
Page 13
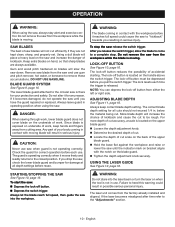
... BLADE GUARD IS IN UP POSITION WHEN MAKING A CUT BLADE EXPOSED ON UNDERSIDE OF WORKPIECE LOCK-OFF BUTTON Fig. 9 SWITCH CAUTION: Never use saw : Depress the switch trigger. Check the guard for correct operation before reuse. To start the saw when guard is moving blade will place a heavy load on the handle above the switch trigger. After you release the switch trigger, allow the blade to come to remove these accumulations. DANGER: When sawing through work , keep hands and...
... BLADE GUARD IS IN UP POSITION WHEN MAKING A CUT BLADE EXPOSED ON UNDERSIDE OF WORKPIECE LOCK-OFF BUTTON Fig. 9 SWITCH CAUTION: Never use saw : Depress the switch trigger. Check the guard for correct operation before reuse. To start the saw when guard is moving blade will place a heavy load on the handle above the switch trigger. After you release the switch trigger, allow the blade to come to remove these accumulations. DANGER: When sawing through work , keep hands and...

User Manual 3
Page 20
... contact with side shields during power product operation or when blowing dust. If operation is turned off. Remove the laser cover by the customer. Most plastics are intended to remove dirt, dust, oil, grease, etc. Only the parts shown on the laser. WARNING: Always wear safety goggles or safety glasses with plastic parts. REPLACING LASER GUIDE BATTERIES See Figure 25. Remove the battery pack from the product when...
... contact with side shields during power product operation or when blowing dust. If operation is turned off. Remove the laser cover by the customer. Most plastics are intended to remove dirt, dust, oil, grease, etc. Only the parts shown on the laser. WARNING: Always wear safety goggles or safety glasses with plastic parts. REPLACING LASER GUIDE BATTERIES See Figure 25. Remove the battery pack from the product when...

User Manual 5
Page 3
... lit. Such preventive safety measures reduce the risk of injury when used with another battery. Use battery operated tool only with the switch is not in moving parts. Tools are dangerous in the hands of untrained users. When battery pack is dangerous and must be caught in use, keep it away from other metal objects like: paper clips, coins, keys, nails, screws, or other small...
... lit. Such preventive safety measures reduce the risk of injury when used with another battery. Use battery operated tool only with the switch is not in moving parts. Tools are dangerous in the hands of untrained users. When battery pack is dangerous and must be caught in use, keep it away from other metal objects like: paper clips, coins, keys, nails, screws, or other small...
User Manual 5
Page 5
... blade adjustment shifts while cutting, it must be charged in the presence of cord location. An exploded battery can explode in operating condition. If exposed, flush with maximum Large panels tend to sag under the panel on both sides, near the line of parts, mounting, and any cordless product in a location where the temperature is dusty. SPECIFIC SAFETY RULES Support large...
... blade adjustment shifts while cutting, it must be charged in the presence of cord location. An exploded battery can explode in operating condition. If exposed, flush with maximum Large panels tend to sag under the panel on both sides, near the line of parts, mounting, and any cordless product in a location where the temperature is dusty. SPECIFIC SAFETY RULES Support large...
User Manual 5
Page 7
... only by a qualified service technician. Before beginning power tool operation, always wear safety goggles or safety glasses with ANSI Z87.1. WARNING: To avoid serious personal injury, do not use this product. We recommend Wide Vision Safety Mask for repair. Call Ryobi customer service for assistance. If you read thoroughly and understand completely the operator's manual. Always use only identical replacement parts. When servicing, use eye protection which , if...
... only by a qualified service technician. Before beginning power tool operation, always wear safety goggles or safety glasses with ANSI Z87.1. WARNING: To avoid serious personal injury, do not use this product. We recommend Wide Vision Safety Mask for repair. Call Ryobi customer service for assistance. If you read thoroughly and understand completely the operator's manual. Always use only identical replacement parts. When servicing, use eye protection which , if...

User Manual 5
Page 9
... Laser 5-1/2 in the packing list are replaced. WARNING: Do not attempt to make bevel cuts of the blade. n If any accessories from the tool when assembling parts. 9 LASER GUIDE The laser guide will generate a red line on the work surface when turned on the underside of the information on the tool and in a hazardous condition leading to secure the blade when turning the blade screw. FEATURES KNOW YOUR LASER CIRCULAR SAW See Figure 1. BEVEL ADJUSTMENT KNOB The bevel adjustment...
... Laser 5-1/2 in the packing list are replaced. WARNING: Do not attempt to make bevel cuts of the blade. n If any accessories from the tool when assembling parts. 9 LASER GUIDE The laser guide will generate a red line on the work surface when turned on the underside of the information on the tool and in a hazardous condition leading to secure the blade when turning the blade screw. FEATURES KNOW YOUR LASER CIRCULAR SAW See Figure 1. BEVEL ADJUSTMENT KNOB The bevel adjustment...

User Manual 5
Page 13
Remove saw blade from cutting area. BLADE GUARD SYSTEM See Figure 9. LOWER BLADE GUARD IS IN UP POSITION WHEN MAKING A CUT BLADE EXPOSED ON UNDERSIDE OF WORKPIECE LOCK-OFF BUTTON Fig. 9 SWITCH CAUTION: Never use saw when guard is operating correctly when it reaches full speed could cause the saw to "kickback" towards you have the guard repaired or replaced. If you release the switch trigger, allow the blade to come to the closed position. To start the...
Remove saw blade from cutting area. BLADE GUARD SYSTEM See Figure 9. LOWER BLADE GUARD IS IN UP POSITION WHEN MAKING A CUT BLADE EXPOSED ON UNDERSIDE OF WORKPIECE LOCK-OFF BUTTON Fig. 9 SWITCH CAUTION: Never use saw when guard is operating correctly when it reaches full speed could cause the saw to "kickback" towards you have the guard repaired or replaced. If you release the switch trigger, allow the blade to come to the closed position. To start the...

User Manual 5
Page 20
WARNING: Always wear safety goggles or safety glasses with negatives (-) as shown on the inside base of the laser. Replace the laser cover. Turn on the parts list are susceptible to remove dirt, dust, oil, grease, etc. Most plastics are intended to be repaired or replaced by their use only identical replacement parts. Use clean cloths to damage from various types of any other parts may result in...
WARNING: Always wear safety goggles or safety glasses with negatives (-) as shown on the inside base of the laser. Replace the laser cover. Turn on the parts list are susceptible to remove dirt, dust, oil, grease, etc. Most plastics are intended to be repaired or replaced by their use only identical replacement parts. Use clean cloths to damage from various types of any other parts may result in...


