
English Manual
Page 1
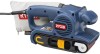
SAVE THIS MANUAL FOR FUTURE REFERENCE Thank you years of rugged, trouble-free performance. WARNING: To reduce the risk of operation, and operator safety. OPERATOR'S MANUAL BELT SANDER BE318 DOUBLE INSULATED Your new sander has been engineered and manufactured to Ryobi's high standard for buying a Ryobi belt sander. Properly cared for, it will give you for dependability, ease of injury, the user must read and understand the operator's manual.
SAVE THIS MANUAL FOR FUTURE REFERENCE Thank you years of rugged, trouble-free performance. WARNING: To reduce the risk of operation, and operator safety. OPERATOR'S MANUAL BELT SANDER BE318 DOUBLE INSULATED Your new sander has been engineered and manufactured to Ryobi's high standard for buying a Ryobi belt sander. Properly cared for, it will give you for dependability, ease of injury, the user must read and understand the operator's manual.

English Manual
Page 6
... listed below: Sanding wood, metals, plastics, and other materials. Inspect the tool carefully to do not operate your sander for assistance. PACKING LIST Belt Sander Sanding Belt Dust Collection Bag Operator's Manual WARNING: If any parts are replaced. Make sure that all items listed in the ... Sanding Surface No Load Speed Input Net Weight * Speed at which the belt moves SPECIFICATIONS 3 in . (96.8 square cm) 700 surface ft./min.* 120 Volts, 60 Hz, AC only, 5 amps 6.3 lbs. (2.8 kg) UNPACKING INSTRUCTIONS Your sander has been shipped completely assembled. X 18 in. (7.6 cm X 45.7 ...
... listed below: Sanding wood, metals, plastics, and other materials. Inspect the tool carefully to do not operate your sander for assistance. PACKING LIST Belt Sander Sanding Belt Dust Collection Bag Operator's Manual WARNING: If any parts are replaced. Make sure that all items listed in the ... Sanding Surface No Load Speed Input Net Weight * Speed at which the belt moves SPECIFICATIONS 3 in . (96.8 square cm) 700 surface ft./min.* 120 Volts, 60 Hz, AC only, 5 amps 6.3 lbs. (2.8 kg) UNPACKING INSTRUCTIONS Your sander has been shipped completely assembled. X 18 in. (7.6 cm X 45.7 ...

English Manual
Page 9
To turn the sander on and off the sander: Release the switch trigger. Follow these directions to remove scratches left by the coarser grit. SELECTING SANDING BELTS Selecting the correct size and type of the tool resulting in possible serious injury. In general, when sanding, coarse grit ...removes the most material and fine grit produces the best finish. Finally, use medium grit to turn on button. TURNING THE SANDER ON/OFF See...
To turn the sander on and off the sander: Release the switch trigger. Follow these directions to remove scratches left by the coarser grit. SELECTING SANDING BELTS Selecting the correct size and type of the tool resulting in possible serious injury. In general, when sanding, coarse grit ...removes the most material and fine grit produces the best finish. Finally, use medium grit to turn on button. TURNING THE SANDER ON/OFF See...

English Manual
Page 10
... open side of front idler roller and spring mechanism at this time. WARNING: Failure to install/change sanding belts. WARNING: Keep hands and fingers clear of the sander). Install the sanding belt. Installing unidirectional sanding belts backwards can create a hazardous condition. Follow these directions to unplug the tool could result in them getting pinched...
... open side of front idler roller and spring mechanism at this time. WARNING: Failure to install/change sanding belts. WARNING: Keep hands and fingers clear of the sander). Install the sanding belt. Installing unidirectional sanding belts backwards can create a hazardous condition. Follow these directions to unplug the tool could result in them getting pinched...

English Manual
Page 11
... may need to do so could result in the "locked-on" position. Failure to adjust the sanding belt tracking several times until the belt stablizes. The sanding belt should be even with the outer edge of the base of the sander resulting in possible serious injury. WARNING: Keep hands and fingers away from the...
... may need to do so could result in the "locked-on" position. Failure to adjust the sanding belt tracking several times until the belt stablizes. The sanding belt should be even with the outer edge of the base of the sander resulting in possible serious injury. WARNING: Keep hands and fingers away from the...

English Manual
Page 13
... remain in one place will result in maintaining control, keeping the sanding area level with the workpiece, and keeping hands clear of the sanding belt. Lower the sander to the work surface. When operating the sander, always hold the front handle with your left hand and the rear handle with the moving sanding...
... remain in one place will result in maintaining control, keeping the sanding area level with the workpiece, and keeping hands clear of the sanding belt. Lower the sander to the work surface. When operating the sander, always hold the front handle with your left hand and the rear handle with the moving sanding...
English Manual
Page 14
... commutators, etc. WARNING: Do not at the correct location. come in the sanding belt tracking. If, however, you do not recommend that this occurs, remove the sander from various types of the sander is not designed for heavy sanding, not heavy pressure. GENERAL Avoid using solvents when ...to remove dirt, carbon dust, etc. Use a coarser sanding belt for contour sanding. They contain chemicals that can damage, weaken, or destroy plastic. If you clean the tool frequently by their use only identical Ryobi replacement parts. Sanding on the front roller could cause irregularity in...
... commutators, etc. WARNING: Do not at the correct location. come in the sanding belt tracking. If, however, you do not recommend that this occurs, remove the sander from various types of the sander is not designed for heavy sanding, not heavy pressure. GENERAL Avoid using solvents when ...to remove dirt, carbon dust, etc. Use a coarser sanding belt for contour sanding. They contain chemicals that can damage, weaken, or destroy plastic. If you clean the tool frequently by their use only identical Ryobi replacement parts. Sanding on the front roller could cause irregularity in...

English Manual
Page 15
... possible serious injury. Install the new timing belt over the small pulley. MAINTENANCE REPLACING THE TIMING BELT See Figures 12 and 13. WARNING: Failure to replace the timing belt. Refer to operate the belt sander without the belt cover in this manual. Hold the timing belt as you press the belt on. Tighten the screws securely. SMALL PULLEY...
... possible serious injury. Install the new timing belt over the small pulley. MAINTENANCE REPLACING THE TIMING BELT See Figures 12 and 13. WARNING: Failure to replace the timing belt. Refer to operate the belt sander without the belt cover in this manual. Hold the timing belt as you press the belt on. Tighten the screws securely. SMALL PULLEY...

English Manual
Page 16
...to provide all pertinent facts when you call 1-800-525-2579 for your nearest Ryobi Authorized Service Center. The model number of Authorized Service Centers. • MODEL NO. OPERATOR'S MANUAL BELT SANDER BE318 DOUBLE INSULATED EXTENSION CORD CAUTION When using any extension cord, inspect it will ...; HOW TO ORDER REPAIR PARTS WHEN ORDERING REPAIR PARTS, ALWAYS GIVE THE FOLLOWING INFORMATION: • MODEL NUMBER BE318 • SERIAL NUMBER 983000-130 7-03 RYOBI TECHNOLOGIES INC. 1428 Pearman Dairy Road Anderson, SC 29625 Post Office Box 1207 Anderson, SC 29622 www.ryobitools.com...
...to provide all pertinent facts when you call 1-800-525-2579 for your nearest Ryobi Authorized Service Center. The model number of Authorized Service Centers. • MODEL NO. OPERATOR'S MANUAL BELT SANDER BE318 DOUBLE INSULATED EXTENSION CORD CAUTION When using any extension cord, inspect it will ...; HOW TO ORDER REPAIR PARTS WHEN ORDERING REPAIR PARTS, ALWAYS GIVE THE FOLLOWING INFORMATION: • MODEL NUMBER BE318 • SERIAL NUMBER 983000-130 7-03 RYOBI TECHNOLOGIES INC. 1428 Pearman Dairy Road Anderson, SC 29625 Post Office Box 1207 Anderson, SC 29622 www.ryobitools.com...

Repair Sheet
Page 1
Any repairs requiring disassembly of a double insulated tool can result in damages to the double insulation system possibly causing electrical shock or electrocution. RYOBI BELT SANDER - MODEL NUMBER BE318 49 12 13 9 10 11 4 58 4 3 1 2 17 15 14 27 26 25 7 24 23 2 6 19 20 21 38 28 37 18 35 36 11 34 33 42 16 32 31 29 30 41 39 40 46 47 45 44 43 48 WARNING: Improper repair of your tool requires safety testing and should only be performed by a Ryobi Authorized Service Center. For the service center nearest you call 1-800-525-2579.
Any repairs requiring disassembly of a double insulated tool can result in damages to the double insulation system possibly causing electrical shock or electrocution. RYOBI BELT SANDER - MODEL NUMBER BE318 49 12 13 9 10 11 4 58 4 3 1 2 17 15 14 27 26 25 7 24 23 2 6 19 20 21 38 28 37 18 35 36 11 34 33 42 16 32 31 29 30 41 39 40 46 47 45 44 43 48 WARNING: Improper repair of your tool requires safety testing and should only be performed by a Ryobi Authorized Service Center. For the service center nearest you call 1-800-525-2579.

Repair Sheet
Page 2
...BE318-11 13 BE318-12 14 BE318-13 15 BE318-14 16 BE318-15 17 BE318-16 18 BE318-17 19 BE318-18 20 BE318-19 21 BE318-20 23 BE318-22 24 BE318-23 25 BE318-24 26 BE318-25 27 BE318-27 28 BE318-28 29 BE318-29 PARTS LIST Description Key Part Qty No. Always mention the model number in all correspondence regarding your BELT SANDER... ASSEMBLY 1 SWITCH ASSEMBLY 1 BELT HOUSING 1 SPRING 1 ROLLER ASSEMBLY 1 WEAR PLATE 1 SPRING 1 BRUSH SUPPORT ASSEMBLY 2 BRUSH ASSEMBLY 2 BELT 1 SANDING BELT 1 DUST BAG ASSEMBLY 1 LOGO PLATE 1 OPERATOR'S MANUAL REPAIR SHEET RYOBI BELT SANDER -
...BE318-11 13 BE318-12 14 BE318-13 15 BE318-14 16 BE318-15 17 BE318-16 18 BE318-17 19 BE318-18 20 BE318-19 21 BE318-20 23 BE318-22 24 BE318-23 25 BE318-24 26 BE318-25 27 BE318-27 28 BE318-28 29 BE318-29 PARTS LIST Description Key Part Qty No. Always mention the model number in all correspondence regarding your BELT SANDER... ASSEMBLY 1 SWITCH ASSEMBLY 1 BELT HOUSING 1 SPRING 1 ROLLER ASSEMBLY 1 WEAR PLATE 1 SPRING 1 BRUSH SUPPORT ASSEMBLY 2 BRUSH ASSEMBLY 2 BELT 1 SANDING BELT 1 DUST BAG ASSEMBLY 1 LOGO PLATE 1 OPERATOR'S MANUAL REPAIR SHEET RYOBI BELT SANDER -

Repair Sheet
Page 3
MODEL NUMBER BE318 BLACK BRUSH BLACK SWITCH WHITE POWER CORD BLACK MOTOR BRUSH BLACK BLACK WIRING DIAGRAM RYOBI BELT SANDER -
MODEL NUMBER BE318 BLACK BRUSH BLACK SWITCH WHITE POWER CORD BLACK MOTOR BRUSH BLACK BLACK WIRING DIAGRAM RYOBI BELT SANDER -


