English Manual
Page 4
... NOT PLANE MATERIAL shorter than 3/4 in doubt as to make certain all holding screws are tight. STOP THE MACHINE and recheck the hex head bolts and blades for safe use of accessories that are no loose knots and as few tight knots as described in handling the blades and cutter...
... NOT PLANE MATERIAL shorter than 3/4 in doubt as to make certain all holding screws are tight. STOP THE MACHINE and recheck the hex head bolts and blades for safe use of accessories that are no loose knots and as few tight knots as described in handling the blades and cutter...
English Manual
Page 13
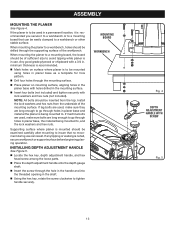
... in planer base as a template for hole pattern. Drill four holes through the supporting surface of the mounting surface. NOTE: All bolts should be easily clamped to , and the lock washers and hex nuts. INSTALLING DEPTH ADJUSTMENT HANDLE See Figure 5. Locate the hex .... Mark holes on mounting surface, aligning holes in the planer base with holes drilled in the mounting surface. Insert four bolts (not included) and tighten securely with a 3/4 in planer base and material the planer is noted, secure workbench or support surface before beginning ...
... in planer base as a template for hole pattern. Drill four holes through the supporting surface of the mounting surface. NOTE: All bolts should be easily clamped to , and the lock washers and hex nuts. INSTALLING DEPTH ADJUSTMENT HANDLE See Figure 5. Locate the hex .... Mark holes on mounting surface, aligning holes in the planer base with holes drilled in the mounting surface. Insert four bolts (not included) and tighten securely with a 3/4 in planer base and material the planer is noted, secure workbench or support surface before beginning ...
English Manual
Page 17
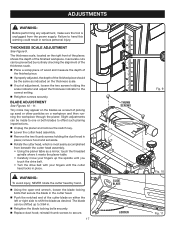
... the finished workpiece. Slight adjustments can be prevented by hand. Using the open-end wrench, loosen the blade locking bolts that secure the blade in . Retighten the blade locking bolts securely. Replace dust hood; ADJUSTMENTS WARNING: Before performing any adjustment, make sure the tool is most easily accomplished from...
... the finished workpiece. Slight adjustments can be prevented by hand. Using the open-end wrench, loosen the blade locking bolts that secure the blade in . Retighten the blade locking bolts securely. Replace dust hood; ADJUSTMENTS WARNING: Before performing any adjustment, make sure the tool is most easily accomplished from...
English Manual
Page 20
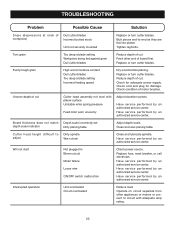
TROUBLESHOOTING Problem Possible Cause Solution Snipe (depressions at ends of motor brushes. Tighten lag bolts. Check condition of Dull cutter blades workpiece) Incorrect butted stock Unit not securely mounted Replace or turn cutter blades. Torn grain Too deep a blade setting ...
TROUBLESHOOTING Problem Possible Cause Solution Snipe (depressions at ends of motor brushes. Tighten lag bolts. Check condition of Dull cutter blades workpiece) Incorrect butted stock Unit not securely mounted Replace or turn cutter blades. Torn grain Too deep a blade setting ...


