
User Manual (English)
Page 1
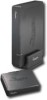
Universal Wireless Rear Speaker Kit RF-WHTIB User Guide
Universal Wireless Rear Speaker Kit RF-WHTIB User Guide

User Manual (English)
Page 2
... install, operate, and get the best performance from your universal wireless rear speaker kit. Your RF-WHTIB represents the state of the art in wireless speaker kit design, and is compatible with a complete range of a Rocketfish RF-WHTIB Universal Wireless Rear Speaker Kit. The system accepts speaker-level inputs, and is designed for quick reference. This manual explains how...
... install, operate, and get the best performance from your universal wireless rear speaker kit. Your RF-WHTIB represents the state of the art in wireless speaker kit design, and is compatible with a complete range of a Rocketfish RF-WHTIB Universal Wireless Rear Speaker Kit. The system accepts speaker-level inputs, and is designed for quick reference. This manual explains how...

User Manual (English)
Page 5
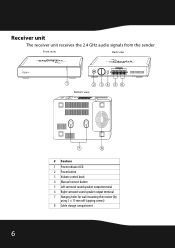
... the receiver. The box should contain: • A sender unit • A receiver unit • A holder for the receiver unit • An AC power adapter (for your RF-WHTIB Universal Wireless Rear Speaker Kit. Front view Back view 1 2 34 5 Bottom view 6 # Feature 1 Power indicator LED 2 Power button 3 Right...
... the receiver. The box should contain: • A sender unit • A receiver unit • A holder for the receiver unit • An AC power adapter (for your RF-WHTIB Universal Wireless Rear Speaker Kit. Front view Back view 1 2 34 5 Bottom view 6 # Feature 1 Power indicator LED 2 Power button 3 Right...
User Manual (English)
Page 6
Front view Back view 1 2 34 5 6 Bottom view 7 8 # Feature 1 Power indicator LED 2 Power button 3 Volume control knob 4 Manual connect button 5 Left surround sound speaker output terminal 6 Right surround sound speaker output terminal 7 Hanging holes for wall mounting the receiver (by using 3 × 15 mm self-tapping screws) 8 Cable storage compartment 6 Receiver unit The receiver unit receives the 2.4 GHz audio signals from the sender.
Front view Back view 1 2 34 5 6 Bottom view 7 8 # Feature 1 Power indicator LED 2 Power button 3 Volume control knob 4 Manual connect button 5 Left surround sound speaker output terminal 6 Right surround sound speaker output terminal 7 Hanging holes for wall mounting the receiver (by using 3 × 15 mm self-tapping screws) 8 Cable storage compartment 6 Receiver unit The receiver unit receives the 2.4 GHz audio signals from the sender.

User Manual (English)
Page 7
Setting up your universal wireless rear speaker kit Left speaker Center speaker Right speaker Right surround Receiver Left surround Amplifier Subwoofer Left surround Receiver Sender Right surround Note: If you need to mount the receiver, make sure that the left and right speaker cords are correctly connected to the speaker terminals of the receiver by checking the labels on the rear panel of the receiver. RF-WHTIB 7
Setting up your universal wireless rear speaker kit Left speaker Center speaker Right speaker Right surround Receiver Left surround Amplifier Subwoofer Left surround Receiver Sender Right surround Note: If you need to mount the receiver, make sure that the left and right speaker cords are correctly connected to the speaker terminals of the receiver by checking the labels on the rear panel of the receiver. RF-WHTIB 7

User Manual (English)
Page 8
... only. 8 Notes: Make sure the exposed tips of the amplifier the same way. Speaker wire colors may vary with different speaker systems. Make sure you connect your amplifier to the right speaker terminals of the sender by connecting the red wire to the Red (+) terminals, and the black wire to the amplifier... Surround speaker outputs Sender back panel Press and hold Release Caution: Turn off your amplifier while connecting the units. Connecting the sender Connecting the sender to the...
... only. 8 Notes: Make sure the exposed tips of the amplifier the same way. Speaker wire colors may vary with different speaker systems. Make sure you connect your amplifier to the right speaker terminals of the sender by connecting the red wire to the Red (+) terminals, and the black wire to the amplifier... Surround speaker outputs Sender back panel Press and hold Release Caution: Turn off your amplifier while connecting the units. Connecting the sender Connecting the sender to the...

User Manual (English)
Page 9
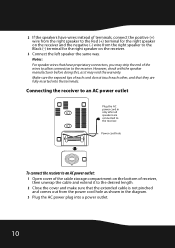
...the AC adapter supplied with your surround speakers Left surround speaker Right surround speaker To connect the surround speakers to the receiver: 1 Connect the right speaker to the right speaker terminals of the receiver, and the left speaker to the left speaker terminals. Connecting the receiver Connecting the ...receiver to your universal wireless rear speaker kit. Connecting the AC adapter To a wall power outlet. OR Sender back panel To the SWITCHED AC outlet of your amplifier. RF-WHTIB 9 Connecting the sender to the AC power adapter The AC...
...the AC adapter supplied with your surround speakers Left surround speaker Right surround speaker To connect the surround speakers to the receiver: 1 Connect the right speaker to the right speaker terminals of the receiver, and the left speaker to the left speaker terminals. Connecting the receiver Connecting the ...receiver to your universal wireless rear speaker kit. Connecting the AC adapter To a wall power outlet. OR Sender back panel To the SWITCHED AC outlet of your amplifier. RF-WHTIB 9 Connecting the sender to the AC power adapter The AC...
User Manual (English)
Page 10
... fully inserted into a power outlet. 10 Make sure the exposed tips of terminals, connect the positive (+) wire from the right speaker to the Red (+) terminal for the right speaker on the receiver and the negative (-) wire from the power cord hole as it may strip the end of receiver, then unwrap the... each cord do not touch each other, and that the extended cable is not pinched and comes out from the right speaker to the Black (-) terminal for the right speaker on the bottom of the wires to allow connection to an AC power outlet Plug the AC power cord in the diagram...
... fully inserted into a power outlet. 10 Make sure the exposed tips of terminals, connect the positive (+) wire from the right speaker to the Red (+) terminal for the right speaker on the receiver and the negative (-) wire from the power cord hole as it may strip the end of receiver, then unwrap the... each cord do not touch each other, and that the extended cable is not pinched and comes out from the right speaker to the Black (-) terminal for the right speaker on the bottom of the wires to allow connection to an AC power outlet Plug the AC power cord in the diagram...

User Manual (English)
Page 12
... manually using the CONNECT button. Make sure that the receiver is established between the sender and receiver To turn solid. Using your universal wireless rear speaker kit Establishing communications between them, the LED indicators turn on the System: 1 Press the (power) button on the back panel of the sender. When an...
... manually using the CONNECT button. Make sure that the receiver is established between the sender and receiver To turn solid. Using your universal wireless rear speaker kit Establishing communications between them, the LED indicators turn on the System: 1 Press the (power) button on the back panel of the sender. When an...

User Manual (English)
Page 13
After the volume of the receiver is set up , always adjust the volume using the volume control knob, to the rear speakers by 15-20 ms. RF-WHTIB 13 The LED indicator will blink quickly first and then go off to indicate that the sender is turned off. The LED indicator ...for two seconds. To turn on the amplifier and adjust it to the receiver. Optimizing your surround sound The RocketFish Universal Wireless Rear Speaker Kit uses state-of the volume between the various speakers in use. The volume control on when not in your surround system. Wireless links create a small latency ...
After the volume of the receiver is set up , always adjust the volume using the volume control knob, to the rear speakers by 15-20 ms. RF-WHTIB 13 The LED indicator will blink quickly first and then go off to indicate that the sender is turned off. The LED indicator ...for two seconds. To turn on the amplifier and adjust it to the receiver. Optimizing your surround sound The RocketFish Universal Wireless Rear Speaker Kit uses state-of the volume between the various speakers in use. The volume control on when not in your surround system. Wireless links create a small latency ...

User Manual (English)
Page 14
... into the "connection mode" for about 30 seconds. If they are any obvious radio frequency interference sources near your universal wireless rear speaker kit. Problem Solution No sound • Make sure that the AC adapter is connected to the sender and the power cord is ...Troubleshooting Please read this period the CONNECT button on the other unit must also be pressed for the receiver. • Make sure that all speaker wires and the amplifier operation should light. No communication between the units. While in "connection mode," the LED indicators blink at a faster ...
... into the "connection mode" for about 30 seconds. If they are any obvious radio frequency interference sources near your universal wireless rear speaker kit. Problem Solution No sound • Make sure that the AC adapter is connected to the sender and the power cord is ...Troubleshooting Please read this period the CONNECT button on the other unit must also be pressed for the receiver. • Make sure that all speaker wires and the amplifier operation should light. No communication between the units. While in "connection mode," the LED indicators blink at a faster ...

User Manual (English)
Page 15
... to 16 ohm speakers • Audio output power: 2 × 25 W (RMS) into 4 ohms (no more than 10% THD) • 15-20 ms • AC 120 V ~ 60 Hz • 15 W Legal notices FCC Part 15 This device complies with Part 15 of the FCC Rules. RF-WHTIB 15 Specifications Sender ...Audio Input: Stereo, speaker-level Audio Output: Wireless Supply voltage Transmission Delay • Maximum audio input signal: 10 V RMS into 220 ohms • Stereo, 16...
... to 16 ohm speakers • Audio output power: 2 × 25 W (RMS) into 4 ohms (no more than 10% THD) • 15-20 ms • AC 120 V ~ 60 Hz • 15 W Legal notices FCC Part 15 This device complies with Part 15 of the FCC Rules. RF-WHTIB 15 Specifications Sender ...Audio Input: Stereo, speaker-level Audio Output: Wireless Supply voltage Transmission Delay • Maximum audio input signal: 10 V RMS into 220 ohms • Stereo, 16...
