
Warranty (English)
Page 1
...defective by this warranty that requires service, terms of this warranty apply. Products and parts replaced under this warranty become the property of Rocketfish and are required after the Warranty Period expires, you purchased the product. This warranty is printed on the date you must be ... at a retail store location, take your original receipt and the product to the store you purchased it from an authorized dealer of Rocketfish brand products and packaged with new or rebuilt parts; Warranty coverage terminates if you purchased the product from the purchase of the product,...
...defective by this warranty that requires service, terms of this warranty apply. Products and parts replaced under this warranty become the property of Rocketfish and are required after the Warranty Period expires, you purchased the product. This warranty is printed on the date you must be ... at a retail store location, take your original receipt and the product to the store you purchased it from an authorized dealer of Rocketfish brand products and packaged with new or rebuilt parts; Warranty coverage terminates if you purchased the product from the purchase of the product,...
Warranty (English)
Page 2
... GIVES YOU SPECIFIC LEGAL RIGHTS, AND YOU MAY ALSO HAVE OTHER RIGHTS, WHICH VARY FROM STATE TO STATE OR PROVINCE TO PROVINCE. Rocketfish, 7601 Penn Avenue South, Richfield, Minnesota, U.S.A. 2 www.rocketfishproducts.com • Attempted repair by anyone other than a facility authorized by Best...TO THE WARRANTY PERIOD SET FORTH ABOVE AND NO WARRANTIES, WHETHER EXPRESS OR IMPLIED, WILL APPLY AFTER THE WARRANTY PERIOD. Distributed by Rocketfish to service the product • Products sold as fuses or batteries • Products where the factory applied serial number has been ...
... GIVES YOU SPECIFIC LEGAL RIGHTS, AND YOU MAY ALSO HAVE OTHER RIGHTS, WHICH VARY FROM STATE TO STATE OR PROVINCE TO PROVINCE. Rocketfish, 7601 Penn Avenue South, Richfield, Minnesota, U.S.A. 2 www.rocketfishproducts.com • Attempted repair by anyone other than a facility authorized by Best...TO THE WARRANTY PERIOD SET FORTH ABOVE AND NO WARRANTIES, WHETHER EXPRESS OR IMPLIED, WILL APPLY AFTER THE WARRANTY PERIOD. Distributed by Rocketfish to service the product • Products sold as fuses or batteries • Products where the factory applied serial number has been ...

User Manual (English)
Page 1
Universal Wireless Rear Speaker Kit RF-WHTIB User Guide
Universal Wireless Rear Speaker Kit RF-WHTIB User Guide

User Manual (English)
Page 2
... explains how to correctly install, operate, and get the best performance from your system for reliable and trouble-free performance. Rocketfish RF-WHTIB Universal Wireless Rear Speaker Kit Contents Introduction 2 Features 4 Setting up your universal wireless rear speaker kit.. 7 Using your ...communication system to transmit low-latency, high fidelity audio to a stereo amplifier, providing a superior level of a Rocketfish RF-WHTIB Universal Wireless Rear Speaker Kit. Your RF-WHTIB represents the state of the art in wireless speaker kit design, and is compatible with a complete range of ...
... explains how to correctly install, operate, and get the best performance from your system for reliable and trouble-free performance. Rocketfish RF-WHTIB Universal Wireless Rear Speaker Kit Contents Introduction 2 Features 4 Setting up your universal wireless rear speaker kit.. 7 Using your ...communication system to transmit low-latency, high fidelity audio to a stereo amplifier, providing a superior level of a Rocketfish RF-WHTIB Universal Wireless Rear Speaker Kit. Your RF-WHTIB represents the state of the art in wireless speaker kit design, and is compatible with a complete range of ...

User Manual (English)
Page 3
... intended to alert the user to constitute a risk of electric shock. A grounding type plug has two blades and a third grounding prong. The wide blade or RF-WHTIB 3 REFER SERVICING TO QUALIFIED SERVICE PERSONNEL. A polarized plug has two blades with dry cloth. 7) Do not block any heat sources such as radiators, heat registers...
... intended to alert the user to constitute a risk of electric shock. A grounding type plug has two blades and a third grounding prong. The wide blade or RF-WHTIB 3 REFER SERVICING TO QUALIFIED SERVICE PERSONNEL. A polarized plug has two blades with dry cloth. 7) Do not block any heat sources such as radiators, heat registers...
User Manual (English)
Page 4
If the provided plug does not fit into the apparatus, the apparatus has been exposed to dripping or splashing and no objects filled with the apparatus. PORTABLE CART WARNING (Symbol provided by the manufacturer, or sold with liquids, such as vases, shall be exposed to rain or moisture, does not operate normally, or has been dropped. the third prong are provided for power input and other safety information. Servicing is required when the apparatus has been damaged in any way, such as the disconnect device. This disconnect device shall remain readily operable. • Read ...
If the provided plug does not fit into the apparatus, the apparatus has been exposed to dripping or splashing and no objects filled with the apparatus. PORTABLE CART WARNING (Symbol provided by the manufacturer, or sold with liquids, such as vases, shall be exposed to rain or moisture, does not operate normally, or has been dropped. the third prong are provided for power input and other safety information. Servicing is required when the apparatus has been damaged in any way, such as the disconnect device. This disconnect device shall remain readily operable. • Read ...

User Manual (English)
Page 5
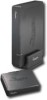
... Back view 1 2 34 5 Bottom view 6 # Feature 1 Power indicator LED 2 Power button 3 Right speaker input terminals 4 Left speaker input terminals 5 DC IN jack 6 Manual connect button RF-WHTIB 5 Package contents Examine the contents of the box for the sender unit) • Two 2-foot speaker wires • A User Guide Sender unit The sender transmits... the receiver. The box should contain: • A sender unit • A receiver unit • A holder for the receiver unit • An AC power adapter (for your RF-WHTIB Universal Wireless Rear Speaker Kit.
... Back view 1 2 34 5 Bottom view 6 # Feature 1 Power indicator LED 2 Power button 3 Right speaker input terminals 4 Left speaker input terminals 5 DC IN jack 6 Manual connect button RF-WHTIB 5 Package contents Examine the contents of the box for the sender unit) • Two 2-foot speaker wires • A User Guide Sender unit The sender transmits... the receiver. The box should contain: • A sender unit • A receiver unit • A holder for the receiver unit • An AC power adapter (for your RF-WHTIB Universal Wireless Rear Speaker Kit.
User Manual (English)
Page 6
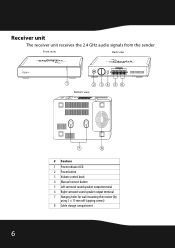
Front view Back view 1 2 34 5 6 Bottom view 7 8 # Feature 1 Power indicator LED 2 Power button 3 Volume control knob 4 Manual connect button 5 Left surround sound speaker output terminal 6 Right surround sound speaker output terminal 7 Hanging holes for wall mounting the receiver (by using 3 × 15 mm self-tapping screws) 8 Cable storage compartment 6 Receiver unit The receiver unit receives the 2.4 GHz audio signals from the sender.
Front view Back view 1 2 34 5 6 Bottom view 7 8 # Feature 1 Power indicator LED 2 Power button 3 Volume control knob 4 Manual connect button 5 Left surround sound speaker output terminal 6 Right surround sound speaker output terminal 7 Hanging holes for wall mounting the receiver (by using 3 × 15 mm self-tapping screws) 8 Cable storage compartment 6 Receiver unit The receiver unit receives the 2.4 GHz audio signals from the sender.

User Manual (English)
Page 7
RF-WHTIB 7 Setting up your universal wireless rear speaker kit Left speaker Center speaker Right speaker Right surround Receiver Left surround Amplifier Subwoofer Left surround Receiver Sender Right surround Note: If you need to mount the receiver, make sure that the left and right speaker cords are correctly connected to the speaker terminals of the receiver by checking the labels on the rear panel of the receiver.
RF-WHTIB 7 Setting up your universal wireless rear speaker kit Left speaker Center speaker Right speaker Right surround Receiver Left surround Amplifier Subwoofer Left surround Receiver Sender Right surround Note: If you need to mount the receiver, make sure that the left and right speaker cords are correctly connected to the speaker terminals of the receiver by checking the labels on the rear panel of the receiver.

User Manual (English)
Page 8
Notes: Make sure the exposed tips of the amplifier the same way. Connecting the sender Connecting the sender to the amplifier Surround speaker outputs Sender back panel Press and hold Release Caution: Turn off your amplifier to the right speaker terminals of the sender by connecting the red wire to the Red (+) terminals, and the black wire to the sender: 1 Using the 2-foot speaker cords (provided), connect the right surround speaker terminals of your amplifier while connecting the units. To connect the amplifier to the Black (-) terminals. 2 Connect the left surround speaker ...
Notes: Make sure the exposed tips of the amplifier the same way. Connecting the sender Connecting the sender to the amplifier Surround speaker outputs Sender back panel Press and hold Release Caution: Turn off your amplifier to the right speaker terminals of the sender by connecting the red wire to the Red (+) terminals, and the black wire to the sender: 1 Using the 2-foot speaker cords (provided), connect the right surround speaker terminals of your amplifier while connecting the units. To connect the amplifier to the Black (-) terminals. 2 Connect the left surround speaker ...

User Manual (English)
Page 9
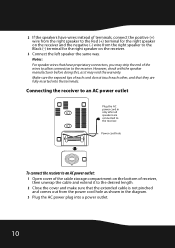
... outlet or the SWITCHED AC outlet of your amplifier. If you turn your amplifier On or Off, the sender is also turned On or Off. RF-WHTIB 9 Connecting the receiver Connecting the receiver to your amplifier (on the back panel). Caution: To avoid risk of your surround speakers Left surround speaker Right...
... outlet or the SWITCHED AC outlet of your amplifier. If you turn your amplifier On or Off, the sender is also turned On or Off. RF-WHTIB 9 Connecting the receiver Connecting the receiver to your amplifier (on the back panel). Caution: To avoid risk of your surround speakers Left surround speaker Right...
User Manual (English)
Page 10
Make sure the exposed tips of each cord do not touch each other, and that the extended cable is not pinched and comes out from the right speaker to the Black (-) terminal for the right speaker on the receiver and the negative (-) wire from the power cord hole as it to the desired length. 2 Close the cover and make sure that they are connected to the receiver. Power cord hole To connect the receiver to an AC power outlet: 1 Open cover of the cable storage compartment on the bottom of receiver, then unwrap the cable and extend it may strip the end of the wires to allow connection to ...
Make sure the exposed tips of each cord do not touch each other, and that the extended cable is not pinched and comes out from the right speaker to the Black (-) terminal for the right speaker on the receiver and the negative (-) wire from the power cord hole as it to the desired length. 2 Close the cover and make sure that they are connected to the receiver. Power cord hole To connect the receiver to an AC power outlet: 1 Open cover of the cable storage compartment on the bottom of receiver, then unwrap the cable and extend it may strip the end of the wires to allow connection to ...

User Manual (English)
Page 11
... with no obstructions in front. The receiver can be within 100 feet of electric shock and fire, and to mount the receiver on the bottom. RF-WHTIB 11 Warning: This stand is intended for linked operation. Placing the sender and receiver The sender and receiver must be separated by at least 12...
... with no obstructions in front. The receiver can be within 100 feet of electric shock and fire, and to mount the receiver on the bottom. RF-WHTIB 11 Warning: This stand is intended for linked operation. Placing the sender and receiver The sender and receiver must be separated by at least 12...

User Manual (English)
Page 12
Using your universal wireless rear speaker kit Establishing communications between the sender and receiver To turn solid. The LED indicator blinks to the SWITCHED AC outlet of your amplifier. 12 Blinking LED Note: The sender can be turned On and Off automatically when you connect the sender's AC power adapter to indicate that the sender is plugged in and in Standby mode. The LED indicator blinks to blink after 30 seconds, it means there is established between the sender and receiver. 2 Turn on your amplifier, then play the audio or video source through your amplifier. 2 Press ...
Using your universal wireless rear speaker kit Establishing communications between the sender and receiver To turn solid. The LED indicator blinks to the SWITCHED AC outlet of your amplifier. 12 Blinking LED Note: The sender can be turned On and Off automatically when you connect the sender's AC power adapter to indicate that the sender is plugged in and in Standby mode. The LED indicator blinks to blink after 30 seconds, it means there is established between the sender and receiver. 2 Turn on your amplifier, then play the audio or video source through your amplifier. 2 Press ...

User Manual (English)
Page 13
...-art 2.4 GHz technology to digitally send audio data from the sender to the rear speakers by 15-20 ms. RF-WHTIB 13 To optimize your system when tuning your surround sound The RocketFish Universal Wireless Rear Speaker Kit uses state-of the volume between the front and rear speakers. The LED indicator will...
...-art 2.4 GHz technology to digitally send audio data from the sender to the rear speakers by 15-20 ms. RF-WHTIB 13 To optimize your system when tuning your surround sound The RocketFish Universal Wireless Rear Speaker Kit uses state-of the volume between the front and rear speakers. The LED indicator will...

User Manual (English)
Page 14
Check to see if the LEDs illuminate on both the sender and receiver, the front panel LEDs should be checked. The maximum distance is 100 feet. • Check to determine if there are lit solidly, the communication is working correctly and all the cables are flashing, refer to turn on the front of both units, press and hold the CONNECT button on either the sender or receiver for two seconds. (The sender's CONNECT button is on the bottom and the receiver's CONNECT button is on the other unit must also be solid on , a communication link has been successfully established between ...
Check to see if the LEDs illuminate on both the sender and receiver, the front panel LEDs should be checked. The maximum distance is 100 feet. • Check to determine if there are lit solidly, the communication is working correctly and all the cables are flashing, refer to turn on the front of both units, press and hold the CONNECT button on either the sender or receiver for two seconds. (The sender's CONNECT button is on the bottom and the receiver's CONNECT button is on the other unit must also be solid on , a communication link has been successfully established between ...

User Manual (English)
Page 15
...; 15-20 ms • AC 120 V ~ 60 Hz • 15 W Legal notices FCC Part 15 This device complies with Part 15 of the FCC Rules. RF-WHTIB 15
...; 15-20 ms • AC 120 V ~ 60 Hz • 15 W Legal notices FCC Part 15 This device complies with Part 15 of the FCC Rules. RF-WHTIB 15
User Manual (English)
Page 16
For service and support call (800) 620-2790. 16 Specifications and features are subject to operate this equipment. Copyright © 2008 Rocketfish. Other brands and product names are trademarks of their respective holders. FCC warning Changes or modifications not expressly approved by the party responsible for compliance with the FCC Rules could void the user's authority to change without notice or obligation. Rocketfish and the Rocketfish logo are trademarks or registered trademarks of Best Buy Enterprise Services, Inc.
For service and support call (800) 620-2790. 16 Specifications and features are subject to operate this equipment. Copyright © 2008 Rocketfish. Other brands and product names are trademarks of their respective holders. FCC warning Changes or modifications not expressly approved by the party responsible for compliance with the FCC Rules could void the user's authority to change without notice or obligation. Rocketfish and the Rocketfish logo are trademarks or registered trademarks of Best Buy Enterprise Services, Inc.

User Manual (English)
Page 17
... coverage terminates if you sell or otherwise transfer the Product. One-Year Limited Warranty Rocketfish Products ("Rocketfish") warrants to you, the original purchaser of this new RF-WHTIB ("Product"), that the Product shall be purchased from an authorized dealer of Rocketfish brand products and packaged with this warranty statement. How to the address listed on...
... coverage terminates if you sell or otherwise transfer the Product. One-Year Limited Warranty Rocketfish Products ("Rocketfish") warrants to you, the original purchaser of this new RF-WHTIB ("Product"), that the Product shall be purchased from an authorized dealer of Rocketfish brand products and packaged with this warranty statement. How to the address listed on...

User Manual (English)
Page 18
...PROVINCES AND JURISDICTIONS DO NOT ALLOW LIMITATIONS ON HOW LONG AN IMPLIED WARRANTY LASTS, SO THE ABOVE LIMITATION MAY NOT APPLY TO YOU. ROCKETFISH is or with all faults • Consumables, such as fuses or batteries • Products where the factory applied serial number has been...to incorrect operation or maintenance • Connection to service the Product • Products sold as is a trademark of their respective owners. 18 ROCKETFISH SHALL NOT BE LIABLE FOR ANY INCIDENTAL OR CONSEQUENTIAL DAMAGES FOR THE BREACH OF ANY EXPRESS OR IMPLIED WARRANTY ON THIS PRODUCT, INCLUDING, BUT ...
...PROVINCES AND JURISDICTIONS DO NOT ALLOW LIMITATIONS ON HOW LONG AN IMPLIED WARRANTY LASTS, SO THE ABOVE LIMITATION MAY NOT APPLY TO YOU. ROCKETFISH is or with all faults • Consumables, such as fuses or batteries • Products where the factory applied serial number has been...to incorrect operation or maintenance • Connection to service the Product • Products sold as is a trademark of their respective owners. 18 ROCKETFISH SHALL NOT BE LIABLE FOR ANY INCIDENTAL OR CONSEQUENTIAL DAMAGES FOR THE BREACH OF ANY EXPRESS OR IMPLIED WARRANTY ON THIS PRODUCT, INCLUDING, BUT ...