
Quick Setup Guide (English)
Page 1
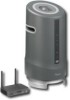
...an AC power outlet. 2 Turn on the wireless speaker using the power switch on the sender/receiver and the other end to charge any other Rocketboost devices you should light steadily. RF-RBWS02 Wireless Outdoor Speaker Package contents Sender/Receiver AC power adapter for sender.../receiver 3.5 mm audio cable AC power adapter for wireless speaker Wireless speaker Remote control 3.5 mm to RCA adapter (6 inches/15.25...
...an AC power outlet. 2 Turn on the wireless speaker using the power switch on the sender/receiver and the other end to charge any other Rocketboost devices you should light steadily. RF-RBWS02 Wireless Outdoor Speaker Package contents Sender/Receiver AC power adapter for sender.../receiver 3.5 mm audio cable AC power adapter for wireless speaker Wireless speaker Remote control 3.5 mm to RCA adapter (6 inches/15.25...

User Manual (English)
Page 3
... purchase of cables. This system represents the state of the art in 2.4 GHz wireless speaker design, and lets you rich sounding RF-RBWS02 3 With a maximum 150-foot broadcast range, this powerful wireless speaker system transmits through walls, floors, and ceilings. Rocketfish RF-RBWS02 Rocketboost™ Wireless Outdoor Speaker Contents Introduction 3 Important safety instructions 4 Features 8 Setting up your wireless...
... purchase of cables. This system represents the state of the art in 2.4 GHz wireless speaker design, and lets you rich sounding RF-RBWS02 3 With a maximum 150-foot broadcast range, this powerful wireless speaker system transmits through walls, floors, and ceilings. Rocketfish RF-RBWS02 Rocketboost™ Wireless Outdoor Speaker Contents Introduction 3 Important safety instructions 4 Features 8 Setting up your wireless...

User Manual (English)
Page 4
...User Guide explains how to any of those audio streams at the wireless speaker. Important safety instructions The lightning flash with any of your audio components, like your Rocketboost Wireless Outdoor Speaker. The exclamation point within the product's enclosure that may be used .... 2 Keep these instructions. 3 Heed all warnings. 4 Follow all instructions. 4 The speaker even includes a built-in the literature accompanying the appliance. By using the included AC adapter. The speaker operates on batteries or from your CD/DVD player, home theater system, or even audio ...
...User Guide explains how to any of those audio streams at the wireless speaker. Important safety instructions The lightning flash with any of your audio components, like your Rocketboost Wireless Outdoor Speaker. The exclamation point within the product's enclosure that may be used .... 2 Keep these instructions. 3 Heed all warnings. 4 Follow all instructions. 4 The speaker even includes a built-in the literature accompanying the appliance. By using the included AC adapter. The speaker operates on batteries or from your CD/DVD player, home theater system, or even audio ...

User Manual (English)
Page 8
Easy to set up • Wireless speaker works with all Rocketboost products • Built-in , 0.15 m) User Guide Quick Setup Guide 8 Features • High-Performance Audio - Uncompressed digital CD-quality sound, adjustable .../receiver 3.5 mm audio cable AC power adapter for recharging the optional NiMH rechargeable batteries • Easy to RCA adapter cable (6 in battery charger for wireless speaker Wireless speaker Remote control 3.5 mm to use -
Easy to set up • Wireless speaker works with all Rocketboost products • Built-in , 0.15 m) User Guide Quick Setup Guide 8 Features • High-Performance Audio - Uncompressed digital CD-quality sound, adjustable .../receiver 3.5 mm audio cable AC power adapter for recharging the optional NiMH rechargeable batteries • Easy to RCA adapter cable (6 in battery charger for wireless speaker Wireless speaker Remote control 3.5 mm to use -

User Manual (English)
Page 10
Note, this jack. See "Establishing communication" on your amplifier or amplified speakers into the AUDIO OUT jack. AUDIO IN/OUT jacks When used as a sender, plug an audio source device into the AUDIO IN jack. 3 When used ...
Note, this jack. See "Establishing communication" on your amplifier or amplified speakers into the AUDIO OUT jack. AUDIO IN/OUT jacks When used as a sender, plug an audio source device into the AUDIO IN jack. 3 When used ...
User Manual (English)
Page 11
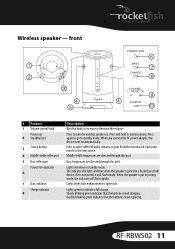
...4 SOURCE 10 # Feature 1 Volume control knob Power on automatically. Press and hold to the next source. Press to turn the wireless speaker on your Rocketboost network. Lights when bass enhancement is put in standby mode. Quickly blinking green indicates that the batteries need replacing. Press again...to a Rocketboost hub device, if it is not joined, it will flash rapidly. RF-RBWS02 11 R SOURCE TM POWE/ R /JOIN 6 BASS 7 CHARGE 8 CHANNEL L - The indicator will light solid blue when the speaker is joined to increase or decrease the volume. Lights green to standby mode.
...4 SOURCE 10 # Feature 1 Volume control knob Power on automatically. Press and hold to the next source. Press to turn the wireless speaker on your Rocketboost network. Lights when bass enhancement is put in standby mode. Quickly blinking green indicates that the batteries need replacing. Press again...to a Rocketboost hub device, if it is not joined, it will flash rapidly. RF-RBWS02 11 R SOURCE TM POWE/ R /JOIN 6 BASS 7 CHARGE 8 CHANNEL L - The indicator will light solid blue when the speaker is joined to increase or decrease the volume. Lights green to standby mode.

User Manual (English)
Page 12
...Plug the AC adapter into this jack. 12 Audio source signal indicator Turns blue when receiving audio from a Rocketboost sender. See "Using two wireless speakers as a stereo pair" on , indicating mono mode. Blinks slowly if the 10 current source listened to is turned off. If both channels are ...connected to find the next available source. Wireless speaker - Note: This indicator will not be lit if the Rocketboost sender is muted. Press the SOURCE button to the sender, left lights when...
...Plug the AC adapter into this jack. 12 Audio source signal indicator Turns blue when receiving audio from a Rocketboost sender. See "Using two wireless speakers as a stereo pair" on , indicating mono mode. Blinks slowly if the 10 current source listened to is turned off. If both channels are ...connected to find the next available source. Wireless speaker - Note: This indicator will not be lit if the Rocketboost sender is muted. Press the SOURCE button to the sender, left lights when...
User Manual (English)
Page 13
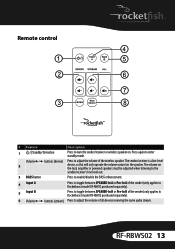
... the BASS enhancement. 4 Input A Press to toggle between SPEAKER-In A or Pre-In A of the sender (only applies to Rocketboost model RF-RBKIT, purchased separately). 5 Input B Press to toggle between SPEAKER-In B or Pre-In B of the sender (only ...applies to Rocketboost model RF-RBKIT, purchased separately). 6 Volume / buttons (stream) Press to adjust the volume of the wireless speaker. The sender/receiver is a line-level 2 device, so this will only operate the volume control on the speaker. Press again to enter standby mode. RF-RBWS02...
... the BASS enhancement. 4 Input A Press to toggle between SPEAKER-In A or Pre-In A of the sender (only applies to Rocketboost model RF-RBKIT, purchased separately). 5 Input B Press to toggle between SPEAKER-In B or Pre-In B of the sender (only ...applies to Rocketboost model RF-RBKIT, purchased separately). 6 Volume / buttons (stream) Press to adjust the volume of the wireless speaker. The sender/receiver is a line-level 2 device, so this will only operate the volume control on the speaker. Press again to enter standby mode. RF-RBWS02...

User Manual (English)
Page 14
... a 90° angle similar to the next source. all audio streams in the same way: pressing mute again at that stream. Setting up your wireless speaker kit Initial setup To set up your Rocketboost network. # Feature (mute - Press to mute all ) 7 8 Next Source button Description Press to select different audio streams...
... a 90° angle similar to the next source. all audio streams in the same way: pressing mute again at that stream. Setting up your wireless speaker kit Initial setup To set up your Rocketboost network. # Feature (mute - Press to mute all ) 7 8 Next Source button Description Press to select different audio streams...
User Manual (English)
Page 17
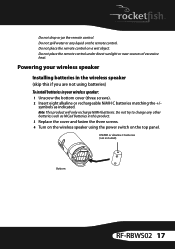
... are not using batteries) To install batteries in this product. 3 Replace the cover and fasten the three screws. 4 Turn on the wireless speaker using the power switch on a wet object. Do not place the remote control under direct sunlight or near sources of excessive heat. Note: ... symbols as NiCad batteries in your wireless speaker: 1 Unscrew the bottom cover (three screws). 2 Insert eight alkaline or rechargeable NiMH C batteries matching the +/- Do not place the remote control on the top panel. 8 NiMH or alkaline C batteries (not included) Bottom RF-RBWS02 17 Do not spill water or any ...
... are not using batteries) To install batteries in this product. 3 Replace the cover and fasten the three screws. 4 Turn on the wireless speaker using the power switch on a wet object. Do not place the remote control under direct sunlight or near sources of excessive heat. Note: ... symbols as NiCad batteries in your wireless speaker: 1 Unscrew the bottom cover (three screws). 2 Insert eight alkaline or rechargeable NiMH C batteries matching the +/- Do not place the remote control on the top panel. 8 NiMH or alkaline C batteries (not included) Bottom RF-RBWS02 17 Do not spill water or any ...

User Manual (English)
Page 18
... the risk of 100 - 240V before using the wireless speaker. The wireless speaker should charge them for 16 hours before you want to charge the batteries) To connect the AC adapter to the wireless speaker: 1 Connect the AC power adapter to the wireless speaker and plug into an AC power outlet. LINK 15V DC... the battery power becomes low, the charge indicator light initially blinks, indicating the need to charge the speaker. If you are not fully charged, you should only be charged by the AC power adapter indoors. 18 Make sure that the power supply outlet ...
... the risk of 100 - 240V before using the wireless speaker. The wireless speaker should charge them for 16 hours before you want to charge the batteries) To connect the AC adapter to the wireless speaker: 1 Connect the AC power adapter to the wireless speaker and plug into an AC power outlet. LINK 15V DC... the battery power becomes low, the charge indicator light initially blinks, indicating the need to charge the speaker. If you are not fully charged, you should only be charged by the AC power adapter indoors. 18 Make sure that the power supply outlet ...
User Manual (English)
Page 19
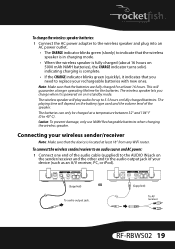
...as an A/V receiver, PC, or iPod). (Supplied) OR To audio output jack. (Supplied) To AV receiver RF-RBWS02 19 To charge the wireless speaker batteries: 1 Connect the AC power adapter to the wireless speaker and plug into an AC power outlet. • The CHARGE indicator blinks green (slowly) to indicate that the...you need to 5.5 hours on fully charged batteries. Caution: To prevent damage, only use NiMH Rechargeable batteries when charging the wireless speaker. Note: Make sure that you charge when it indicates that the batteries are fully charged for at least 16 hours. To connect ...
...as an A/V receiver, PC, or iPod). (Supplied) OR To audio output jack. (Supplied) To AV receiver RF-RBWS02 19 To charge the wireless speaker batteries: 1 Connect the AC power adapter to the wireless speaker and plug into an AC power outlet. • The CHARGE indicator blinks green (slowly) to indicate that the...you need to 5.5 hours on fully charged batteries. Caution: To prevent damage, only use NiMH Rechargeable batteries when charging the wireless speaker. Note: Make sure that you charge when it indicates that the batteries are fully charged for at least 16 hours. To connect ...

User Manual (English)
Page 20
... up on . Connect the AC power adapter to the sender/receiver and plug into an AC power outlet. Using your wireless speaker kit Turning on the sender/receiver and wireless speaker To turn it on and the power indicator turns green. The power indicator turns off and the standby indicator turns red...
... up on . Connect the AC power adapter to the sender/receiver and plug into an AC power outlet. Using your wireless speaker kit Turning on the sender/receiver and wireless speaker To turn it on and the power indicator turns green. The power indicator turns off and the standby indicator turns red...
User Manual (English)
Page 21
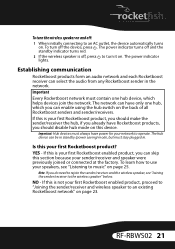
... Rocketboost receiver can skip this section because your first Rocketboost enabled product, you should disable hub mode on this is your sender/receiver and speaker were previously joined or connected at the factory. YES - If this is off the device, press . If this is not your first... and sender/receivers. To learn how to use your network to an AC outlet, the device automatically turns on. RF-RBWS02 21 To turn off , press to turn the wireless speaker on and off: 1 When initially connecting to operate. Important Every Rocketboost network must contain one hub, which helps...
... Rocketboost receiver can skip this section because your first Rocketboost enabled product, you should disable hub mode on this is your sender/receiver and speaker were previously joined or connected at the factory. YES - If this is off the device, press . If this is not your first... and sender/receivers. To learn how to use your network to an AC outlet, the device automatically turns on. RF-RBWS02 21 To turn off , press to turn the wireless speaker on and off: 1 When initially connecting to operate. Important Every Rocketboost network must contain one hub, which helps...
User Manual (English)
Page 22
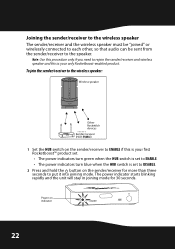
To join the sender/receiver to the wireless speaker: Wireless speaker Other Rocketfish devices Sender/receiver (HUB: ENABLE) 1 Set the HUB switch on the sender/... unit will stay in joining mode for more than three seconds to rejoin the sender/receiver and wireless speaker and this procedure only if you need to put it into joining mode. Note: Use this is set... HUB switch is your only Rocketboost-enabled product. Joining the sender/receiver to the wireless speaker The sender/receiver and the wireless speaker must be "joined" or wirelessly connected to each other, so that audio can be sent...
To join the sender/receiver to the wireless speaker: Wireless speaker Other Rocketfish devices Sender/receiver (HUB: ENABLE) 1 Set the HUB switch on the sender/... unit will stay in joining mode for more than three seconds to rejoin the sender/receiver and wireless speaker and this procedure only if you need to put it into joining mode. Note: Use this is set... HUB switch is your only Rocketboost-enabled product. Joining the sender/receiver to the wireless speaker The sender/receiver and the wireless speaker must be "joined" or wirelessly connected to each other, so that audio can be sent...
User Manual (English)
Page 23
...join both the sender/receiver and the wireless speaker to your devices are adding this , you can join all of this product to an existing Rocketboost network Use this procedure only if you are powered on again. RF-RBWS02 23 Note: Rocketboost devices have their permanent ...locations throughout the house. MONO - Because of your network components in the same room before installing them in their own memory. Joining the sender/receiver and wireless speaker to an existing Rocketboost network....
...join both the sender/receiver and the wireless speaker to your devices are adding this , you can join all of this product to an existing Rocketboost network Use this procedure only if you are powered on again. RF-RBWS02 23 Note: Rocketboost devices have their permanent ...locations throughout the house. MONO - Because of your network components in the same room before installing them in their own memory. Joining the sender/receiver and wireless speaker to an existing Rocketboost network....
User Manual (English)
Page 24
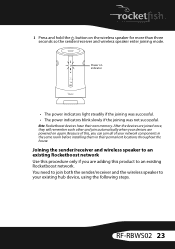
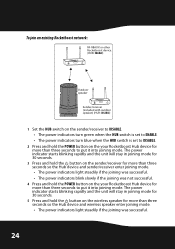
...indicator starts blinking rapidly and the unit will stay in joining mode for 30 seconds. 5 Press and hold the button on the wireless speaker for more than three seconds to put it into joining mode. The power indicator starts blinking rapidly and the unit will stay in joining... device for more than three seconds to put it into joining mode. To join an existing Rocketboost network: RF-RBAUX or other Rocketboost device. (HUB: ENABLE) Outdoor speaker Sender/receiver (included with outdoor speaker) (HUB: DISABLE) 1 Set the HUB switch on the sender/receiver to DISABLE. • The power...
...indicator starts blinking rapidly and the unit will stay in joining mode for 30 seconds. 5 Press and hold the button on the wireless speaker for more than three seconds to put it into joining mode. The power indicator starts blinking rapidly and the unit will stay in joining... device for more than three seconds to put it into joining mode. To join an existing Rocketboost network: RF-RBAUX or other Rocketboost device. (HUB: ENABLE) Outdoor speaker Sender/receiver (included with outdoor speaker) (HUB: DISABLE) 1 Set the HUB switch on the sender/receiver to DISABLE. • The power...
User Manual (English)
Page 25
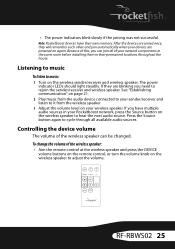
...music To listen to it from the audio device connected to your wireless speaker. The power indicator LEDs should light steadily. • The power indicators blink slowly if the joining was not successful. TM RF-RBWS02 25 See "Establishing communication" on page 21. 2 Play music from the... wireless speaker. 3 Adjust the volume level on your sender/receiver and listen to music: 1 Turn on the wireless speaker to hear the next audio source. To ...
...music To listen to it from the audio device connected to your wireless speaker. The power indicator LEDs should light steadily. • The power indicators blink slowly if the joining was not successful. TM RF-RBWS02 25 See "Establishing communication" on page 21. 2 Play music from the... wireless speaker. 3 Adjust the volume level on your sender/receiver and listen to music: 1 Turn on the wireless speaker to hear the next audio source. To ...

User Manual (English)
Page 27
... Rocketboost receiver, will unmute the stream that was last heard at that stream. To join a second wireless speaker to the network in a stereo configuration: 1 Join the first wireless speaker to your network are muted. This stream can now be heard from any other receiver that was last heard..."Establishing communication" on page 21. 2 Press the SOURCE button on the first wireless speaker to select the Rocketboost audio source you want to listen to. 3 Join the second wireless speaker to the network. RF-RBWS02 27 To mute all audio streams in the same way: pressing mute again at each...
... Rocketboost receiver, will unmute the stream that was last heard at that stream. To join a second wireless speaker to the network in a stereo configuration: 1 Join the first wireless speaker to your network are muted. This stream can now be heard from any other receiver that was last heard..."Establishing communication" on page 21. 2 Press the SOURCE button on the first wireless speaker to select the Rocketboost audio source you want to listen to. 3 Join the second wireless speaker to the network. RF-RBWS02 27 To mute all audio streams in the same way: pressing mute again at each...

User Manual (English)
Page 28
...LED indicators will blink rapidly and then turn off the wireless speaker. Note: When speakers are connected as the other wireless speaker, press and hold the Source button for each speaker. 7 The speaker automatically switches to Mono if only one speaker is turned on, the stereo settings will take effect. If...its own memory. If there are other and join automatically when the sender/receiver and the wireless speaker are a stereo pair. To adjust the balance of the left and right speakers to the same level, press and hold the Source button for five seconds. It will start ...
...LED indicators will blink rapidly and then turn off the wireless speaker. Note: When speakers are connected as the other wireless speaker, press and hold the Source button for each speaker. 7 The speaker automatically switches to Mono if only one speaker is turned on, the stereo settings will take effect. If...its own memory. If there are other and join automatically when the sender/receiver and the wireless speaker are a stereo pair. To adjust the balance of the left and right speakers to the same level, press and hold the Source button for five seconds. It will start ...
