
Quick Setup Guide (English)
Page 1
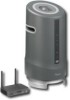
... batteries in . © 2010 BBY Solutions, Inc., All Rights Reserved. RF-RBWS02 Wireless Outdoor Speaker Package contents Sender/Receiver AC power adapter for sender/receiver 3.5 mm audio cable AC power adapter for wireless speaker Wireless speaker Remote control 3.5 mm to RCA adapter (6 inches/15.25 cm) User ... to at least 80% of all available audio sources. Distributed by rotating both the sender/receiver and the wireless speaker Lights when speaker is connected BASS 15V DC to cycle through all Rocketboost senders and sender/receivers. If you can enable using...
... batteries in . © 2010 BBY Solutions, Inc., All Rights Reserved. RF-RBWS02 Wireless Outdoor Speaker Package contents Sender/Receiver AC power adapter for sender/receiver 3.5 mm audio cable AC power adapter for wireless speaker Wireless speaker Remote control 3.5 mm to RCA adapter (6 inches/15.25 cm) User ... to at least 80% of all available audio sources. Distributed by rotating both the sender/receiver and the wireless speaker Lights when speaker is connected BASS 15V DC to cycle through all Rocketboost senders and sender/receivers. If you can enable using...

User Manual (English)
Page 3
... transmits through walls, floors, and ceilings. This system represents the state of the Rocketboost™ Wireless Outdoor Speaker system. Rocketfish RF-RBWS02 Rocketboost™ Wireless Outdoor Speaker Contents Introduction 3 Important safety instructions 4 Features 8 Setting up your wireless speaker kit 14 Using your wireless speaker kit 20 Expanding your Rocketboost System 29 Maintaining your system 30 Troubleshooting 31 Specifications 32 Legal notices...
... transmits through walls, floors, and ceilings. This system represents the state of the Rocketboost™ Wireless Outdoor Speaker system. Rocketfish RF-RBWS02 Rocketboost™ Wireless Outdoor Speaker Contents Introduction 3 Important safety instructions 4 Features 8 Setting up your wireless speaker kit 14 Using your wireless speaker kit 20 Expanding your Rocketboost System 29 Maintaining your system 30 Troubleshooting 31 Specifications 32 Legal notices...

User Manual (English)
Page 4
...instructions in charger for quick reference. This User Guide explains how to the presence of those audio streams at the wireless speaker. The exclamation point within an equilateral triangle is intended to alert the user to the presence of your audio components... correctly install, operate, and get the best performance from a computer or mp3 player. Read this guide carefully before installing your Rocketboost Wireless Outdoor Speaker. NO USER SERVICING PARTS INSIDE. 㕐 REFER SERVICING TO QUALIFIED SERVICE PERSONNEL. 1 Read these instructions. 2 Keep these instructions. ...
...instructions in charger for quick reference. This User Guide explains how to the presence of those audio streams at the wireless speaker. The exclamation point within an equilateral triangle is intended to alert the user to the presence of your audio components... correctly install, operate, and get the best performance from a computer or mp3 player. Read this guide carefully before installing your Rocketboost Wireless Outdoor Speaker. NO USER SERVICING PARTS INSIDE. 㕐 REFER SERVICING TO QUALIFIED SERVICE PERSONNEL. 1 Read these instructions. 2 Keep these instructions. ...

User Manual (English)
Page 8
... cable AC power adapter for recharging the optional NiMH rechargeable batteries • Easy to RCA adapter cable (6 in battery charger for wireless speaker Wireless speaker Remote control 3.5 mm to use - Features • High-Performance Audio - Easy to set up • Wireless speaker works with all Rocketboost products • Built-in , 0.15 m) User Guide Quick Setup Guide 8
... cable AC power adapter for recharging the optional NiMH rechargeable batteries • Easy to RCA adapter cable (6 in battery charger for wireless speaker Wireless speaker Remote control 3.5 mm to use - Features • High-Performance Audio - Easy to set up • Wireless speaker works with all Rocketboost products • Built-in , 0.15 m) User Guide Quick Setup Guide 8
User Manual (English)
Page 11
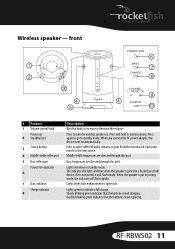
...to go to turn the wireless speaker on. Lights when bass enhancement is not joined, it is turned on / 2 Standby/Join 3 Source button 4 Middle-treble reflex port 5 Bass reflex port Power/Join indicator 6 7 Bass indicator Charge indicator 8 Description Turn this port. RF-RBWS02 11 MONO - R ... automatically. Press and hold to indicate a full charge. When you connect the AC power adapter, the device turns on your Rocketboost network. Wireless speaker - MONO - R SOURCE TM POWE/ R /JOIN 6 BASS 7 CHARGE 8 CHANNEL L - Middle-treble frequencies are directed through this knob...
...to go to turn the wireless speaker on. Lights when bass enhancement is not joined, it is turned on / 2 Standby/Join 3 Source button 4 Middle-treble reflex port 5 Bass reflex port Power/Join indicator 6 7 Bass indicator Charge indicator 8 Description Turn this port. RF-RBWS02 11 MONO - R ... automatically. Press and hold to indicate a full charge. When you connect the AC power adapter, the device turns on your Rocketboost network. Wireless speaker - MONO - R SOURCE TM POWE/ R /JOIN 6 BASS 7 CHARGE 8 CHANNEL L - Middle-treble frequencies are directed through this knob...

User Manual (English)
Page 12
...is muted. Also performs the Stereo Trim mode. Audio source signal indicator Turns blue when receiving audio from a Rocketboost sender. See "Using two wireless speakers as a stereo pair" on page 27 for more information. Blinks slowly if the 10 current source listened to find the next available source. If... both left audio channel is on and right lights when the right audio channel is on. Press the SOURCE button to is turned off. Wireless speaker - Plug the AC adapter into this jack. 12 back BASS 1 15V DC BASS 2 15V DC # Feature BASS button 1 2 DC IN jack...
...is muted. Also performs the Stereo Trim mode. Audio source signal indicator Turns blue when receiving audio from a Rocketboost sender. See "Using two wireless speakers as a stereo pair" on page 27 for more information. Blinks slowly if the 10 current source listened to find the next available source. If... both left audio channel is on and right lights when the right audio channel is on. Press the SOURCE button to is turned off. Wireless speaker - Plug the AC adapter into this jack. 12 back BASS 1 15V DC BASS 2 15V DC # Feature BASS button 1 2 DC IN jack...
User Manual (English)
Page 13
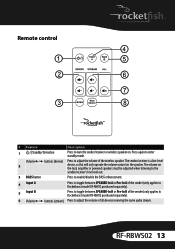
...the sender (only applies to Rocketboost model RF-RBKIT, purchased separately). 6 Volume / buttons (stream) Press to adjust the volume of all devices receiving the same audio stream. RF-RBWS02 13 Press again to turn the sender/receiver or wireless speaker on. Volume / buttons (device) Press... to adjust the volume of the wireless speaker. The volume on the speaker. Remote control 1 2 3 4 5 6 7 8 TM # Feature...
...the sender (only applies to Rocketboost model RF-RBKIT, purchased separately). 6 Volume / buttons (stream) Press to adjust the volume of all devices receiving the same audio stream. RF-RBWS02 13 Press again to turn the sender/receiver or wireless speaker on. Volume / buttons (device) Press... to adjust the volume of the wireless speaker. The volume on the speaker. Remote control 1 2 3 4 5 6 7 8 TM # Feature...

User Manual (English)
Page 14
... "V". 14 This stream can now be heard from any Rocketboost receiver will unmute the stream that was last heard at that receiver. Setting up your wireless speaker kit Initial setup To set up your Rocketboost network. For best results, raise the antennas of the sender/receiver to the vertical position. 1 2 Tip: In...
... "V". 14 This stream can now be heard from any Rocketboost receiver will unmute the stream that was last heard at that receiver. Setting up your wireless speaker kit Initial setup To set up your Rocketboost network. For best results, raise the antennas of the sender/receiver to the vertical position. 1 2 Tip: In...
User Manual (English)
Page 17
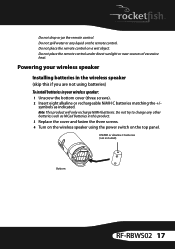
... indicated. Do not try to charge any liquid on a wet object. Note: This product will only recharge NiMH batteries. Powering your wireless speaker: 1 Unscrew the bottom cover (three screws). 2 Insert eight alkaline or rechargeable NiMH C batteries matching the +/- Do not place the...install batteries in your wireless speaker Installing batteries in the wireless speaker (skip this product. 3 Replace the cover and fasten the three screws. 4 Turn on the wireless speaker using the power switch on the top panel. 8 NiMH or alkaline C batteries (not included) Bottom RF-RBWS02 17 Do not place ...
... indicated. Do not try to charge any liquid on a wet object. Note: This product will only recharge NiMH batteries. Powering your wireless speaker: 1 Unscrew the bottom cover (three screws). 2 Insert eight alkaline or rechargeable NiMH C batteries matching the +/- Do not place the...install batteries in your wireless speaker Installing batteries in the wireless speaker (skip this product. 3 Replace the cover and fasten the three screws. 4 Turn on the wireless speaker using the power switch on the top panel. 8 NiMH or alkaline C batteries (not included) Bottom RF-RBWS02 17 Do not place ...

User Manual (English)
Page 18
...blinks, indicating the need to prevent damage, only use the AC power adapter supplied with the DC adapter. The wireless speaker should charge them for 16 hours before using the wireless speaker. If batteries are not fully charged, you connect power. If it does not receive a charge, the indicator ...you should only be charged by the AC power adapter indoors. 18 If you are using NiMH rechargeable batteries, your wireless speaker kit. Connecting the AC adapter to the wireless speaker (if you are not using batteries, or if you want to charge the batteries) To connect the AC adapter to...
...blinks, indicating the need to prevent damage, only use the AC power adapter supplied with the DC adapter. The wireless speaker should charge them for 16 hours before using the wireless speaker. If batteries are not fully charged, you connect power. If it does not receive a charge, the indicator ...you should only be charged by the AC power adapter indoors. 18 If you are using NiMH rechargeable batteries, your wireless speaker kit. Connecting the AC adapter to the wireless speaker (if you are not using batteries, or if you want to charge the batteries) To connect the AC adapter to...
User Manual (English)
Page 19
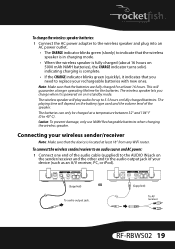
...play audio for the batteries. The wireless speaker lets you charge when it indicates that you need to replace your device (such as an A/V receiver, PC, or iPod). (Supplied) OR To audio output jack. (Supplied) To AV receiver RF-RBWS02 19 Caution: To prevent damage, only... use NiMH Rechargeable batteries when charging the wireless speaker. To charge the wireless speaker batteries: 1 Connect the AC power adapter to the wireless speaker and plug into an AC power outlet. • The CHARGE...
...play audio for the batteries. The wireless speaker lets you charge when it indicates that you need to replace your device (such as an A/V receiver, PC, or iPod). (Supplied) OR To audio output jack. (Supplied) To AV receiver RF-RBWS02 19 Caution: To prevent damage, only... use NiMH Rechargeable batteries when charging the wireless speaker. To charge the wireless speaker batteries: 1 Connect the AC power adapter to the wireless speaker and plug into an AC power outlet. • The CHARGE...

User Manual (English)
Page 20
... a headphone output. 3 Connect the AC power adapter to an AC power outlet only after all other connections are completed. Using your wireless speaker kit Turning on the sender/receiver and wireless speaker To turn the sender/receiver on and off , press to turn it on . The power indicator turns off and the standby indicator...
... a headphone output. 3 Connect the AC power adapter to an AC power outlet only after all other connections are completed. Using your wireless speaker kit Turning on the sender/receiver and wireless speaker To turn the sender/receiver on and off , press to turn it on . The power indicator turns off and the standby indicator...
User Manual (English)
Page 21
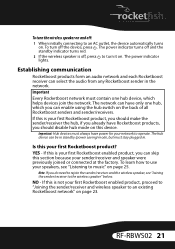
... devices join the network. If this is not your first Rocketboost enabled product, proceed to "Joining the sender/receiver and wireless speaker to music" on . YES - RF-RBWS02 21 The hub device can skip this device. NO - To turn off and the standby indicator turns red. 2 If the... wireless speaker is your first Rocketboost product? The power indicator turns off the device, press . Establishing communication Rocketboost products form an audio...
... devices join the network. If this is not your first Rocketboost enabled product, proceed to "Joining the sender/receiver and wireless speaker to music" on . YES - RF-RBWS02 21 The hub device can skip this device. NO - To turn off and the standby indicator turns red. 2 If the... wireless speaker is your first Rocketboost product? The power indicator turns off the device, press . Establishing communication Rocketboost products form an audio...
User Manual (English)
Page 22
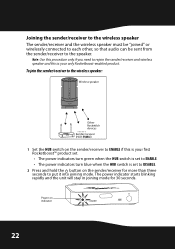
To join the sender/receiver to the wireless speaker: Wireless speaker Other Rocketfish devices Sender/receiver (HUB: ENABLE) 1 Set the HUB switch on the sender/receiver to DISABLE. 2 Press and hold the button on indicator TM 22 The ... this is your only Rocketboost-enabled product. Power on the sender/receiver for 30 seconds. Joining the sender/receiver to the wireless speaker The sender/receiver and the wireless speaker must be "joined" or wirelessly connected to each other, so that audio can be sent from the sender/receiver to put it into joining mode.
To join the sender/receiver to the wireless speaker: Wireless speaker Other Rocketfish devices Sender/receiver (HUB: ENABLE) 1 Set the HUB switch on the sender/receiver to DISABLE. 2 Press and hold the button on indicator TM 22 The ... this is your only Rocketboost-enabled product. Power on the sender/receiver for 30 seconds. Joining the sender/receiver to the wireless speaker The sender/receiver and the wireless speaker must be "joined" or wirelessly connected to each other, so that audio can be sent from the sender/receiver to put it into joining mode.
User Manual (English)
Page 23
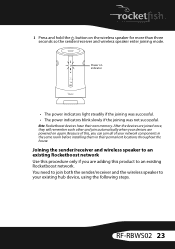
You need to join both the sender/receiver and the wireless speaker to an existing Rocketboost network. Joining the sender/receiver and wireless speaker to an existing Rocketboost network Use this procedure only if you are adding this , you can join all of your... sender/receiver and wireless speaker enter joining mode. Note: Rocketboost devices have their permanent locations throughout the house. Because of this product to your devices are joined once, they will remember each other and join automatically when your existing hub device, using the following steps. RF-RBWS02 23 MONO - ...
You need to join both the sender/receiver and the wireless speaker to an existing Rocketboost network. Joining the sender/receiver and wireless speaker to an existing Rocketboost network Use this procedure only if you are adding this , you can join all of your... sender/receiver and wireless speaker enter joining mode. Note: Rocketboost devices have their permanent locations throughout the house. Because of this product to your devices are joined once, they will remember each other and join automatically when your existing hub device, using the following steps. RF-RBWS02 23 MONO - ...
User Manual (English)
Page 24
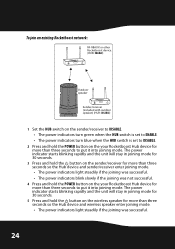
...device for more than three seconds to put it into joining mode. To join an existing Rocketboost network: RF-RBAUX or other Rocketboost device. (HUB: ENABLE) Outdoor speaker Sender/receiver (included with outdoor speaker) (HUB: DISABLE) 1 Set the HUB switch on the sender/receiver to DISABLE. • The ... turn blue when the HUB switch is set to DISABLE. 2 Press and hold the POWER button on the wireless speaker for more than three seconds so the Hub device and wireless speaker enter joining mode. • The power indicators light steadily if the joining was not successful. 4 Press and...
...device for more than three seconds to put it into joining mode. To join an existing Rocketboost network: RF-RBAUX or other Rocketboost device. (HUB: ENABLE) Outdoor speaker Sender/receiver (included with outdoor speaker) (HUB: DISABLE) 1 Set the HUB switch on the sender/receiver to DISABLE. • The ... turn blue when the HUB switch is set to DISABLE. 2 Press and hold the POWER button on the wireless speaker for more than three seconds so the Hub device and wireless speaker enter joining mode. • The power indicators light steadily if the joining was not successful. 4 Press and...
User Manual (English)
Page 25
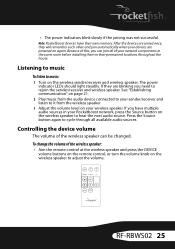
... you have their permanent locations throughout the house. The power indicator LEDs should light steadily. TM RF-RBWS02 25 See "Establishing communication" on page 21. 2 Play music from the wireless speaker. 3 Adjust the volume level on again. If they will remember each other and join automatically when your devices are blinking you can be...
... you have their permanent locations throughout the house. The power indicator LEDs should light steadily. TM RF-RBWS02 25 See "Establishing communication" on page 21. 2 Play music from the wireless speaker. 3 Adjust the volume level on again. If they will remember each other and join automatically when your devices are blinking you can be...

User Manual (English)
Page 27
...mute again at each receiver will "unmute" the stream that was last heard at that receiver. RF-RBWS02 27 Other streams are unmuted in the network. To join a second wireless speaker to the network in your network (if it is already connected, skip to "Establishing communication"... a stereo configuration: 1 Join the first wireless speaker to your network are unsure how to the network. If you use a second wireless speaker. To mute all devices in case you are muted. Using two wireless speakers as a stereo pair Your wireless speaker supports an easy-to-use stereo mode in...
...mute again at each receiver will "unmute" the stream that was last heard at that receiver. RF-RBWS02 27 Other streams are unmuted in the network. To join a second wireless speaker to the network in your network (if it is already connected, skip to "Establishing communication"... a stereo configuration: 1 Join the first wireless speaker to your network are unsure how to the network. If you use a second wireless speaker. To mute all devices in case you are muted. Using two wireless speakers as a stereo pair Your wireless speaker supports an easy-to-use stereo mode in...

User Manual (English)
Page 28
...will take effect. If the balance has been set the balance of each speaker. 7 The speaker automatically switches to the AC adapter. - The power indicator goes off the system: 1 Press on the second wireless speaker to the same level, press and hold the Source button for five seconds... on the front panel of the left and right speakers to select the same Rocketboost audio source as a stereo pair, changing the volume on both speakers, because they will remember each other wireless speaker. If there are other wireless speaker, press and hold the Bass Boost button for five...
...will take effect. If the balance has been set the balance of each speaker. 7 The speaker automatically switches to the AC adapter. - The power indicator goes off the system: 1 Press on the second wireless speaker to the same level, press and hold the Source button for five seconds... on the front panel of the left and right speakers to select the same Rocketboost audio source as a stereo pair, changing the volume on both speakers, because they will remember each other wireless speaker. If there are other wireless speaker, press and hold the Bass Boost button for five...

User Manual (English)
Page 29
... go out. As a sender you can connect it your Rocketboost sender devices. Expanding your Rocketboost audio network. RF-RBKIT (sender) RF-RBWHP01 (sender/receiver) RF-RBAUX (sender/receiver) RF-RBWS02 (receiver) • RF-RBWS02, Rocketboost Wireless Outdoor Speaker, includes a wireless speaker and the RF-RBAUX wireless sender/receiver. To turn off the transmitter: • Remove the 3.5 mm plug from any Sender in the...
... go out. As a sender you can connect it your Rocketboost sender devices. Expanding your Rocketboost audio network. RF-RBKIT (sender) RF-RBWHP01 (sender/receiver) RF-RBAUX (sender/receiver) RF-RBWS02 (receiver) • RF-RBWS02, Rocketboost Wireless Outdoor Speaker, includes a wireless speaker and the RF-RBAUX wireless sender/receiver. To turn off the transmitter: • Remove the 3.5 mm plug from any Sender in the...
