
User Manual (English)
Page 3
... Before getting started, read these instructions and save them for reliable and trouble-free performance. Rocketfish RF-NANOMSE2/RF-NANO11/12/13 Nano 2.4G Optical Mouse Contents Introduction 3 Features 4 Mouse LED status 6 Setting up the mouse 6 Configuring the mouse 13 Using the mouse 20 Maintaining 21 Troubleshooting 21 Specifications 21 Legal notices 22 One-year limited warranty 25 Introduction Congratulations on your mouse. This mouse represents the state of the art in wireless mouse design...
... Before getting started, read these instructions and save them for reliable and trouble-free performance. Rocketfish RF-NANOMSE2/RF-NANO11/12/13 Nano 2.4G Optical Mouse Contents Introduction 3 Features 4 Mouse LED status 6 Setting up the mouse 6 Configuring the mouse 13 Using the mouse 20 Maintaining 21 Troubleshooting 21 Specifications 21 Legal notices 22 One-year limited warranty 25 Introduction Congratulations on your mouse. This mouse represents the state of the art in wireless mouse design...
User Manual (English)
Page 4
..., safety devices, and life-support systems. Features • Scroll wheel • Optical sensor • Low battery consumption Package contents • Mouse • Nano adapter (dongle) • Quick Setup Guide • AA battery x 1 System requirements Your computer must meet these requirements: • Microsoft® Windows® 7 32bit/64bit, Windows® VISTA 32bit/64bit, or Windows® XP 32bit/64bit • One available USB port • CD-ROM for general computer use your...
..., safety devices, and life-support systems. Features • Scroll wheel • Optical sensor • Low battery consumption Package contents • Mouse • Nano adapter (dongle) • Quick Setup Guide • AA battery x 1 System requirements Your computer must meet these requirements: • Microsoft® Windows® 7 32bit/64bit, Windows® VISTA 32bit/64bit, or Windows® XP 32bit/64bit • One available USB port • CD-ROM for general computer use your...
User Manual (English)
Page 5
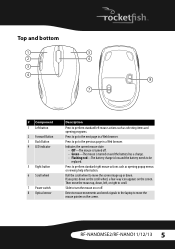
... 1 Left button 2 Forward Button 3 Back Button 4 LED indicator 5 Right button 6 Scroll wheel 7 Power switch 8 Optical sensor Description Press to perform standard left , or right to scroll. RF-NANOMSE2/RF-NANO11/12/13 5 Press to go to the next page in a Web browser. Then move the mouse pointer on and the battery has a charge. • Flashing red-The battery charge is low and the battery needs to move the screen image up , down, left mouse actions...
... 1 Left button 2 Forward Button 3 Back Button 4 LED indicator 5 Right button 6 Scroll wheel 7 Power switch 8 Optical sensor Description Press to perform standard left , or right to scroll. RF-NANOMSE2/RF-NANO11/12/13 5 Press to go to the next page in a Web browser. Then move the mouse pointer on and the battery has a charge. • Flashing red-The battery charge is low and the battery needs to move the screen image up , down, left mouse actions...
User Manual (English)
Page 9
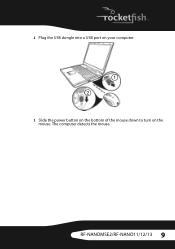
RF-NANOMSE2/RF-NANO11/12/13 9 The computer detects the mouse. 2 Plug the USB dongle into a USB port on your computer. 1 2 3 Slide the power button on the bottom of the mouse down to turn on the mouse.
RF-NANOMSE2/RF-NANO11/12/13 9 The computer detects the mouse. 2 Plug the USB dongle into a USB port on your computer. 1 2 3 Slide the power button on the bottom of the mouse down to turn on the mouse.
User Manual (English)
Page 10
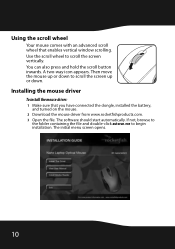
...-way icon appears. The software should start automatically. If not, browse to the folder containing the file and double-click autorun.exe to begin installation. Using the scroll wheel Your mouse comes with an advanced scroll wheel that you have connected the dongle, installed the battery, and turned on the mouse. 2 Download the mouse driver from www.rocketfishproducts.com. 3 Open the file. Installing the mouse driver To install the mouse driver: 1 Make sure that enables vertical...
...-way icon appears. The software should start automatically. If not, browse to the folder containing the file and double-click autorun.exe to begin installation. Using the scroll wheel Your mouse comes with an advanced scroll wheel that you have connected the dongle, installed the battery, and turned on the mouse. 2 Download the mouse driver from www.rocketfishproducts.com. 3 Open the file. Installing the mouse driver To install the mouse driver: 1 Make sure that enables vertical...
User Manual (English)
Page 11
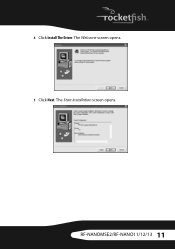
RF-NANOMSE2/RF-NANO11/12/13 11 The Start Installation screen opens. The Welcome screen opens. 5 Click Next. 4 Click Install The Driver.
RF-NANOMSE2/RF-NANO11/12/13 11 The Start Installation screen opens. The Welcome screen opens. 5 Click Next. 4 Click Install The Driver.
User Manual (English)
Page 12
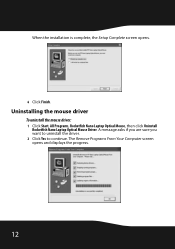
A message asks if you are sure you want to uninstall the driver. 2 Click Yes to continue. Uninstalling the mouse driver To uninstall the mouse driver: 1 Click Start, All Programs, Rocketfish Nano Laptop Optical Mouse, then click Uninstall Rocketfish Nano Laptop Optical Mouse Driver. The Remove Programs From Your Computer screen opens and displays the progress. 12 When the installation is complete, the Setup Complete screen opens. 6 Click Finish.
A message asks if you are sure you want to uninstall the driver. 2 Click Yes to continue. Uninstalling the mouse driver To uninstall the mouse driver: 1 Click Start, All Programs, Rocketfish Nano Laptop Optical Mouse, then click Uninstall Rocketfish Nano Laptop Optical Mouse Driver. The Remove Programs From Your Computer screen opens and displays the progress. 12 When the installation is complete, the Setup Complete screen opens. 6 Click Finish.

User Manual (English)
Page 13
Your laptop restarts and the uninstallation is complete, click OK to open the mouse program. - Configuring the mouse To configure the mouse: • Double-click the mouse icon on the system tray to continue. RF-NANOMSE2/RF-NANO11/12/13 13 Or- • Click Start, All Programs, Rocketfish Nano Laptop Optical Mouse, then click Rocketfish Nano Laptop Optical Mouse Driver. The Uninstall Complete screen opens. 4 Click Finish. 3 When the uninstallation is complete.
Your laptop restarts and the uninstallation is complete, click OK to open the mouse program. - Configuring the mouse To configure the mouse: • Double-click the mouse icon on the system tray to continue. RF-NANOMSE2/RF-NANO11/12/13 13 Or- • Click Start, All Programs, Rocketfish Nano Laptop Optical Mouse, then click Rocketfish Nano Laptop Optical Mouse Driver. The Uninstall Complete screen opens. 4 Click Finish. 3 When the uninstallation is complete.

User Manual (English)
Page 14
Configuring mouse buttons To configure the buttons: 1 Open the Rocketfish Nano Laptop Optical Mouse application. 2 Click the Buttons tab. • To change a button function, click the drop-down menu and select a function from the list. • To restore the default settings, click the Use Default button. 3 Click other tabs to configure other settings, or click OK to save changes and close the application. 14
Configuring mouse buttons To configure the buttons: 1 Open the Rocketfish Nano Laptop Optical Mouse application. 2 Click the Buttons tab. • To change a button function, click the drop-down menu and select a function from the list. • To restore the default settings, click the Use Default button. 3 Click other tabs to configure other settings, or click OK to save changes and close the application. 14
User Manual (English)
Page 15
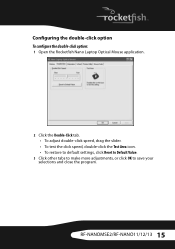
RF-NANOMSE2/RF-NANO11/12/13 15 Configuring the double-click option To configure the double-click option: 1 Open the Rocketfish Nano Laptop Optical Mouse application. 2 Click the Double-Click tab. • To adjust double-click speed, drag the slider. • To test the click speed, double-click the Test Area icon. • To restore to default settings, click Reset to Default Value. 3 Click other tabs to make more adjustments, or click OK to save your selections and close the program.
RF-NANOMSE2/RF-NANO11/12/13 15 Configuring the double-click option To configure the double-click option: 1 Open the Rocketfish Nano Laptop Optical Mouse application. 2 Click the Double-Click tab. • To adjust double-click speed, drag the slider. • To test the click speed, double-click the Test Area icon. • To restore to default settings, click Reset to Default Value. 3 Click other tabs to make more adjustments, or click OK to save your selections and close the program.
User Manual (English)
Page 16
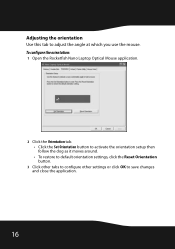
Adjusting the orientation Use this tab to save changes and close the application. 16 To configure the orientation: 1 Open the Rocketfish Nano Laptop Optical Mouse application. 2 Click the Orientation tab. • Click the Set Orientation button to activate the orientation setup then follow the dog as it moves around. • To restore to default orientation settings, click the Reset Orientation button. 3 Click other tabs to configure other settings or click OK to adjust the angle at which you use the mouse.
Adjusting the orientation Use this tab to save changes and close the application. 16 To configure the orientation: 1 Open the Rocketfish Nano Laptop Optical Mouse application. 2 Click the Orientation tab. • Click the Set Orientation button to activate the orientation setup then follow the dog as it moves around. • To restore to default orientation settings, click the Reset Orientation button. 3 Click other tabs to configure other settings or click OK to adjust the angle at which you use the mouse.
User Manual (English)
Page 17
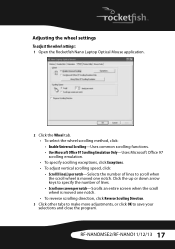
... the program. RF-NANOMSE2/RF-NANO11/12/13 17 Adjusting the wheel settings To adjust the wheel settings: 1 Open the Rocketfish Nano Laptop Optical Mouse application. 2 Click the Wheel tab. • To select the wheel scrolling method, click: • Enable Universal Scrolling-Uses common scrolling functions. • Use Microsoft Office 97 Scrolling Emulation Only-Uses Microsoft Office 97 scrolling emulation. • To specify scrolling exceptions, click Exceptions. • To adjust vertical scrolling speed, click: • Scroll X line(s) per notch-Selects the number...
... the program. RF-NANOMSE2/RF-NANO11/12/13 17 Adjusting the wheel settings To adjust the wheel settings: 1 Open the Rocketfish Nano Laptop Optical Mouse application. 2 Click the Wheel tab. • To select the wheel scrolling method, click: • Enable Universal Scrolling-Uses common scrolling functions. • Use Microsoft Office 97 Scrolling Emulation Only-Uses Microsoft Office 97 scrolling emulation. • To specify scrolling exceptions, click Exceptions. • To adjust vertical scrolling speed, click: • Scroll X line(s) per notch-Selects the number...
User Manual (English)
Page 18
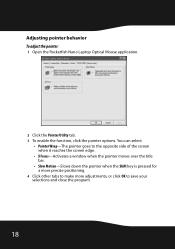
...: 1 Open the Rocketfish Nano Laptop Optical Mouse application. 2 Click the Pointer Utility tab. 3 To enable the function, click the pointer options. You can select: • Pointer Wrap-The pointer goes to the opposite side of the screen when it reaches the screen edge. • X Focus-Activates a window when the... pointer moves over the title bar. • Slow Motion-Slows down the pointer when the Shift key is pressed for a more precise positioning. 4 Click other tabs to make more adjustments, or click OK to save your selections and close the program. 18
...: 1 Open the Rocketfish Nano Laptop Optical Mouse application. 2 Click the Pointer Utility tab. 3 To enable the function, click the pointer options. You can select: • Pointer Wrap-The pointer goes to the opposite side of the screen when it reaches the screen edge. • X Focus-Activates a window when the... pointer moves over the title bar. • Slow Motion-Slows down the pointer when the Shift key is pressed for a more precise positioning. 4 Click other tabs to make more adjustments, or click OK to save your selections and close the program. 18
User Manual (English)
Page 19
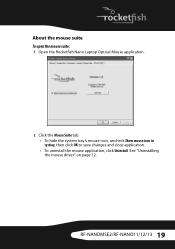
About the mouse suite To open the mouse suite: 1 Open the Rocketfish Nano Laptop Optical Mouse application. 2 Click the Mouse Suite tab. • To hide the system tray's mouse icon, uncheck Show mouse icon in systray, then click OK to save changes and close application. • To uninstall the mouse application, click Uninstall. See "Uninstalling the mouse driver" on page 12. RF-NANOMSE2/RF-NANO11/12/13 19
About the mouse suite To open the mouse suite: 1 Open the Rocketfish Nano Laptop Optical Mouse application. 2 Click the Mouse Suite tab. • To hide the system tray's mouse icon, uncheck Show mouse icon in systray, then click OK to save changes and close application. • To uninstall the mouse application, click Uninstall. See "Uninstalling the mouse driver" on page 12. RF-NANOMSE2/RF-NANO11/12/13 19
User Manual (English)
Page 20
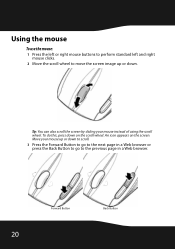
To do this, press down on the screen. Move your mouse instead of using the scroll wheel. Tip: You can also scroll the screen by sliding your mouse up or down. An icon appears on the scroll wheel. Using the mouse To use the mouse: 1 Press the left or right mouse buttons to perform standard left and right mouse clicks. 2 Move the scroll wheel to the previous page in a Web browser or press the Back Button to go to move the screen image up or down to scroll. 3 Press the Forward Button to go to the next page in a Web browser. 20 Forward Button Back Button
To do this, press down on the screen. Move your mouse instead of using the scroll wheel. Tip: You can also scroll the screen by sliding your mouse up or down. An icon appears on the scroll wheel. Using the mouse To use the mouse: 1 Press the left or right mouse buttons to perform standard left and right mouse clicks. 2 Move the scroll wheel to the previous page in a Web browser or press the Back Button to go to move the screen image up or down to scroll. 3 Press the Forward Button to go to the next page in a Web browser. 20 Forward Button Back Button
User Manual (English)
Page 21
... the dongle is installed correctly. Make sure the polarity of the battery corresponds with water. Maintaining To clean the mouse: • Wipe the surface and the optical sensor with a soft, lint-free cloth slightly moistened with the polarity symbols inside the battery compartment. • When the mouse LED lights red, the battery power is low. Specifications Specifications subject to 60°C) 90% RH or less RF-NANOMSE2/RF-NANO11...
... the dongle is installed correctly. Make sure the polarity of the battery corresponds with water. Maintaining To clean the mouse: • Wipe the surface and the optical sensor with a soft, lint-free cloth slightly moistened with the polarity symbols inside the battery compartment. • When the mouse LED lights red, the battery power is low. Specifications Specifications subject to 60°C) 90% RH or less RF-NANOMSE2/RF-NANO11...
User Manual (English)
Page 22
... with the instructions, may cause undesired operation. Operation is encouraged to try to correct the interference by the party responsible for a Class B digital device, pursuant to part 15 of the FCC Rules. FCC warning Changes or modifications not expressly approved by one or more of the IC Rules. Storage humidity 90% RH or less Battery AA (1) Legal...
... with the instructions, may cause undesired operation. Operation is encouraged to try to correct the interference by the party responsible for a Class B digital device, pursuant to part 15 of the FCC Rules. FCC warning Changes or modifications not expressly approved by one or more of the IC Rules. Storage humidity 90% RH or less Battery AA (1) Legal...
User Manual (English)
Page 23
RF-NANOMSE2/RF-NANO11/12/13 23 Operation is subject to the following conditions: (1). This device must accept any interference received, including interference that may not cause interference and (2). This Device complies with Part 15 of the IC Rules, Operation is subject to the following two conditions: (1) This device may not cause harmful interference, and (2) This device must accept any interference received, including...
RF-NANOMSE2/RF-NANO11/12/13 23 Operation is subject to the following conditions: (1). This device must accept any interference received, including interference that may not cause interference and (2). This Device complies with Part 15 of the IC Rules, Operation is subject to the following two conditions: (1) This device may not cause harmful interference, and (2) This device must accept any interference received, including...
User Manual (English)
Page 25
..., mail your Rocketfish Product during the Warranty Period of this warranty apply. This warranty does not cover: • Customer instruction • Installation • Set up adjustments • Cosmetic damage RF-NANOMSE2/RF-NANO11/12/13 25 How to the store you must be defective by this warranty that requires service, terms of a defect covered by an authorized Rocketfish repair center or store personnel, Rocketfish will (at...
..., mail your Rocketfish Product during the Warranty Period of this warranty apply. This warranty does not cover: • Customer instruction • Installation • Set up adjustments • Cosmetic damage RF-NANOMSE2/RF-NANO11/12/13 25 How to the store you must be defective by this warranty that requires service, terms of a defect covered by an authorized Rocketfish repair center or store personnel, Rocketfish will (at...
User Manual (English)
Page 26
... call 1-800-620-2790 www.rocketfishproducts.com Distributed by Rocketfish to service the Product • Products sold as fuses or batteries • Products where the factory applied serial number has been altered or removed REPAIR REPLACEMENT AS PROVIDED UNDER THIS WARRANTY IS YOUR EXCLUSIVE REMEDY. All other than a facility authorized by Best Buy Purchasing, LLC 7601 Penn Avenue South, Richfield, Minnesota, U.S.A. 55423...
... call 1-800-620-2790 www.rocketfishproducts.com Distributed by Rocketfish to service the Product • Products sold as fuses or batteries • Products where the factory applied serial number has been altered or removed REPAIR REPLACEMENT AS PROVIDED UNDER THIS WARRANTY IS YOUR EXCLUSIVE REMEDY. All other than a facility authorized by Best Buy Purchasing, LLC 7601 Penn Avenue South, Richfield, Minnesota, U.S.A. 55423...


