User Manual (English)
Page 1
Gaming Headset with 3D Sound RF-GUV1201 User Guide
Gaming Headset with 3D Sound RF-GUV1201 User Guide
User Manual (English)
Page 2
... 3D Sound Contents Important safety instructions 3 Features...4 Package contents...5 Headset jacks and controls 6 In-line control unit 7 Connecting to a PlayStation 3 (PS3 8 Using a headphone jack or AV cable 8 Using an HDMI connection 12 Connecting to an ...
... 3D Sound Contents Important safety instructions 3 Features...4 Package contents...5 Headset jacks and controls 6 In-line control unit 7 Connecting to a PlayStation 3 (PS3 8 Using a headphone jack or AV cable 8 Using an HDMI connection 12 Connecting to an ...
User Manual (English)
Page 4
..., breathable padding for hours of comfort • Convenient in-line controls • Separate volume controls for game and chat • "All-mute" button on the headset instantly mutes all audio and chat 4
..., breathable padding for hours of comfort • Convenient in-line controls • Separate volume controls for game and chat • "All-mute" button on the headset instantly mutes all audio and chat 4
User Manual (English)
Page 5
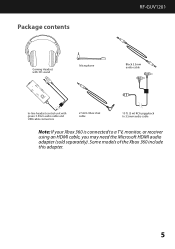
Package contents RF-GUV1201 Gaming Headset with 3D sound Microphone Black 3.5mm audio cable In-line headset control unit with green 3.5mm audio cable and USB cable connectors 2.5mm Xbox chat cable 10 ft. (3 m) RCA piggyback to 3.5mm audio cable Note: If your Xbox 360 is connected to a TV, monitor, or receiver using an HDMI cable, you may need the Microsoft HDMI audio adapter (sold separately). Some models of the Xbox 360 include this adapter. 5
Package contents RF-GUV1201 Gaming Headset with 3D sound Microphone Black 3.5mm audio cable In-line headset control unit with green 3.5mm audio cable and USB cable connectors 2.5mm Xbox chat cable 10 ft. (3 m) RCA piggyback to 3.5mm audio cable Note: If your Xbox 360 is connected to a TV, monitor, or receiver using an HDMI cable, you may need the Microsoft HDMI audio adapter (sold separately). Some models of the Xbox 360 include this adapter. 5
User Manual (English)
Page 6
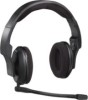
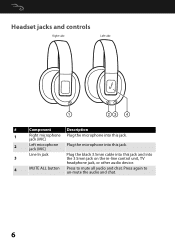
Press again to mute all audio and chat. Headset jacks and controls Right side Left side # Component Description 1 Right microphone Plug the microphone into this jack. jack (MIC) 2 Left microphone Plug the microphone into this jack and into the 3.5mm jack on the in-line control unit, TV headphone jack, or other audio device. 4 MUTE ALL button Press to un-mute the audio and chat. 6 jack (MIC) Line In jack 3 Plug the black 3.5mm cable into this jack.
Press again to mute all audio and chat. Headset jacks and controls Right side Left side # Component Description 1 Right microphone Plug the microphone into this jack. jack (MIC) 2 Left microphone Plug the microphone into this jack and into the 3.5mm jack on the in-line control unit, TV headphone jack, or other audio device. 4 MUTE ALL button Press to un-mute the audio and chat. 6 jack (MIC) Line In jack 3 Plug the black 3.5mm cable into this jack.
User Manual (English)
Page 7
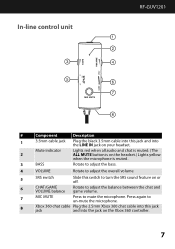
... mute the microphone. In-line control unit RF-GUV1201 # Component Description 1 3.5mm cable jack Plug the black 3.5mm cable into this jack and into the jack on your headset. Mute indicator Lights red when all audio and chat is muted. (The 2 ALL MUTE button is on the headset.) Lights yellow when the microphone is...
... mute the microphone. In-line control unit RF-GUV1201 # Component Description 1 3.5mm cable jack Plug the black 3.5mm cable into this jack and into the jack on your headset. Mute indicator Lights red when all audio and chat is muted. (The 2 ALL MUTE button is on the headset.) Lights yellow when the microphone is...

User Manual (English)
Page 8
... your PS3 in a variety of the microphone so the sound holes face your headset. Microphone 8 Right side Left side Connect the microphone to a PS3 using a headphone jack or AV cable: 1 Plug the microphone into the left or right MIC ...
... your PS3 in a variety of the microphone so the sound holes face your headset. Microphone 8 Right side Left side Connect the microphone to a PS3 using a headphone jack or AV cable: 1 Plug the microphone into the left or right MIC ...
User Manual (English)
Page 11
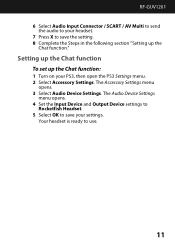
... Device and Output Device settings to Rocketfish Headset. 5 Select OK to save the setting. 8 Complete the Steps in the following section "Setting up the Chat function: 1 Turn on your settings. Setting up the Chat function To set up the Chat function." RF-GUV1201 6 Select Audio Input Connector / SCART... / AV Multi to send the audio to your headset. 7 Press X to save your PS3, then open the PS3 Settings menu. 2 Select Accessory Settings....
... Device and Output Device settings to Rocketfish Headset. 5 Select OK to save the setting. 8 Complete the Steps in the following section "Setting up the Chat function: 1 Turn on your settings. Setting up the Chat function To set up the Chat function." RF-GUV1201 6 Select Audio Input Connector / SCART... / AV Multi to send the audio to your headset. 7 Press X to save your PS3, then open the PS3 Settings menu. 2 Select Accessory Settings....
User Manual (English)
Page 12
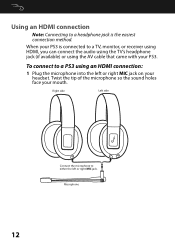
Twist the tip of the microphone so the sound holes face your PS3 is connected to a headphone jack is the easiest connection method. Using an HDMI connection Note: Connecting to a TV, monitor, or receiver using HDMI, you can connect the audio using the TV's headphone jack (if available) or using an HDMI connection: 1 Plug the microphone into the left or right MIC jack. To connect to either the left or right MIC jack on your headset. Right side Left side Connect the microphone to a PS3 using the AV cable that came with your PS3. When your mouth. Microphone 12
Twist the tip of the microphone so the sound holes face your PS3 is connected to a headphone jack is the easiest connection method. Using an HDMI connection Note: Connecting to a TV, monitor, or receiver using HDMI, you can connect the audio using the TV's headphone jack (if available) or using an HDMI connection: 1 Plug the microphone into the left or right MIC jack. To connect to either the left or right MIC jack on your headset. Right side Left side Connect the microphone to a PS3 using the AV cable that came with your PS3. When your mouth. Microphone 12

User Manual (English)
Page 15
RF-GUV1201 6 Select Settings, Sound Settings, Audio Multi Output. The Accessory Settings menu opens. 3 Select Audio Device Settings. Your headset is ready to save your PS3, then open the PS3 Settings menu. 2 Select Accessory Settings. Setting up the Chat function To set up the ...Chat function." The Audio Device Settings menu opens. 4 Set the Input Device and Output Device settings to Rocketfish Headset. 5 Select OK to use the standard PS3 AV cable that came with your PS3 simultaneously with an HDMI or digital (optical) audio output. 7 Complete...
RF-GUV1201 6 Select Settings, Sound Settings, Audio Multi Output. The Accessory Settings menu opens. 3 Select Audio Device Settings. Your headset is ready to save your PS3, then open the PS3 Settings menu. 2 Select Accessory Settings. Setting up the Chat function To set up the ...Chat function." The Audio Device Settings menu opens. 4 Set the Input Device and Output Device settings to Rocketfish Headset. 5 Select OK to use the standard PS3 AV cable that came with your PS3 simultaneously with an HDMI or digital (optical) audio output. 7 Complete...

User Manual (English)
Page 16
Microphone Twist the tip of the microphone so the sound holes face your headset. Right side Left side 16 Connect the microphone to an Xbox 360 using a headphone jack or AV cable: 1 Plug the microphone into the left or ...
Microphone Twist the tip of the microphone so the sound holes face your headset. Right side Left side 16 Connect the microphone to an Xbox 360 using a headphone jack or AV cable: 1 Plug the microphone into the left or ...
User Manual (English)
Page 17
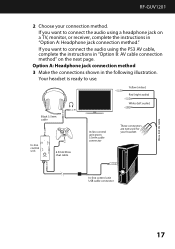
Option A: Headphone jack connection method 3 Make the connections shown in "Option A: Headphone jack connection method." Your headset is ready to connect the audio using the PS3 AV cable, complete the instructions in "Option B: AV cable connection method" on a TV, monitor, or ...-line control unit 2.5mm Xbox chat cable In-line control unit green 3.5mm cable connector These connectors are not used for your connection method. RF-GUV1201 2 Choose your headset. If you want to connect the audio using a headphone jack on the next page. In-line control unit USB cable connector 17
Option A: Headphone jack connection method 3 Make the connections shown in "Option A: Headphone jack connection method." Your headset is ready to connect the audio using the PS3 AV cable, complete the instructions in "Option B: AV cable connection method" on a TV, monitor, or ...-line control unit 2.5mm Xbox chat cable In-line control unit green 3.5mm cable connector These connectors are not used for your connection method. RF-GUV1201 2 Choose your headset. If you want to connect the audio using a headphone jack on the next page. In-line control unit USB cable connector 17

User Manual (English)
Page 18
In-line control unit 2.5mm Xbox chat cable In-line control unit green 3.5mm cable connector In-line control unit USB cable connector Xbox 360 AV cable 18 Option B: AV cable connection method Step 3 (continued) Make the connections shown in the following illustration. Your headset is ready to use. Yellow (video) Red (audio) White (audio) Black 3.5mm cable SOURCE RCA piggyback cable These connectors are not used for your headset.
In-line control unit 2.5mm Xbox chat cable In-line control unit green 3.5mm cable connector In-line control unit USB cable connector Xbox 360 AV cable 18 Option B: AV cable connection method Step 3 (continued) Make the connections shown in the following illustration. Your headset is ready to use. Yellow (video) Red (audio) White (audio) Black 3.5mm cable SOURCE RCA piggyback cable These connectors are not used for your headset.
User Manual (English)
Page 19
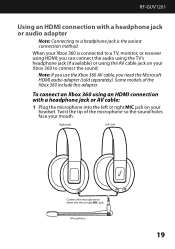
Right side Left side Connect the microphone to a headphone jack is the easiest connection method. RF-GUV1201 Using an HDMI connection with a headphone jack or AV cable: 1 Plug the microphone into the left or right MIC jack. Note: If you use the ..., or receiver using HDMI, you need the Microsoft HDMI audio adapter (sold separately). To connect an Xbox 360 using the AV cable jack on your headset.
Right side Left side Connect the microphone to a headphone jack is the easiest connection method. RF-GUV1201 Using an HDMI connection with a headphone jack or AV cable: 1 Plug the microphone into the left or right MIC jack. Note: If you use the ..., or receiver using HDMI, you need the Microsoft HDMI audio adapter (sold separately). To connect an Xbox 360 using the AV cable jack on your headset.

User Manual (English)
Page 20
Your headset is ready to connect the audio using an HDMI audio adapter (sold separately), complete the instructions in "Option B: HDMI audio adapter connection method" on a TV, ...
Your headset is ready to connect the audio using an HDMI audio adapter (sold separately), complete the instructions in "Option B: HDMI audio adapter connection method" on a TV, ...
User Manual (English)
Page 21
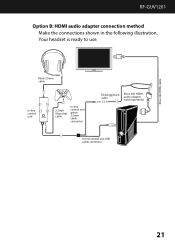
Xbox 360 HDMI cable SOURCE Black 3.5mm cable In-line control unit 2.5mm Xbox chat cable In-line control unit green 3.5mm cable connector RCA piggyback Xbox 360 HDMI cable audio adapter (sold separately) In-line control unit USB cable connector 21 Your headset is ready to use. RF-GUV1201 Option B: HDMI audio adapter connection method Make the connections shown in the following illustration.
Xbox 360 HDMI cable SOURCE Black 3.5mm cable In-line control unit 2.5mm Xbox chat cable In-line control unit green 3.5mm cable connector RCA piggyback Xbox 360 HDMI cable audio adapter (sold separately) In-line control unit USB cable connector 21 Your headset is ready to use. RF-GUV1201 Option B: HDMI audio adapter connection method Make the connections shown in the following illustration.

User Manual (English)
Page 22
Microphone Twist the tip of the microphone so the sound holes face your computer has a Mac operating system, go to either the left or right MIC jack on page 25. Connecting to a computer If your computer has a Windows operating system, go to a Windows-based computer: 1 Plug the microphone into the left or right MIC jack. Right side Left side 22 Connect the microphone to "Windows 7, Windows Vista, or Windows XP" on page 22. Windows 7, Windows Vista, or Windows XP To connect to "Mac OS X v10.2.8 and above" on your headset. If your mouth.
Microphone Twist the tip of the microphone so the sound holes face your computer has a Mac operating system, go to either the left or right MIC jack on page 25. Connecting to a computer If your computer has a Windows operating system, go to a Windows-based computer: 1 Plug the microphone into the left or right MIC jack. Right side Left side 22 Connect the microphone to "Windows 7, Windows Vista, or Windows XP" on page 22. Windows 7, Windows Vista, or Windows XP To connect to "Mac OS X v10.2.8 and above" on your headset. If your mouth.
User Manual (English)
Page 23
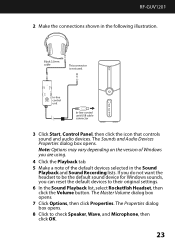
...you do not want the headset to be the default sound device for Windows sounds, you are using. 4 Click the Playback tab. 5 Make a note of Windows you can reset the default devices to check Speaker, Wave, and Microphone, then click OK. 23 RF-GUV1201 2 Make the connections ...shown in the Sound Playback and Sound Recording lists. Black 3.5mm cable This connector is not used. The Properties dialog box opens. 8 Click to their original settings. 6 In the Sound Playback list, select Rocketfish Headset, then click the Volume button...
...you do not want the headset to be the default sound device for Windows sounds, you are using. 4 Click the Playback tab. 5 Make a note of Windows you can reset the default devices to check Speaker, Wave, and Microphone, then click OK. 23 RF-GUV1201 2 Make the connections ...shown in the Sound Playback and Sound Recording lists. Black 3.5mm cable This connector is not used. The Properties dialog box opens. 8 Click to their original settings. 6 In the Sound Playback list, select Rocketfish Headset, then click the Volume button...

User Manual (English)
Page 24
... Slide the Microphone slider to close the box. 12 Open the Sounds and Audio Devices Properties box again. 13 In the Sound Recording list, select Rocketfish Headset, then click the Volume button. The Master Volume dialog box opens. 14 Slide the Mic Volume slider to balance the microphone position and the volume...
... Slide the Microphone slider to close the box. 12 Open the Sounds and Audio Devices Properties box again. 13 In the Sound Recording list, select Rocketfish Headset, then click the Volume button. The Master Volume dialog box opens. 14 Slide the Mic Volume slider to balance the microphone position and the volume...
User Manual (English)
Page 25
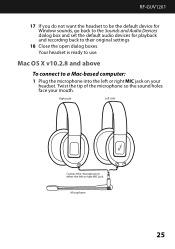
... their original settings 18 Close the open dialog boxes. Twist the tip of the microphone so the sound holes face your headset. Microphone 25 RF-GUV1201 17 If you do not want the headset to be the default device for Window sounds, go back to the Sounds and Audio Devices dialog box and set... playback and recording back to either the left or right MIC jack on your mouth. Mac OS X v10.2.8 and above To connect to use. Your headset is ready to a Mac-based computer: 1 Plug the microphone into the left or right MIC jack.
... their original settings 18 Close the open dialog boxes. Twist the tip of the microphone so the sound holes face your headset. Microphone 25 RF-GUV1201 17 If you do not want the headset to be the default device for Window sounds, go back to the Sounds and Audio Devices dialog box and set... playback and recording back to either the left or right MIC jack on your mouth. Mac OS X v10.2.8 and above To connect to use. Your headset is ready to a Mac-based computer: 1 Plug the microphone into the left or right MIC jack.

