User Manual (English)
Page 2
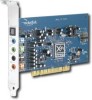
...® Windows® 7, 32-bit and 64-bit, Microsoft® Windows Vista® 32-bit and 64-bit with Service Pack 1 or higher, Windows XP Professional x64 Edition and Windows XP Service Pack 3 • 1 GB RAM (2 GB recommended for your purchase of the RF-71SDCD sound card. This sound card provides better quality surround audio for Windows 7, 64-bit) 2 Rocketfish RF-71SDCD 7.1 Sound Card Contents Introduction 2 Sound card components 3 Setting up the sound card 4 Connecting the speakers 8 Connecting peripherals 15 Software suite 20 Specifications 20 Troubleshooting 23 Legal...
...® Windows® 7, 32-bit and 64-bit, Microsoft® Windows Vista® 32-bit and 64-bit with Service Pack 1 or higher, Windows XP Professional x64 Edition and Windows XP Service Pack 3 • 1 GB RAM (2 GB recommended for your purchase of the RF-71SDCD sound card. This sound card provides better quality surround audio for Windows 7, 64-bit) 2 Rocketfish RF-71SDCD 7.1 Sound Card Contents Introduction 2 Sound card components 3 Setting up the sound card 4 Connecting the speakers 8 Connecting peripherals 15 Software suite 20 Specifications 20 Troubleshooting 23 Legal...
User Manual (English)
Page 3
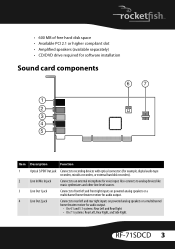
...software installation Sound card components 6 7 1 2 3 4 5 Item Description Function 1 Optical S/PDIF Out jack Connects to recording devices with optical connectors (for example, digital audio tape recorders, minidisc recorders, or external hard disk recorders). 2 Line In/Mic In jack Connects to rear left and rear right inputs on powered analog speakers or a multichannel home theater receiver for voice input. RF-71SDCD 3 Also connects to analog devices like music synthesizers and other line-level sources. 3 Line Out 1 jack Connects to front left and front right inputs on powered...
...software installation Sound card components 6 7 1 2 3 4 5 Item Description Function 1 Optical S/PDIF Out jack Connects to recording devices with optical connectors (for example, digital audio tape recorders, minidisc recorders, or external hard disk recorders). 2 Line In/Mic In jack Connects to rear left and rear right inputs on powered analog speakers or a multichannel home theater receiver for voice input. RF-71SDCD 3 Also connects to analog devices like music synthesizers and other line-level sources. 3 Line Out 1 jack Connects to front left and front right inputs on powered...
User Manual (English)
Page 4
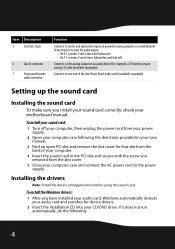
...Center, Subwoofer, and Side Left. Installing the drivers Note: Install the drivers and applications before using an analog CD cable (available separately). Connects to the analog output on powered analog speakers or a multichannel home theater receiver for device drivers. 2 Insert the Installation CD into your CD/DVD drive. Setting up the sound card Installing the sound card To make sure you have installed your audio card, Windows automatically detects your computer case and connect the AC power cord to the power supply. To install the Windows drivers: 1 After you install your sound...
...Center, Subwoofer, and Side Left. Installing the drivers Note: Install the drivers and applications before using an analog CD cable (available separately). Connects to the analog output on powered analog speakers or a multichannel home theater receiver for device drivers. 2 Insert the Installation CD into your CD/DVD drive. Setting up the sound card Installing the sound card To make sure you have installed your audio card, Windows automatically detects your computer case and connect the AC power cord to the power supply. To install the Windows drivers: 1 After you install your sound...
User Manual (English)
Page 5
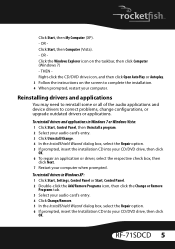
... Windows Vista: 1 Click Start, Control Panel, then Uninstall a program. 2 Select your audio card's entry. 3 Click Uninstall/Change. 4 In the InstallShield Wizard dialog box, select the Repair option. 5 If prompted, insert the installation CD into your CD/DVD drive, then click OK. OR Click Start, then Computer (Vista). - RF-71SDCD 5 Reinstalling drivers and applications You may need to reinstall some or all of the audio applications and device drivers...
... Windows Vista: 1 Click Start, Control Panel, then Uninstall a program. 2 Select your audio card's entry. 3 Click Uninstall/Change. 4 In the InstallShield Wizard dialog box, select the Repair option. 5 If prompted, insert the installation CD into your CD/DVD drive, then click OK. OR Click Start, then Computer (Vista). - RF-71SDCD 5 Reinstalling drivers and applications You may need to reinstall some or all of the audio applications and device drivers...

User Manual (English)
Page 7
.... Installing selected drivers or applications Installing selected drivers or applications in Windows XP: 1 Click Start, Settings, Control Panel or Start, Control Panel. 2 Double-click the Add/Remove Programs icon, then click the Change or Remove Programs tab. 3 Select your audio card's entry. 4 Click Change/Remove. 5 In the InstallShield Wizard dialog box, select the Add option to add new software components to your computer when prompted. RF-71SDCD...
.... Installing selected drivers or applications Installing selected drivers or applications in Windows XP: 1 Click Start, Settings, Control Panel or Start, Control Panel. 2 Double-click the Add/Remove Programs icon, then click the Change or Remove Programs tab. 3 Select your audio card's entry. 4 Click Change/Remove. 5 In the InstallShield Wizard dialog box, select the Add option to add new software components to your computer when prompted. RF-71SDCD...

User Manual (English)
Page 8
Connecting analog speakers You can connect analog speaker systems for your speaker system. The cables shown here are available separately. Connecting the speakers The connectors and associated components shown here may be different from that of your speaker system to 7.1 channels. For more information on the appropriate jacks and cables to use for up to identify similar input connectors. Consult the User's Guide of your speaker system, refer to the following speaker configurations. 8
Connecting analog speakers You can connect analog speaker systems for your speaker system. The cables shown here are available separately. Connecting the speakers The connectors and associated components shown here may be different from that of your speaker system to 7.1 channels. For more information on the appropriate jacks and cables to use for up to identify similar input connectors. Consult the User's Guide of your speaker system, refer to the following speaker configurations. 8

User Manual (English)
Page 9
RF-71SDCD 9 2.1 channel analog speakers OPTICAL 2 1 3 # Jack, connector, or cable 1 Line Out 1 jack 2 2-channel audio cable 3 Speaker system audio input jack Note: You can use the speaker cables that were bundled with your speakers.
RF-71SDCD 9 2.1 channel analog speakers OPTICAL 2 1 3 # Jack, connector, or cable 1 Line Out 1 jack 2 2-channel audio cable 3 Speaker system audio input jack Note: You can use the speaker cables that were bundled with your speakers.

User Manual (English)
Page 11
Optical cable is available separately. RF-71SDCD 11 5.1 channel analog speakers OPTICAL 1 2 3 4 5 # Jack, connector, or cable 1 Line Out 1 jack 2 Line Out 2 jack 3 Line Out 3 jack 4 5.1-channel audio cable 5 Speaker system audio input jacks (front, rear, and center/subwoofer) Note: You can use the speaker cables that were bundled with your speakers.
Optical cable is available separately. RF-71SDCD 11 5.1 channel analog speakers OPTICAL 1 2 3 4 5 # Jack, connector, or cable 1 Line Out 1 jack 2 Line Out 2 jack 3 Line Out 3 jack 4 5.1-channel audio cable 5 Speaker system audio input jacks (front, rear, and center/subwoofer) Note: You can use the speaker cables that were bundled with your speakers.
User Manual (English)
Page 13
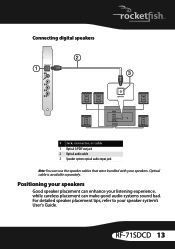
RF-71SDCD 13 Positioning your speakers Good speaker placement can enhance your speaker system's User's Guide. For detailed speaker placement tips, refer to your listening experience, while careless placement can use the speaker cables that were bundled with your speakers. Optical cable is available separately. Connecting digital speakers 2 1 3 optical in digital in # Jack, connector, or cable 1 Optical S/PDIF out jack 2 Optical audio cable 3 Speaker system optical audio input jack Note: You can make good audio systems sound bad.
RF-71SDCD 13 Positioning your speakers Good speaker placement can enhance your speaker system's User's Guide. For detailed speaker placement tips, refer to your listening experience, while careless placement can use the speaker cables that were bundled with your speakers. Optical cable is available separately. Connecting digital speakers 2 1 3 optical in digital in # Jack, connector, or cable 1 Optical S/PDIF out jack 2 Optical audio cable 3 Speaker system optical audio input jack Note: You can make good audio systems sound bad.

User Manual (English)
Page 16
Watching DVDs Connecting a multichannel home theater receiver If you have a multichannel home theater or A/V receiver, connect it directly to -RCA cable (not provided) 3 Left front input jack (A/V receiver) 4 Right front input jack (A/V receiver) 16 Front 2 3 1 4 # Jack, connector, or cable 1 Line out 1 jack 2 3.50 mm (1/8 inch) stereo-to the audio card's Line Out 1, Line Out 2, and Line Out 3 jacks as shown below. For more information on multichannel home theater receiver speaker connections, consult the User's Guide of your multichannel home theater receiver.
Watching DVDs Connecting a multichannel home theater receiver If you have a multichannel home theater or A/V receiver, connect it directly to -RCA cable (not provided) 3 Left front input jack (A/V receiver) 4 Right front input jack (A/V receiver) 16 Front 2 3 1 4 # Jack, connector, or cable 1 Line out 1 jack 2 3.50 mm (1/8 inch) stereo-to the audio card's Line Out 1, Line Out 2, and Line Out 3 jacks as shown below. For more information on multichannel home theater receiver speaker connections, consult the User's Guide of your multichannel home theater receiver.

User Manual (English)
Page 20
... with your audio card. Specifications Rocketfish 7.1 Audio Card • PCI Specification Version 2.1 compliant • Professional quality digital mixing and equalization Professional Digital Audio Processing • 24-bit Analog-to-digital conversion of analog inputs at up to 96 kHz sample rate. • 24-bit Digital-to-analog conversion of digital sources at up to 96 kHz to analog 7.1 output. • 24-bit Digital-to-analog conversion of digital stereo sources at up to 192 kHz to stereo output. • 16-bit to 24-bit recording sampling rates: 8, 11.025...
... with your audio card. Specifications Rocketfish 7.1 Audio Card • PCI Specification Version 2.1 compliant • Professional quality digital mixing and equalization Professional Digital Audio Processing • 24-bit Analog-to-digital conversion of analog inputs at up to 96 kHz sample rate. • 24-bit Digital-to-analog conversion of digital sources at up to 96 kHz to analog 7.1 output. • 24-bit Digital-to-analog conversion of digital stereo sources at up to 192 kHz to stereo output. • 16-bit to 24-bit recording sampling rates: 8, 11.025...
User Manual (English)
Page 21
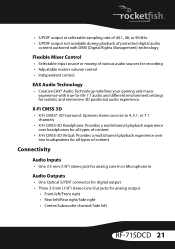
... and different environment settings for realistic and immersive 3D positional audio experience. Flexible Mixer Control • Selectable input source or mixing of content Connectivity Audio Inputs • One 3.5 mm (1/8") stereo jack for analog Line In or Microphone In Audio Outputs • One Optical S/PDIF connector for digital output • Three 3.5mm (1/8") stereo Line Out jacks for analog output: • Front left/Front right • Rear left/Rear right/Side right • Center/Subwoofer channel/Side left RF-71SDCD 21 • S/PDIF output at selectable sampling rate of 44.1, 48...
... and different environment settings for realistic and immersive 3D positional audio experience. Flexible Mixer Control • Selectable input source or mixing of content Connectivity Audio Inputs • One 3.5 mm (1/8") stereo jack for analog Line In or Microphone In Audio Outputs • One Optical S/PDIF connector for digital output • Three 3.5mm (1/8") stereo Line Out jacks for analog output: • Front left/Front right • Rear left/Rear right/Side right • Center/Subwoofer channel/Side left RF-71SDCD 21 • S/PDIF output at selectable sampling rate of 44.1, 48...

User Manual (English)
Page 22
right channel (Headphone) Jack detection return for front panel (JACK2) 22 right channel (Microphone) Active low signal that signals BIOS that an Intel HD Audio dongle is connected Analog Port 2 - Interfaces • 2 x 5 pin front panel header for connection to the analog header. PRESENCE# = 0 when an Intel HD Audio dongle is connected to Intel HD Front Panel Audio standard header Front Panel Header Audio Connector Connection compatiblity • Intel HD Front Panel Audio standard only. Not compatible with AC97 or Intel-compatible HD Front Panel Audio Pin Signal name 1 PORT 1L ...
right channel (Headphone) Jack detection return for front panel (JACK2) 22 right channel (Microphone) Active low signal that signals BIOS that an Intel HD Audio dongle is connected Analog Port 2 - Interfaces • 2 x 5 pin front panel header for connection to the analog header. PRESENCE# = 0 when an Intel HD Audio dongle is connected to Intel HD Front Panel Audio standard header Front Panel Header Audio Connector Connection compatiblity • Intel HD Front Panel Audio standard only. Not compatible with AC97 or Intel-compatible HD Front Panel Audio Pin Signal name 1 PORT 1L ...
User Manual (English)
Page 23
... audio device installed in your powered speakers or home theater receiver are connected to your sound card's output. • Make sure that you have selected the correct speaker configuration in Windows 7 and Windows Vista. To solve this CD-ROM device check box to select it. Troubleshooting This section provides solutions to problems you may be an audio card or an onboard audio chipset. OR - • If your computer detects an installed audio card during installation or normal use...
... audio device installed in your powered speakers or home theater receiver are connected to your sound card's output. • Make sure that you have selected the correct speaker configuration in Windows 7 and Windows Vista. To solve this CD-ROM device check box to select it. Troubleshooting This section provides solutions to problems you may be an audio card or an onboard audio chipset. OR - • If your computer detects an installed audio card during installation or normal use...

User Manual (English)
Page 24
... Creative Technology Ltd. EAX and CMSS are subject to change without notice and does not represent a commitment on the Installation CD. Version 1.0 October 2008 FCC statement: United States Regulatory Information This device complies with Canadian ICES-003. For service and support call 1-800-620-2790. 24 No part of this manual may cause undesired operation. Specifications and features are...
... Creative Technology Ltd. EAX and CMSS are subject to change without notice and does not represent a commitment on the Installation CD. Version 1.0 October 2008 FCC statement: United States Regulatory Information This device complies with Canadian ICES-003. For service and support call 1-800-620-2790. 24 No part of this manual may cause undesired operation. Specifications and features are...
FAQs (English)
Page 1
... and connect the AC power cord to identify similar connectors. o 2.1 Channel Analog Speakers You will need a 2-channel audio cable. If more help you used your sound card. 2. PCI slots are usually white. Refer to the User's Guide that came with your speaker system to the power supply. To Connect Your Speakers: o The connectors and associated components on your Quick Setup Guide to help is needed, please follow the steps below. To Install Your Sound Card: o Turn...
... and connect the AC power cord to identify similar connectors. o 2.1 Channel Analog Speakers You will need a 2-channel audio cable. If more help you used your sound card. 2. PCI slots are usually white. Refer to the User's Guide that came with your speaker system to the power supply. To Connect Your Speakers: o The connectors and associated components on your Quick Setup Guide to help is needed, please follow the steps below. To Install Your Sound Card: o Turn...
FAQs (English)
Page 2
... Speaker System Audio Rear Input jack. 5. Plug the other end of the cable with the black connector into the Speaker System Audio Front Input jack. 3. Plug the other end of the audio cable into the Line Out 1 jack on your sound card. 2. o 7.1 Channel Analog Speakers (7.1 Sound Card ONLY, RF-71SDCD) You will need 4-channel audio cable. Plug the cable with the green connector into the OPTICAL OUT jack on your sound card. 2. Plug the other end of the cable with the black connector into the Speaker System Audio Center/Subwoofer Input jack. A 5-channel audio cable...
... Speaker System Audio Rear Input jack. 5. Plug the other end of the cable with the black connector into the Speaker System Audio Front Input jack. 3. Plug the other end of the audio cable into the Line Out 1 jack on your sound card. 2. o 7.1 Channel Analog Speakers (7.1 Sound Card ONLY, RF-71SDCD) You will need 4-channel audio cable. Plug the cable with the green connector into the OPTICAL OUT jack on your sound card. 2. Plug the other end of the cable with the black connector into the Speaker System Audio Center/Subwoofer Input jack. A 5-channel audio cable...
FAQs (English)
Page 3
...; 5.1 Sound Card, RF-51SDCD: http://rocketfishproducts.com/p-171rocketfish-51-channel-pci-sound-card.aspx 7.1 Sound Card, RF-71SDCD: http://rocketfishproducts.com/p-172rocketfish-71-channel-pci-sound-card.aspx o To reinstall drivers in which you saved the drivers you do not have your sound card's entry. 4. Click Start, Control Panel. 2. Select your Installation CD, the drivers can be downloaded from the web. 6. OR If prompted, select the folder in Windows XP: 1. Click Uninstall/Change. 4. Windows XP & Windows Vista Users: Double...
...; 5.1 Sound Card, RF-51SDCD: http://rocketfishproducts.com/p-171rocketfish-51-channel-pci-sound-card.aspx 7.1 Sound Card, RF-71SDCD: http://rocketfishproducts.com/p-172rocketfish-71-channel-pci-sound-card.aspx o To reinstall drivers in which you saved the drivers you do not have your sound card's entry. 4. Click Start, Control Panel. 2. Select your Installation CD, the drivers can be downloaded from the web. 6. OR If prompted, select the folder in Windows XP: 1. Click Uninstall/Change. 4. Windows XP & Windows Vista Users: Double...
FAQs (English)
Page 4
... in Windows XP: 1. To repair a driver, select the respective check box, then click Next. 8. Click Start, Control Panel, then Uninstall a program. 2. Select your CD/DVD drive, then click OK. See your computer and that you previously had a sound card installed, be downloaded from the Rocketfish website. 5.1 Sound Card, RF-51SDCD: http://rocketfishproducts.com/p-171rocketfish-51-channel-pci-sound-card.aspx 7.1 Sound Card, RF-71SDCD: http://rocketfishproducts.com/p-172rocketfish-71-channel-pci-sound-card.aspx...
... in Windows XP: 1. To repair a driver, select the respective check box, then click Next. 8. Click Start, Control Panel, then Uninstall a program. 2. Select your CD/DVD drive, then click OK. See your computer and that you previously had a sound card installed, be downloaded from the Rocketfish website. 5.1 Sound Card, RF-51SDCD: http://rocketfishproducts.com/p-171rocketfish-51-channel-pci-sound-card.aspx 7.1 Sound Card, RF-71SDCD: http://rocketfishproducts.com/p-172rocketfish-71-channel-pci-sound-card.aspx...
FAQs (English)
Page 5
... files from the folder. Click Properties. 7. General Information 8. o To enable digital CD playback in Windows Vista and Windows 7. Click Start, Settings, Control Panel. Double-click the DVD/CD drives icon. My sound card did not come with an Installation CD. The software and drivers are playing an audio CD or game that your speaker's volume is breaking up. Check volume levels. Make sure that the speakers are using may only play in 4.1, 5.1, or 7.1 surround sound...
... files from the folder. Click Properties. 7. General Information 8. o To enable digital CD playback in Windows Vista and Windows 7. Click Start, Settings, Control Panel. Double-click the DVD/CD drives icon. My sound card did not come with an Installation CD. The software and drivers are playing an audio CD or game that your speaker's volume is breaking up. Check volume levels. Make sure that the speakers are using may only play in 4.1, 5.1, or 7.1 surround sound...
