Owners Manual
Page 1
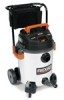
Thank you for buying a RIDGID product. • Español - WARNING: To reduce the risk of injury, the user must read and understand the owner's manual before using this product. GALLON/60 LITER PROFESSIONAL WET/DRY VAC WD19560 FOR QUESTIONS OR INFORMATION CONTACT US AT CALL 1-800-4-RIDGID (1-800-474-3443) OR www.ridgidvacs.com ! página 21 SAVE THIS MANUAL FOR FUTURE REFERENCE Part No. SP6731-1 16 Gallon E S 2/3/12 2:06 PM Page 1 OWNER'S MANUAL 16 U.S. SP6731 Printed in Mexico
Thank you for buying a RIDGID product. • Español - WARNING: To reduce the risk of injury, the user must read and understand the owner's manual before using this product. GALLON/60 LITER PROFESSIONAL WET/DRY VAC WD19560 FOR QUESTIONS OR INFORMATION CONTACT US AT CALL 1-800-4-RIDGID (1-800-474-3443) OR www.ridgidvacs.com ! página 21 SAVE THIS MANUAL FOR FUTURE REFERENCE Part No. SP6731-1 16 Gallon E S 2/3/12 2:06 PM Page 1 OWNER'S MANUAL 16 U.S. SP6731 Printed in Mexico
Owners Manual
Page 2
... for Storage 6 Removing Handle 6 Installing Tool Holder 6 Filter Removal and Replacement 7 Drum/Caddy Assembly 8 Wet/Dry Vac Assembly 9 Insert Hose 9 Operation 10 Vacuuming Dry Materials 10 Section Page Vacuuming Liquids 11 Emptying the Drum 11 Moving the Wet/Dry Vac 11 Blowing Feature 11 Accessory and Hose Storage 12 Cord Wrap 13 Maintenance 13 Filter 13 Cleaning & Disinfecting the Wet/Dry Vac . 14 Cord Maintenance 14 Storage 14 Casters & Wheels 14 Frame & Handles 14 Repair Parts 16 Warranty 20 IMPORTANT SAFETY INSTRUCTIONS Safety is burning...
... for Storage 6 Removing Handle 6 Installing Tool Holder 6 Filter Removal and Replacement 7 Drum/Caddy Assembly 8 Wet/Dry Vac Assembly 9 Insert Hose 9 Operation 10 Vacuuming Dry Materials 10 Section Page Vacuuming Liquids 11 Emptying the Drum 11 Moving the Wet/Dry Vac 11 Blowing Feature 11 Accessory and Hose Storage 12 Cord Wrap 13 Maintenance 13 Filter 13 Cleaning & Disinfecting the Wet/Dry Vac . 14 Cord Maintenance 14 Storage 14 Casters & Wheels 14 Frame & Handles 14 Repair Parts 16 Warranty 20 IMPORTANT SAFETY INSTRUCTIONS Safety is burning...
Owners Manual
Page 3
... a Vac that may reduce air flow. • Keep hair, loose clothing, fingers, and all parts of body away from heated surfaces. • Do not handle plug, switch, or the Vac with your own safety, read and understand owner's manual. SAVE THIS MANUAL 3 To reduce power loss, use . Use only identical replacement parts. Keep children away when blowing. - To reduce the risk of these hazards, be sure the cord...
... a Vac that may reduce air flow. • Keep hair, loose clothing, fingers, and all parts of body away from heated surfaces. • Do not handle plug, switch, or the Vac with your own safety, read and understand owner's manual. SAVE THIS MANUAL 3 To reduce power loss, use . Use only identical replacement parts. Keep children away when blowing. - To reduce the risk of these hazards, be sure the cord...

Owners Manual
Page 4
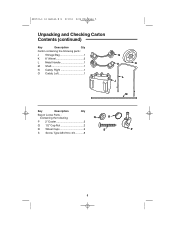
... use. Unpacking and Checking Carton Contents Tools Required Long Phillips Screwdriver Refer to understand the specific usage of your new Vac. Call 1-800-4-RIDGID (1-800-474-3443) or E-mail us at [email protected] if any parts are damaged or missing. Hammer Mallet Remove contents of parts. Carton Contents List Key Description Qty A Wet/Dry Vac Assembly 1 B Dual-Flex™ Locking Hose ...........1 C Utility Nozzle 1 D Wet Nozzle 1 E Crevice Nozzle 1 F Car Nozzle 1 G Extension Wands 2 H Owner's Manual...
... use. Unpacking and Checking Carton Contents Tools Required Long Phillips Screwdriver Refer to understand the specific usage of your new Vac. Call 1-800-4-RIDGID (1-800-474-3443) or E-mail us at [email protected] if any parts are damaged or missing. Hammer Mallet Remove contents of parts. Carton Contents List Key Description Qty A Wet/Dry Vac Assembly 1 B Dual-Flex™ Locking Hose ...........1 C Utility Nozzle 1 D Wet Nozzle 1 E Crevice Nozzle 1 F Car Nozzle 1 G Extension Wands 2 H Owner's Manual...
Owners Manual
Page 5
SP6731-1 16 Gallon E S 2/3/12 2:06 PM Page 5 Unpacking and Checking Carton Contents (continued) Key Description Qty Carton containing the following parts: J Storage Bag 1 K 8" Wheel 2 L Metal Handle 1 M Shaft 1 N Caddy, Right 1 O Caddy, Left 1 N O K L J M Key Description Qty Bag of Loose Parts Containing the following: Q R P 2" Caster 2 Q 1/2" Cap Nut 2 R Wheel Caps 2 S P S Screw, Type AB #10 x 3/4............8 5
SP6731-1 16 Gallon E S 2/3/12 2:06 PM Page 5 Unpacking and Checking Carton Contents (continued) Key Description Qty Carton containing the following parts: J Storage Bag 1 K 8" Wheel 2 L Metal Handle 1 M Shaft 1 N Caddy, Right 1 O Caddy, Left 1 N O K L J M Key Description Qty Bag of Loose Parts Containing the following: Q R P 2" Caster 2 Q 1/2" Cap Nut 2 R Wheel Caps 2 S P S Screw, Type AB #10 x 3/4............8 5
Owners Manual
Page 6
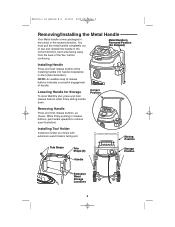
... snap of release buttons indicates successful engagement of the Vac, before continuing. While firmly pushing in the correct direction, bent area facing away from the back of handle. Installing Tool Holder Install tool holder as shown. Moving Position Tote Snaps Tote Straps (5) Storage Position Handle Extension Wand Storage Locations 6 SP6731-1 16 Gallon E S 2/3/12 2:06 PM Page 6 Removing/Installing the Metal Handle Your Metal handle comes packaged...
... snap of release buttons indicates successful engagement of the Vac, before continuing. While firmly pushing in the correct direction, bent area facing away from the back of handle. Installing Tool Holder Install tool holder as shown. Moving Position Tote Snaps Tote Straps (5) Storage Position Handle Extension Wand Storage Locations 6 SP6731-1 16 Gallon E S 2/3/12 2:06 PM Page 6 Removing/Installing the Metal Handle Your Metal handle comes packaged...
Owners Manual
Page 7
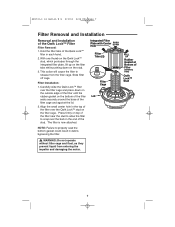
...™ Filter Filter Removal: 1. Filter Installation: 1. Integrated Filter Plate with Center Hole PUSH DOWN Filter Tabs (2) Filter Cage Lid PULL UP Rubber Gasket at Bottom of the Qwik Lock™ filter in each hand. 2. Slide filter off cage...filter is now attached. Hold the filter tabs of Filter (cutaway view) Qwik Lock™ Stud ! Align the small center hole in debris bypassing the filter. Press firmly on top of the filter near the stud to allow the filter to release from entering the impeller and damaging the motor. 7 WARNING: Do not operate without filter...
...™ Filter Filter Removal: 1. Filter Installation: 1. Integrated Filter Plate with Center Hole PUSH DOWN Filter Tabs (2) Filter Cage Lid PULL UP Rubber Gasket at Bottom of the Qwik Lock™ filter in each hand. 2. Slide filter off cage...filter is now attached. Hold the filter tabs of Filter (cutaway view) Qwik Lock™ Stud ! Align the small center hole in debris bypassing the filter. Press firmly on top of the filter near the stud to allow the filter to release from entering the impeller and damaging the motor. 7 WARNING: Do not operate without filter...
Owners Manual
Page 8
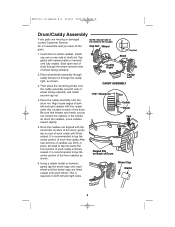
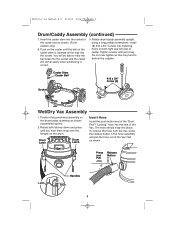
...missing or damaged contact Customer Service. Cap Nut Wheel Cap Nut Shaft RIGHT Caddy Right 2. Be sure that wheels spin freely, and do touch the caddies, move caddies inward slightly. SP6731-1 16 Gallon E S 2/3/12 2:06 PM Page 8 Drum/Caddy Assembly If any parts are firmly in place,...caddy. Place wheel/shaft assembly through caddy left and right caddies with the raised outer ribs, located on through the wheel (smooth side of Drum Wheel Cap Mallet 8 Install cap nut on Back of wheel facing outward). If the wheels do not contact the caddies. Slide open end of the...
...missing or damaged contact Customer Service. Cap Nut Wheel Cap Nut Shaft RIGHT Caddy Right 2. Be sure that wheels spin freely, and do touch the caddies, move caddies inward slightly. SP6731-1 16 Gallon E S 2/3/12 2:06 PM Page 8 Drum/Caddy Assembly If any parts are firmly in place,...caddy. Place wheel/shaft assembly through caddy left and right caddies with the raised outer ribs, located on through the wheel (smooth side of Drum Wheel Cap Mallet 8 Install cap nut on Back of wheel facing outward). If the wheels do not contact the caddies. Slide open end of the...
Owners Manual
Page 9
... assembly upright, using a long phillips screwdriver, install (8) #10 x 3/4" screws into the socket and the caster will be able to deform the caddies. To remove the hose from the Vac, press the release button in the hose assembly and pull the hose out of the caster foot as shown (assembled earlier). 2. Caster Stem Caster Ball #10 x 3/4" Screw (8) Socket LEFT Wet/Dry Vac Assembly 1. Drum Latch Drum Latch Insert Hose...
... assembly upright, using a long phillips screwdriver, install (8) #10 x 3/4" screws into the socket and the caster will be able to deform the caddies. To remove the hose from the Vac, press the release button in the hose assembly and pull the hose out of the caster foot as shown (assembled earlier). 2. Caster Stem Caster Ball #10 x 3/4" Screw (8) Socket LEFT Wet/Dry Vac Assembly 1. Drum Latch Drum Latch Insert Hose...
Owners Manual
Page 10
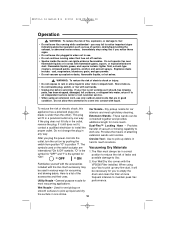
... 2:06 PM Page 10 Operation ! Explosive dusts include: coal, magnesium, aluminum, grain, and gun powder. • Do not vacuum up debris in any way. "O" is the symbol for you plug the power cord into contact with the Vac. General purpose nozzle for vacuuming and blowing debris. Crevice Tool - Used for wet pickup on the switch actuator are in various ways for most upholstery cleaning.
... 2:06 PM Page 10 Operation ! Explosive dusts include: coal, magnesium, aluminum, grain, and gun powder. • Do not vacuum up debris in any way. "O" is the symbol for you plug the power cord into contact with the Vac. General purpose nozzle for vacuuming and blowing debris. Crevice Tool - Used for wet pickup on the switch actuator are in various ways for most upholstery cleaning.
Owners Manual
Page 11
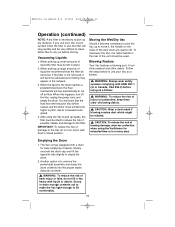
... make the Vac light enough to empty the drum. 2. Allow filter to lift. You will rise automatically to pick the Vac up dry material. Moving the Wet/Dry Vac Should it become necessary to cut off the Vac, unplug the power cord, and empty the drum. To maneuver the Vac, the metal handle in the rear of back injury or falls, do not run motor with...
... make the Vac light enough to empty the drum. 2. Allow filter to lift. You will rise automatically to pick the Vac up dry material. Moving the Wet/Dry Vac Should it become necessary to cut off the Vac, unplug the power cord, and empty the drum. To maneuver the Vac, the metal handle in the rear of back injury or falls, do not run motor with...
Owners Manual
Page 12
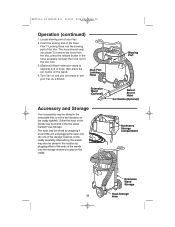
Either the hose or the wands may be stored in the hose assembly and pull the hose out of the Vac inlet. 3. (Optional) Attach extension wand to use your Vac. 2. Locate blowing port of hose, then place the car nozzle on the caddy. Turn Vac on the caddy assembly. To remove the hose from the Vac, press the release button in this location by wrapping it around the unit and plugging the open end into...
Either the hose or the wands may be stored in the hose assembly and pull the hose out of the Vac inlet. 3. (Optional) Attach extension wand to use your Vac. 2. Locate blowing port of hose, then place the car nozzle on the caddy. Turn Vac on the caddy assembly. To remove the hose from the Vac, press the release button in this location by wrapping it around the unit and plugging the open end into...
Owners Manual
Page 13
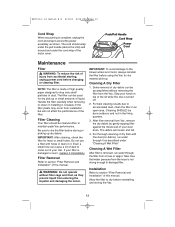
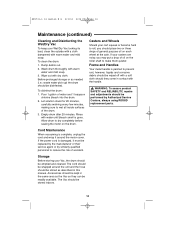
... your Vac. Slap your filter is turned off. 2. IMPORTANT: After cleaning, check the filter for dry material pick-up dry debris. Filter Removal Refer to the blower wheel and motor, always reinstall the filter before changing or cleaning filter. The debris will not affect the performance of this manual. The cord should be done outdoors and not in an open area. Take care that water pressure from accidental starting, unplug power cord before using the Vac...
... your Vac. Slap your filter is turned off. 2. IMPORTANT: After cleaning, check the filter for dry material pick-up dry debris. Filter Removal Refer to the blower wheel and motor, always reinstall the filter before changing or cleaning filter. The debris will not affect the performance of this manual. The cord should be done outdoors and not in an open area. Take care that water pressure from accidental starting, unplug power cord before using the Vac...
Owners Manual
Page 14
... 20 minutes. Casters and Wheels Should your casters are noisy, you should be replaced by the manufacturer or their service agent or by Authorized Service Centers, always using RIDGID replacement parts. Before prolonged storage or as described in contact with the handle. ! Rinse with warm water and mild soap. Storage Before storing your Wet/Dry Vac looking its best, clean the outside with a cloth...
... 20 minutes. Casters and Wheels Should your casters are noisy, you should be replaced by the manufacturer or their service agent or by Authorized Service Centers, always using RIDGID replacement parts. Before prolonged storage or as described in contact with the handle. ! Rinse with warm water and mild soap. Storage Before storing your Wet/Dry Vac looking its best, clean the outside with a cloth...
Owners Manual
Page 16
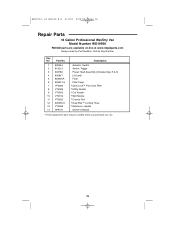
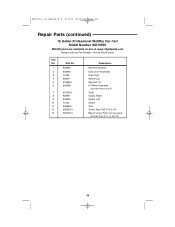
... 8 VT2509 9 VT2503 10 VT2510 11 VT2502 12 826356-5 13 VT2508 14 SP6731 Description Actuator, Switch Switch, Toggle Power Head Assembly (Includes Keys 5 & 6) Lid Latch Float Filter Cage † Qwik Lock™ Fine Dust Filter † Utility Nozzle † Car Nozzle † Wet Nozzle † Crevice Tool † Dual-Flex™ Locking Hose † Extension, Handle Owner's Manual † These replacement parts may be available where you purchased your Vac. 16
... 8 VT2509 9 VT2503 10 VT2510 11 VT2502 12 826356-5 13 VT2508 14 SP6731 Description Actuator, Switch Switch, Toggle Power Head Assembly (Includes Keys 5 & 6) Lid Latch Float Filter Cage † Qwik Lock™ Fine Dust Filter † Utility Nozzle † Car Nozzle † Wet Nozzle † Crevice Tool † Dual-Flex™ Locking Hose † Extension, Handle Owner's Manual † These replacement parts may be available where you purchased your Vac. 16
Owners Manual
Page 17
... the parts they replace. Servicing a double- insulated Wet/Dry Vac requires extreme care and knowledge of the system, and should a means for a double-insulated Wet/Dry Vac must be added. To reduce the risk of injury from electrical shock, unplug power cord before servicing the electrical parts of the Wet/Dry Vac. 1 8 2 9 4 3 10 5 11 6 13 7 14 12 17 SP6731-1 16 Gallon E S 2/3/12 2:06 PM Page 17 Repair Parts (continued) RIDGID parts are...
... the parts they replace. Servicing a double- insulated Wet/Dry Vac requires extreme care and knowledge of the system, and should a means for a double-insulated Wet/Dry Vac must be added. To reduce the risk of injury from electrical shock, unplug power cord before servicing the electrical parts of the Wet/Dry Vac. 1 8 2 9 4 3 10 5 11 6 13 7 14 12 17 SP6731-1 16 Gallon E S 2/3/12 2:06 PM Page 17 Repair Parts (continued) RIDGID parts are...
Owners Manual
Page 18
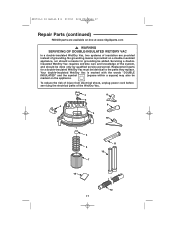
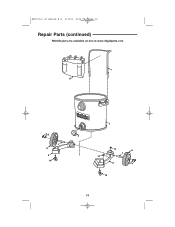
...-4 13 509748-3 Description Handle Assembly Dust Drum Assembly Drain Cap Wheel Cap Cap Nut 1/2" 8" Wheel Assembly (Includes Keys 4 and 5) Shaft Caddy, Right Caddy, Left Caster Tote Screw Type "AB" #10 x 3/4 Bag of Loose Parts (Not Illustrated) (Includes Keys 4, 5, 10, and 12) 18 SP6731-1 16 Gallon E S 2/3/12 2:06 PM Page 18 Repair Parts (continued) 16 Gallon Professional Wet/Dry Vac Cart Model Number WD19560 RIDGID parts are available on-line...
...-4 13 509748-3 Description Handle Assembly Dust Drum Assembly Drain Cap Wheel Cap Cap Nut 1/2" 8" Wheel Assembly (Includes Keys 4 and 5) Shaft Caddy, Right Caddy, Left Caster Tote Screw Type "AB" #10 x 3/4 Bag of Loose Parts (Not Illustrated) (Includes Keys 4, 5, 10, and 12) 18 SP6731-1 16 Gallon E S 2/3/12 2:06 PM Page 18 Repair Parts (continued) 16 Gallon Professional Wet/Dry Vac Cart Model Number WD19560 RIDGID parts are available on-line...
Owners Manual
Page 19
SP6731-1 16 Gallon E S 2/3/12 2:06 PM Page 19 Repair Parts (continued) RIDGID parts are available on-line at www.ridgidparts.com 1 11 45 7 6 9 10 2 3 12 6 7 12 8 54 10 19
SP6731-1 16 Gallon E S 2/3/12 2:06 PM Page 19 Repair Parts (continued) RIDGID parts are available on-line at www.ridgidparts.com 1 11 45 7 6 9 10 2 3 12 6 7 12 8 54 10 19
Owners Manual
Page 20
... WARRANTY is the sole and exclusive warranty for RIDGID® Wet/Dry Vacs. WD1956 Model No. WD19560 Serial Number Model and serial numbers may be repaired or replaced, at Ridge Tool Company's option, and returned at no charge; c 2012 Emerson Part No. Printed in workmanship and material. • How long coverage lasts This warranty lasts for future use. or, if after three attempts to repair or replace during the warranty period the Wet/Dry Vac...
... WARRANTY is the sole and exclusive warranty for RIDGID® Wet/Dry Vacs. WD1956 Model No. WD19560 Serial Number Model and serial numbers may be repaired or replaced, at Ridge Tool Company's option, and returned at no charge; c 2012 Emerson Part No. Printed in workmanship and material. • How long coverage lasts This warranty lasts for future use. or, if after three attempts to repair or replace during the warranty period the Wet/Dry Vac...


