
Owners Manual
Page 21
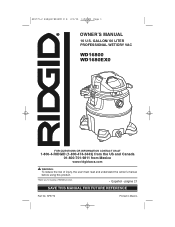
WARNING: To reduce the risk of injury, the user must read and understand the owner's manual before using this product. SP6779-2 Ridgid WD1680 E S 2/3/12 1:57 PM Page 1 OWNER'S MANUAL 16 U.S. Thank you for buying a RIDGID product. • Español - GALLON/ 60 LITER PROFESSIONAL WET/DRY VAC WD16800 WD1680EX0 FOR QUESTIONS OR INFORMATION CONTACT US AT 1-800-4-RIDGID (1-800-474-3443) from the US and Canada 01-800-701-9811 from Mexico www.ridgidvacs.com ! SP6779 Printed in Mexico página 21 SAVE THIS MANUAL FOR FUTURE REFERENCE Part No.
WARNING: To reduce the risk of injury, the user must read and understand the owner's manual before using this product. SP6779-2 Ridgid WD1680 E S 2/3/12 1:57 PM Page 1 OWNER'S MANUAL 16 U.S. Thank you for buying a RIDGID product. • Español - GALLON/ 60 LITER PROFESSIONAL WET/DRY VAC WD16800 WD1680EX0 FOR QUESTIONS OR INFORMATION CONTACT US AT 1-800-4-RIDGID (1-800-474-3443) from the US and Canada 01-800-701-9811 from Mexico www.ridgidvacs.com ! SP6779 Printed in Mexico página 21 SAVE THIS MANUAL FOR FUTURE REFERENCE Part No.
Owners Manual
Page 22
... 7 Wet/Dry Vac Assembly 8 Positioning Detachable Blower (Power Head Assembly 9 Operation 10 Vacuuming Dry Materials 11 Vacuuming Liquids 11 Emptying the Drum 11 Section Page Moving the Wet/Dry Vac 12 Blowing Feature 12 Assemble the Detachable Blower for "Blowing 12 Maintenance 14 Detachable Blower Intake 14 Filter 15 Cleaning and Disinfecting the Wet/Dry Vac 16 Cord Maintenance 16 Storage 16 Casters 16 Repair Parts 18 Servicing of Double-Insulated Wet/Dry Vac. . . 19 Warranty 20 IMPORTANT SAFETY INSTRUCTIONS Safety...
... 7 Wet/Dry Vac Assembly 8 Positioning Detachable Blower (Power Head Assembly 9 Operation 10 Vacuuming Dry Materials 11 Vacuuming Liquids 11 Emptying the Drum 11 Section Page Moving the Wet/Dry Vac 12 Blowing Feature 12 Assemble the Detachable Blower for "Blowing 12 Maintenance 14 Detachable Blower Intake 14 Filter 15 Cleaning and Disinfecting the Wet/Dry Vac 16 Cord Maintenance 16 Storage 16 Casters 16 Repair Parts 18 Servicing of Double-Insulated Wet/Dry Vac. . . 19 Warranty 20 IMPORTANT SAFETY INSTRUCTIONS Safety...
Owners Manual
Page 23
... Servicing DoubleInsulated Wet/Dry Vacs before setting on ground or releasing grasp from heated surfaces. • Do not handle plug, switch, or the Vac with liquid or debris. electric shock could occur if used on wet surfaces. The operation of your own safety, read and understand owner's manual. • Do not run Vac over cord. Observe the following warnings that liquid does not contact the connection. Do not direct air at work...
... Servicing DoubleInsulated Wet/Dry Vacs before setting on ground or releasing grasp from heated surfaces. • Do not handle plug, switch, or the Vac with liquid or debris. electric shock could occur if used on wet surfaces. The operation of your own safety, read and understand owner's manual. • Do not run Vac over cord. Observe the following warnings that liquid does not contact the connection. Do not direct air at work...
Owners Manual
Page 24
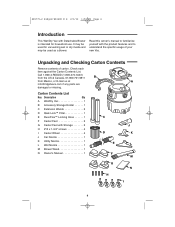
... yourself with the product features and to understand the specific usage of carton. Unpacking and Checking Carton Contents Remove contents of your new Vac. Carton Contents List Key Description Qty A Wet/Dry Vac 1 B Accessory Storage Holder 1 C Extension Wands 2 D Qwik Lock™ Filter 1 E Dual-Flex™ Locking Hose 1 F Caster Feet 2 G Caster Feet with Storage 2 H #10 x 1-3/4" screws 4 I Caster Wheel 4 J Car Nozzle 1 K Utility Nozzle 1 L Wet Nozzle 1 M Blower Wand 1 N Owner's Manual 1 C J D K E L F M G N H I 4 Call 1-800-4-RIDGID (1-800-474...
... yourself with the product features and to understand the specific usage of carton. Unpacking and Checking Carton Contents Remove contents of your new Vac. Carton Contents List Key Description Qty A Wet/Dry Vac 1 B Accessory Storage Holder 1 C Extension Wands 2 D Qwik Lock™ Filter 1 E Dual-Flex™ Locking Hose 1 F Caster Feet 2 G Caster Feet with Storage 2 H #10 x 1-3/4" screws 4 I Caster Wheel 4 J Car Nozzle 1 K Utility Nozzle 1 L Wet Nozzle 1 M Blower Wand 1 N Owner's Manual 1 C J D K E L F M G N H I 4 Call 1-800-4-RIDGID (1-800-474...
Owners Manual
Page 25
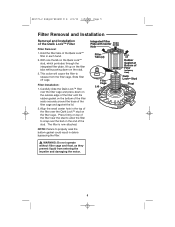
... gasket on the filter cage. Integrated Filter Plate with Center Hole PUSH DOWN Filter Tabs (2) Filter Cage Lid PULL UP Rubber Gasket at Bottom of the Qwik Lock™ Filter Filter Removal: 1. NOTE: Failure to properly seat the bottom gasket could result in each hand. 2. The filter is now attached. SP6779-2 Ridgid WD1680 E S 2/3/12 1:57 PM Page 5 Filter Removal and Installation Removal and Installation of Filter (cutaway view) Qwik Lock...
... gasket on the filter cage. Integrated Filter Plate with Center Hole PUSH DOWN Filter Tabs (2) Filter Cage Lid PULL UP Rubber Gasket at Bottom of the Qwik Lock™ Filter Filter Removal: 1. NOTE: Failure to properly seat the bottom gasket could result in each hand. 2. The filter is now attached. SP6779-2 Ridgid WD1680 E S 2/3/12 1:57 PM Page 5 Filter Removal and Installation Removal and Installation of Filter (cutaway view) Qwik Lock...
Owners Manual
Page 26
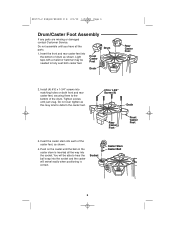
SP6779-2 Ridgid WD1680 E S 2/3/12 1:57 PM Page 6 Drum/Caster Foot Assembly If any parts are missing or damaged contact Customer Service. Install (4) #10 x 1-3/4" screws into matching holes on the caster stem is inserted all the parts. 1....on both caster feet. Light taps with a mallet or hammer may tend to the bottom of the caster feet, as shown. 4. Do not assemble until just snug. Insert the ...front and rear caster feet into each of the drum. Tighten screws until you have all the way into the socket and the caster will be needed...
SP6779-2 Ridgid WD1680 E S 2/3/12 1:57 PM Page 6 Drum/Caster Foot Assembly If any parts are missing or damaged contact Customer Service. Install (4) #10 x 1-3/4" screws into matching holes on the caster stem is inserted all the parts. 1....on both caster feet. Light taps with a mallet or hammer may tend to the bottom of the caster feet, as shown. 4. Do not assemble until just snug. Insert the ...front and rear caster feet into each of the drum. Tighten screws until you have all the way into the socket and the caster will be needed...
Owners Manual
Page 27
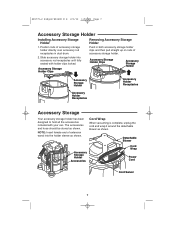
... storage holder directly over accessory rod receptacles in both accessory storage holder clips and then pull straight up on rods of extension wand into accessory rod receptacles until fully seated with your vac. The accessories and hose should be ... Removing Accessory Storage Holder Push in dust drum. 2. Detachable Blower Accessory Storage Holder Accessories Cord Wrap Power Cord Cord Swivel 7 Cord Wrap When vacuuming is complete, unplug the cord and wrap it around the detachable blower as shown. NOTE: Insert female end of accessory storage holder. SP6779-2 Ridgid WD1680 ...
... storage holder directly over accessory rod receptacles in both accessory storage holder clips and then pull straight up on rods of extension wand into accessory rod receptacles until fully seated with your vac. The accessories and hose should be ... Removing Accessory Storage Holder Push in dust drum. 2. Detachable Blower Accessory Storage Holder Accessories Cord Wrap Power Cord Cord Swivel 7 Cord Wrap When vacuuming is complete, unplug the cord and wrap it around the detachable blower as shown. NOTE: Insert female end of accessory storage holder. SP6779-2 Ridgid WD1680 ...
Owners Manual
Page 28
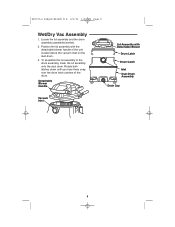
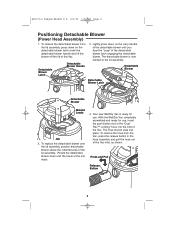
To assemble the lid assembly to the drum assembly, lower the lid assembly onto the dust drum. Locate the lid assembly and the drum assembly (assembled earlier). 2. Position the lid assembly with Detachable Blower Drum Latch Drum Catch Inlet Dust Drum Assembly Drain Cap 8 Detachable Blower Handle Vacuum Inlet Lid Assembly with the detachable blower handle of the drum. SP6779-2 Ridgid WD1680 E S 2/3/12 1:57 PM Page 8 Wet/Dry Vac Assembly 1. Rotate both latches...
To assemble the lid assembly to the drum assembly, lower the lid assembly onto the dust drum. Locate the lid assembly and the drum assembly (assembled earlier). 2. Position the lid assembly with Detachable Blower Drum Latch Drum Catch Inlet Dust Drum Assembly Drain Cap 8 Detachable Blower Handle Vacuum Inlet Lid Assembly with the detachable blower handle of the drum. SP6779-2 Ridgid WD1680 E S 2/3/12 1:57 PM Page 8 Wet/Dry Vac Assembly 1. Rotate both latches...
Owners Manual
Page 29
... new Wet/Dry Vac is now latched to the lid assembly. Press and Pull Release Button 9 The detachable blower is ready for use . With the Wet/Dry Vac completely assembled and ready for use , insert the push button end of the "DualFlex™ Locking" hose into place. To remove the detachable blower from the Vac, press the release button in the hose assembly and pull the hose out of the Vac. The hose should...
... new Wet/Dry Vac is now latched to the lid assembly. Press and Pull Release Button 9 The detachable blower is ready for use . With the Wet/Dry Vac completely assembled and ready for use , insert the push button end of the "DualFlex™ Locking" hose into place. To remove the detachable blower from the Vac, press the release button in the hose assembly and pull the hose out of the Vac. The hose should...
Owners Manual
Page 30
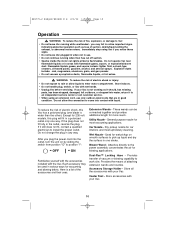
...). Used for wet pickup on by sliding the switch from position "O" to the power assembly concentrates the air for vacuuming and blowing debris. Attaches directly to position "l": = OFF = ON Familiarize yourself with the accessories included with your Vac. Dry pickup nozzle for most upholstery cleaning. Do not operate Vac near flammable liquids or in one way. Do not change the plug in the outlet, reverse the plug. Wet Nozzle - General...
...). Used for wet pickup on by sliding the switch from position "O" to the power assembly concentrates the air for vacuuming and blowing debris. Attaches directly to position "l": = OFF = ON Familiarize yourself with the accessories included with your Vac. Dry pickup nozzle for most upholstery cleaning. Do not operate Vac near flammable liquids or in one way. Do not change the plug in the outlet, reverse the plug. Wet Nozzle - General...

Owners Manual
Page 31
...the motor. 3. SP6779-2 Ridgid WD1680 E S 2/3/12 1:57 PM Page 11 Operation (continued) Vacuuming Dry Materials 1. If the filter is wet, the filter will be removed. Simply unscrew the drain cap and allow the liquid to lift comfortably. 11 When this happens, turn off air-...changing the filter. 3. When the liquid in pitch, due to cut off the Vac, unplug the power cord, and empty the drum. 4. You will know that the filter be necessary for easy emptying. Emptying the Drum ! When picking up material when the filter is not removed, it will clog quickly and be dried...
...the motor. 3. SP6779-2 Ridgid WD1680 E S 2/3/12 1:57 PM Page 11 Operation (continued) Vacuuming Dry Materials 1. If the filter is wet, the filter will be removed. Simply unscrew the drain cap and allow the liquid to lift comfortably. 11 When this happens, turn off air-...changing the filter. 3. When the liquid in pitch, due to cut off the Vac, unplug the power cord, and empty the drum. 4. You will know that the filter be necessary for easy emptying. Emptying the Drum ! When picking up material when the filter is not removed, it will clog quickly and be dried...

Owners Manual
Page 32
... to lift. SP6779-2 Ridgid WD1680 E S 2/3/12 1:57 PM Page 12 Operation (continued) Moving the Wet/Dry Vac Should it become necessary to pick the Vac up to move it, the handles on the detachable blower latch under the handle of the detachable blower and lift by pressing down on the sides of the dust drum are used to bystanders, keep them clear of...
... to lift. SP6779-2 Ridgid WD1680 E S 2/3/12 1:57 PM Page 12 Operation (continued) Moving the Wet/Dry Vac Should it become necessary to pick the Vac up to move it, the handles on the detachable blower latch under the handle of the detachable blower and lift by pressing down on the sides of the dust drum are used to bystanders, keep them clear of...

Owners Manual
Page 33
... Dusk Mask 3. Blowing Port TURN CLOCKWISE TO LOCK Blower Wand - OR 2. For added control, an extension wand and/or car nozzle can be used for blowing applications. 13 Insert the round end of the blower wand into the blowing port of the hose. Install the push button end of the Vac hose in the handle of using the seven-foot hose supplied with the Wet/Dry Vac.
... Dusk Mask 3. Blowing Port TURN CLOCKWISE TO LOCK Blower Wand - OR 2. For added control, an extension wand and/or car nozzle can be used for blowing applications. 13 Insert the round end of the blower wand into the blowing port of the hose. Install the push button end of the Vac hose in the handle of using the seven-foot hose supplied with the Wet/Dry Vac.
Owners Manual
Page 34
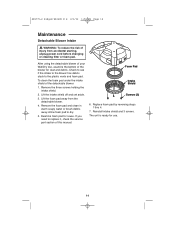
... need to replace it, check the service part section of the detachable blower: 1. The unit is ready for use. 14 WARNING: To reduce the risk of the blower for reuse. Foam Pad Intake Shield Screws (3) 6. Lift the foam pad away from accidental starting, unplug power cord before changing or cleaning filter or foam pad. Remove the foam pad and clean in warm soapy water or brush...
... need to replace it, check the service part section of the detachable blower: 1. The unit is ready for use. 14 WARNING: To reduce the risk of the blower for reuse. Foam Pad Intake Shield Screws (3) 6. Lift the foam pad away from accidental starting, unplug power cord before changing or cleaning filter or foam pad. Remove the foam pad and clean in warm soapy water or brush...
Owners Manual
Page 35
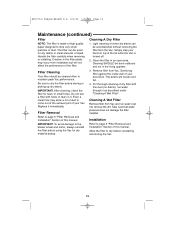
... performance of this manual. Cleaning A Wet Filter Remove filter from the Vac. Allow the filter to dry before storing or picking up dry debris. IMPORTANT: After cleaning, check the filter for dry debris or small amounts of dust. Simply slap your hand on top of your Vac. SP6779-2 Ridgid WD1680 E S 2/3/12 1:57 PM Page 15 Maintenance (continued) Filter Cleaning A Dry Filter NOTE: The filter is turned off. 2. Handle the filter carefully when removing or installing. Replace it as described under "Cleaning A Wet Filter". IMPORTANT: To...
... performance of this manual. Cleaning A Wet Filter Remove filter from the Vac. Allow the filter to dry before storing or picking up dry debris. IMPORTANT: After cleaning, check the filter for dry debris or small amounts of dust. Simply slap your hand on top of your Vac. SP6779-2 Ridgid WD1680 E S 2/3/12 1:57 PM Page 15 Maintenance (continued) Filter Cleaning A Dry Filter NOTE: The filter is turned off. 2. Handle the filter carefully when removing or installing. Replace it as described under "Cleaning A Wet Filter". IMPORTANT: To...
Owners Manual
Page 36
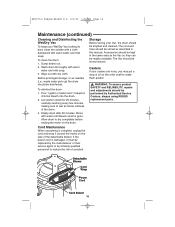
... service agent or by Authorized Service Centers, always using RIDGID replacement parts. Storage Before storing your casters are noisy, you may put a drop of the drum. 3. Cord Maintenance When vacuuming is gone. Detachable Blower Cord Wrap Power Cord Cord Swivel 16 SP6779-2 Ridgid WD1680 E S 2/3/12 1:57 PM Page 16 Maintenance (continued) Cleaning and Disinfecting the Wet/Dry Vac To keep your Wet/Dry Vac looking its best, clean the outside with a cloth dampened with warm water...
... service agent or by Authorized Service Centers, always using RIDGID replacement parts. Storage Before storing your casters are noisy, you may put a drop of the drum. 3. Cord Maintenance When vacuuming is gone. Detachable Blower Cord Wrap Power Cord Cord Swivel 16 SP6779-2 Ridgid WD1680 E S 2/3/12 1:57 PM Page 16 Maintenance (continued) Cleaning and Disinfecting the Wet/Dry Vac To keep your Wet/Dry Vac looking its best, clean the outside with a cloth dampened with warm water...
Owners Manual
Page 38
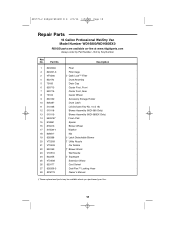
... Caster Wheel Accessory Storage Holder Drum Latch Lid (Includes Key No. 10 & 18) Blower Assembly (WD1680 Only) Blower Assembly (WD1680EX Only) Foam Pad Spacer Blower Wheel Washer Nut † Latch Detachable Blower † Utility Nozzle Car Nozzle † Blower Wand Wet Nozzle † Squeegee Extension Wand Cord Swivel Dual-Flex™ Locking Hose Owner's Manual † These replacement parts may be available where you purchased your Vac. 18...
... Caster Wheel Accessory Storage Holder Drum Latch Lid (Includes Key No. 10 & 18) Blower Assembly (WD1680 Only) Blower Assembly (WD1680EX Only) Foam Pad Spacer Blower Wheel Washer Nut † Latch Detachable Blower † Utility Nozzle Car Nozzle † Blower Wand Wet Nozzle † Squeegee Extension Wand Cord Swivel Dual-Flex™ Locking Hose Owner's Manual † These replacement parts may be available where you purchased your Vac. 18...
Owners Manual
Page 39
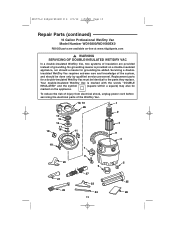
... (square within a square) may also be added. WARNING SERVICING OF DOUBLE-INSULATED WET/DRY VAC In a double-insulated Wet/Dry Vac, two systems of insulation are available on the appliance. Replacement parts for grounding be marked on -line at www.ridgidparts.com ! SP6779-2 Ridgid WD1680 E S 2/3/12 1:57 PM Page 19 Repair Parts (continued) 16 Gallon Professional Wet/Dry Vac Model Number WD16800/WD1680EX0 RIDGID parts are provided instead of grounding.
... (square within a square) may also be added. WARNING SERVICING OF DOUBLE-INSULATED WET/DRY VAC In a double-insulated Wet/Dry Vac, two systems of insulation are available on the appliance. Replacement parts for grounding be marked on -line at www.ridgidparts.com ! SP6779-2 Ridgid WD1680 E S 2/3/12 1:57 PM Page 19 Repair Parts (continued) 16 Gallon Professional Wet/Dry Vac Model Number WD16800/WD1680EX0 RIDGID parts are provided instead of grounding.

Owners Manual
Page 40
... of power head assembly. SP6779 Professional Tools Form No. SP6779-2 Ridgid WD1680 E S 2/3/12 1:57 PM Page 20 • What is covered RIDGID® Wet/Dry Vacs are not covered by this warranty. Pipe wrenches and other warranty on behalf of this warranty or make any authorized RIDGID® INDEPENDENT SERVICE CENTER. WD1680/WD1680EX Model No. or, if after three attempts to repair or replace during the warranty period the Wet/Dry Vac is...
... of power head assembly. SP6779 Professional Tools Form No. SP6779-2 Ridgid WD1680 E S 2/3/12 1:57 PM Page 20 • What is covered RIDGID® Wet/Dry Vacs are not covered by this warranty. Pipe wrenches and other warranty on behalf of this warranty or make any authorized RIDGID® INDEPENDENT SERVICE CENTER. WD1680/WD1680EX Model No. or, if after three attempts to repair or replace during the warranty period the Wet/Dry Vac is...


