Owners Manual
Page 2
......4-5 Symbols...6-7 Electrical...8-9 Glossary of this product making the use of Terms...10 Features...11-13 Tools Needed ...14 Loose Parts...15-16 Assembly...17-28 Operation...29-44 Adjustments...45-48 Maintenance...49-50 Troubleshooting...51-52 Warranty...53...
......4-5 Symbols...6-7 Electrical...8-9 Glossary of this product making the use of Terms...10 Features...11-13 Tools Needed ...14 Loose Parts...15-16 Assembly...17-28 Operation...29-44 Adjustments...45-48 Maintenance...49-50 Troubleshooting...51-52 Warranty...53...

Owners Manual
Page 3
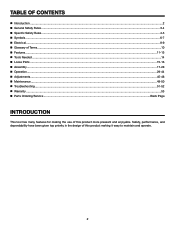
...ranges, refrigerator enclosures. KEEP GUARDS IN PLACE and in good working outdoors. Don't use of the tool, a guard or other part that is off when plugging in working order. KEEP BLADES CLEAN, SHARP, and with padlocks and master switches, or by removing ... purpose not intended. USE THE PROPER Extension Cord. Never yank cord to determine that is unintentionally contacted. CHECK DAMAGED PARTS. Sharp blades minimize stalling and kickback. 3 Learn the saw while it was not designed for outdoor use an outdoor extension cord marked "W-A"...
...ranges, refrigerator enclosures. KEEP GUARDS IN PLACE and in good working outdoors. Don't use of the tool, a guard or other part that is off when plugging in working order. KEEP BLADES CLEAN, SHARP, and with padlocks and master switches, or by removing ... purpose not intended. USE THE PROPER Extension Cord. Never yank cord to determine that is unintentionally contacted. CHECK DAMAGED PARTS. Sharp blades minimize stalling and kickback. 3 Learn the saw while it was not designed for outdoor use an outdoor extension cord marked "W-A"...

Owners Manual
Page 4
... into the blade resulting in serious personal injury. Normal sparking of drugs, alcohol, or any medication. When servicing use only identical replacement parts. Repair or replace a damaged or worn cord immediately. Always use a fence or straight edge guide when ripping. SUPPORT LARGE PANELS. ...ALWAYS USE BLADE GUARD, Spreader, AND ANTIKICKBACK PAWLS on all fences and auxiliary tables before cutting. Never touch blade or other parts may cause the risk of using your hand does not come close to prevent the push stick from oil and grease. GENERAL SAFETY ...
... into the blade resulting in serious personal injury. Normal sparking of drugs, alcohol, or any medication. When servicing use only identical replacement parts. Repair or replace a damaged or worn cord immediately. Always use a fence or straight edge guide when ripping. SUPPORT LARGE PANELS. ...ALWAYS USE BLADE GUARD, Spreader, AND ANTIKICKBACK PAWLS on all fences and auxiliary tables before cutting. Never touch blade or other parts may cause the risk of using your hand does not come close to prevent the push stick from oil and grease. GENERAL SAFETY ...
Owners Manual
Page 5
... type of work. g) Never reach around or over , or within the thickness range stamped on the spreader/riving knife. THIS TOOL should have any part of your body in line with the path of the saw blade. NEVER reach behind, over the saw blade. Some examples of these instructions...
... type of work. g) Never reach around or over , or within the thickness range stamped on the spreader/riving knife. THIS TOOL should have any part of your body in line with the path of the saw blade. NEVER reach behind, over the saw blade. Some examples of these instructions...
Owners Manual
Page 7
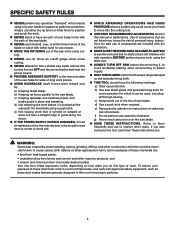
... Indicates an imminently hazardous situation, which, if not avoided, will result in death or serious injury. Call RIDGID® customer service for repair. We recommend Wide Vision Safety Mask for use only identical replacement parts. For service we suggest you return the product to your eyes, which can result in severe eye...
... Indicates an imminently hazardous situation, which, if not avoided, will result in death or serious injury. Call RIDGID® customer service for repair. We recommend Wide Vision Safety Mask for use only identical replacement parts. For service we suggest you return the product to your eyes, which can result in severe eye...
Owners Manual
Page 10
..., is designed to stop the workpiece from being kicked back toward operator. Dado Cut A non-through cut removing a wedge from a block so the end (or part of turns completed by a fence, miter gauge, or other than the kerf, which helps keep the kerf open and also helps to prevent kickback. Kerf...
..., is designed to stop the workpiece from being kicked back toward operator. Dado Cut A non-through cut removing a wedge from a block so the end (or part of turns completed by a fence, miter gauge, or other than the kerf, which helps keep the kerf open and also helps to prevent kickback. Kerf...
Owners Manual
Page 15
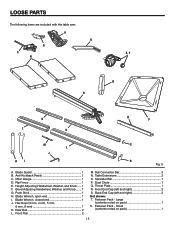
... Rail 2 M. Miter Gauge 1 D. Fastener Pack - Push Stick 1 H. Hex Keys (3 mm, 4 mm, 5 mm, 6 mm, 8 mm 1 K. Spreader Bar 1 P. Dust Chute 1 Q. Large (contents noted on pack 1 15 LOOSE PARTS The following items are included with the table saw: A G B C E, F N Q D K L K O P M S L J HI R Fig. 8 A. Height Adjusting Handwheel, Washer, and Knob...... 1 F. Small (contents noted on pack 1 S. Bevel Adjusting Handwheel...
... Rail 2 M. Miter Gauge 1 D. Fastener Pack - Push Stick 1 H. Hex Keys (3 mm, 4 mm, 5 mm, 6 mm, 8 mm 1 K. Spreader Bar 1 P. Dust Chute 1 Q. Large (contents noted on pack 1 15 LOOSE PARTS The following items are included with the table saw: A G B C E, F N Q D K L K O P M S L J HI R Fig. 8 A. Height Adjusting Handwheel, Washer, and Knob...... 1 F. Small (contents noted on pack 1 S. Bevel Adjusting Handwheel...

Owners Manual
Page 16
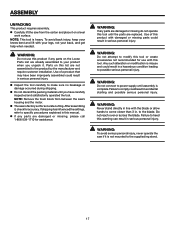
Caster Assembly 4 E. Center Support 1 I . Leg Stand Side Sections 2 B. Outer Corners 4 D. Rip Fence Storage Brackets 2 I Fig. 9 F. Leg Stand Front and Back 2 C. Rear Axle 1 G. Foot 4 16 Front Axle 1 H. LOOSE PARTS C A H F E B D G A.
Caster Assembly 4 E. Center Support 1 I . Leg Stand Side Sections 2 B. Outer Corners 4 D. Rip Fence Storage Brackets 2 I Fig. 9 F. Leg Stand Front and Back 2 C. Rear Axle 1 G. Foot 4 16 Front Axle 1 H. LOOSE PARTS C A H F E B D G A.
Owners Manual
Page 17
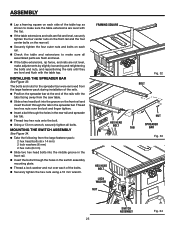
... create accessories not recommended for assistance. to comply could result in serious personal injury. Failure to heed this product if any parts are not assembled to the product by the manufacturer and require customer installation. Use of this product with this list are damaged... starting and possible serious personal injury. After assembling it, check for accurate cutting. WARNING: Do not use with damaged or missing parts could result in serious personal injury. If shipping has influenced the settings, refer to your back, and get help when needed. ...
... create accessories not recommended for assistance. to comply could result in serious personal injury. Failure to heed this product if any parts are not assembled to the product by the manufacturer and require customer installation. Use of this product with this list are damaged... starting and possible serious personal injury. After assembling it, check for accurate cutting. WARNING: Do not use with damaged or missing parts could result in serious personal injury. If shipping has influenced the settings, refer to your back, and get help when needed. ...

Owners Manual
Page 18
...; Insert a bolt into each side to the saw table. Repeat for assembly to remove the wrapping. From the large fastener pack, locate the following parts: 24 Bolts (M6 x 10) Place an outer corner outside a leg stand section. ASSEMBLING THE LEG stand See Figure 12. Locate the following... on the boards as the power cord. NOTE: The front of the stand is helpful to move the saw and set it easier to assemble parts, and to place two inch-thick boards on the floor before lifting the saw table and motor housing from the table and lift each of...
...; Insert a bolt into each side to the saw table. Repeat for assembly to remove the wrapping. From the large fastener pack, locate the following parts: 24 Bolts (M6 x 10) Place an outer corner outside a leg stand section. ASSEMBLING THE LEG stand See Figure 12. Locate the following... on the boards as the power cord. NOTE: The front of the stand is helpful to move the saw and set it easier to assemble parts, and to place two inch-thick boards on the floor before lifting the saw table and motor housing from the table and lift each of...
Owners Manual
Page 25
... in the rear rail and spreader bar tab. Thread two hex nuts onto the bolt. Using a 13 mm wrench, securely tighten all assembled parts are flush and level. If the table extensions, rip fence, and rails are not level, make sure all bolts. MOUNTING THE SWITCH ASSEMBLY See...
... in the rear rail and spreader bar tab. Thread two hex nuts onto the bolt. Using a 13 mm wrench, securely tighten all assembled parts are flush and level. If the table extensions, rip fence, and rails are not level, make sure all bolts. MOUNTING THE SWITCH ASSEMBLY See...

Owners Manual
Page 43
...: Always put all dado cuts are necessary when making a DADO cut See Figure 67. Note: The blade washer may purchase an optional dado throat plate (part number 080035003093). Fig. 67 Install the dado throat plate and rotate the blade by hand to move the wood through cuts. When the...
...: Always put all dado cuts are necessary when making a DADO cut See Figure 67. Note: The blade washer may purchase an optional dado throat plate (part number 080035003093). Fig. 67 Install the dado throat plate and rotate the blade by hand to move the wood through cuts. When the...
Owners Manual
Page 46
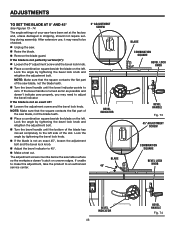
.... Turn the bevel handle until the bevel indicator points to adjust the bevel indicator. NOTE: Make sure that the square contacts the flat part of the blade has moved completely to 45°. Make a test cut. If the blade is turned as far as possible and doesn... blade, not the blade teeth. Place a combination square beside the blade on uneven edges. NOTE: Make sure that the square contacts the flat part of the slot. If the bevel handle is not perfectly vertical (0°): Loosen the 0º adjustment screw and the bevel lock knob. ...
.... Turn the bevel handle until the bevel indicator points to adjust the bevel indicator. NOTE: Make sure that the square contacts the flat part of the blade has moved completely to 45°. Make a test cut. If the blade is turned as far as possible and doesn... blade, not the blade teeth. Place a combination square beside the blade on uneven edges. NOTE: Make sure that the square contacts the flat part of the slot. If the bevel handle is not perfectly vertical (0°): Loosen the 0º adjustment screw and the bevel lock knob. ...
Owners Manual
Page 49
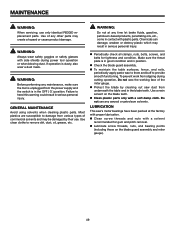
...smooth functioning. To prevent work from the power supply and the switch is dusty, also wear a dust mask. Do not use only identical RIDGID replacement parts. Failure to damage from underneath the table and in serious personal injury. Periodically check all clamps, nuts, bolts, screws, and ... for gum and pitch removal. Lubricate screw threads, nuts, and bearing points (including those on the blade teeth. Clean plastic parts only with side shields during cutting operation, Do not wax the working face of the miter gauge. Protect the blade by their use....
...smooth functioning. To prevent work from the power supply and the switch is dusty, also wear a dust mask. Do not use only identical RIDGID replacement parts. Failure to damage from underneath the table and in serious personal injury. Periodically check all clamps, nuts, bolts, screws, and ... for gum and pitch removal. Lubricate screw threads, nuts, and bearing points (including those on the blade teeth. Clean plastic parts only with side shields during cutting operation, Do not wax the working face of the miter gauge. Protect the blade by their use....
Owners Manual
Page 53
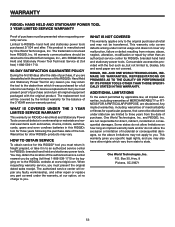
The replacement tool will repair any faulty workmanship, and either repair or replace any part covered under state law are dissatisfied with the performance of the 3 YEAR service warranty period. WHAT IS NOT COVERED This warranty applies only to ...TO THE QUALITY OR PERFORMANCE OF ITS POWER TOOLS OTHER THAN THOSE SPECIFICALLY STATED IN THIS WARRANTY. Box 35, Hwy. 8 Pickens, SC 29671 53 WARRANTY RIDGID® HAND HELD AND STATIONARY POWER TOOL 3 YEAR LIMITED SERVICE WARRANTY Proof of MERCHANTABILITY or FITNESS FOR A PARTICULAR PURPOSE, are disclaimed. Warranties for the ...
The replacement tool will repair any faulty workmanship, and either repair or replace any part covered under state law are dissatisfied with the performance of the 3 YEAR service warranty period. WHAT IS NOT COVERED This warranty applies only to ...TO THE QUALITY OR PERFORMANCE OF ITS POWER TOOLS OTHER THAN THOSE SPECIFICALLY STATED IN THIS WARRANTY. Box 35, Hwy. 8 Pickens, SC 29671 53 WARRANTY RIDGID® HAND HELD AND STATIONARY POWER TOOL 3 YEAR LIMITED SERVICE WARRANTY Proof of MERCHANTABILITY or FITNESS FOR A PARTICULAR PURPOSE, are disclaimed. Warranties for the ...

Owners Manual
Page 54
... information: Model No. Be sure to the motor housing. Please record the serial number in . R4512 Serial No. 987000-988 4-4-11 (REV:03) 54 TABLE SAW R4512 Customer Service Information For parts or service, contact your nearest RIDGID authorized service center. OPERATOR'S MANUAL 10 in the space provided below. For the location of this...
... information: Model No. Be sure to the motor housing. Please record the serial number in . R4512 Serial No. 987000-988 4-4-11 (REV:03) 54 TABLE SAW R4512 Customer Service Information For parts or service, contact your nearest RIDGID authorized service center. OPERATOR'S MANUAL 10 in the space provided below. For the location of this...


