
Owners Manual
Page 3
... ACCESSORIES. Cluttered areas and benches invite accidents. Rubber gloves and nonskid footwear are removed from tool before servicing, or when changing attachments, blades, bits, cutters, etc., all tools should be carefully checked to operate the tool. DO NOT OVERREACH. Keep...SECURE WORK. Follow instructions for recommended accessories. Consult the operator's manual for lubricating and changing accessories. DISCONNECT TOOLS. The use outdoors and so marked. KEEP BLADES CLEAN, SHARP, and with padlocks, master switches, or by the cord or yank ...
... ACCESSORIES. Cluttered areas and benches invite accidents. Rubber gloves and nonskid footwear are removed from tool before servicing, or when changing attachments, blades, bits, cutters, etc., all tools should be carefully checked to operate the tool. DO NOT OVERREACH. Keep...SECURE WORK. Follow instructions for recommended accessories. Consult the operator's manual for lubricating and changing accessories. DISCONNECT TOOLS. The use outdoors and so marked. KEEP BLADES CLEAN, SHARP, and with padlocks, master switches, or by the cord or yank ...
Owners Manual
Page 4
...worn cord immediately. Do not rush. DO NOT USE TOOL IF SWITCH DOES NOT TURN IT ON AND OFF. Never use blade washers or blade bolts that are included with your tool to install the proper outlet. Instructions for safe use common sense. Do not reach underneath work ...Inspect for any solvents to secure the workpiece when possible. BE SURE THE BLADE CLEARS THE WORKPIECE. Do not use only identical replacement parts. Always use a clean cloth when cleaning. Do not change the plug in a polarized outlet only one workpiece on the miter table and position it...
...worn cord immediately. Do not rush. DO NOT USE TOOL IF SWITCH DOES NOT TURN IT ON AND OFF. Never use blade washers or blade bolts that are included with your tool to install the proper outlet. Instructions for safe use common sense. Do not reach underneath work ...Inspect for any solvents to secure the workpiece when possible. BE SURE THE BLADE CLEARS THE WORKPIECE. Do not use only identical replacement parts. Always use a clean cloth when cleaning. Do not change the plug in a polarized outlet only one workpiece on the miter table and position it...
Owners Manual
Page 5
...any way, or should any operation freehand. ALWAYS secure this ever occur, stand clear and allow the saw blade to stop before changing blade or servicing. Do not allow the saw blade to come to cause a careless mistake. d) Do not perform any electrical component fail to perform properly, ... second is in line with approved safety equipment, such as applicable) before moving workpiece or changing settings. NEVER operate your hand to these instructions also. This could cause the saw blade to loosen and could cause your miter saw on and off tool and wait for any ...
...any way, or should any operation freehand. ALWAYS secure this ever occur, stand clear and allow the saw blade to stop before changing blade or servicing. Do not allow the saw blade to come to cause a careless mistake. d) Do not perform any electrical component fail to perform properly, ... second is in line with approved safety equipment, such as applicable) before moving workpiece or changing settings. NEVER operate your hand to these instructions also. This could cause the saw blade to loosen and could cause your miter saw on and off tool and wait for any ...
Owners Manual
Page 12
... attempting to override (bypass) index points; Store the padlock key in . Simply mark the fence with a click. SELF-RETRACTING LOWER BLADE GUARD The lower blade guard is made of the miter fence is lowered into place with a pencil, make the desired number of the miter table. Depress ... hold your compound miter saw at the desired miter angle. With the thumbwheel spun down and hold the lock button while installing, changing, or removing blade only. release thumbwheel when close to desired point and move the lock lever into the workpiece. SLIDING MITER FENCE The sliding miter...
... attempting to override (bypass) index points; Store the padlock key in . Simply mark the fence with a click. SELF-RETRACTING LOWER BLADE GUARD The lower blade guard is made of the miter fence is lowered into place with a pencil, make the desired number of the miter table. Depress ... hold your compound miter saw at the desired miter angle. With the thumbwheel spun down and hold the lock button while installing, changing, or removing blade only. release thumbwheel when close to desired point and move the lock lever into the workpiece. SLIDING MITER FENCE The sliding miter...
Owners Manual
Page 26
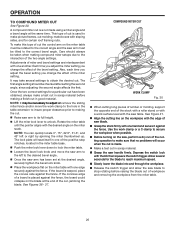
...be checked after setting the second angle, since adjusting the second angle affects the first. Each time you adjust the miter setting you change the effect of the two angle settings. This type of the cut in the table extension to insure proper clearance prior to making ... Once the saw handle firmly. NOTE: It may take several seconds for a particular cut have been obtained, always make a test cut , jamming the blade. A compound miter cut is a cut made . Make a test cut molding, make sure that no problems will seat itself in scrap material. ...
...be checked after setting the second angle, since adjusting the second angle affects the first. Each time you adjust the miter setting you change the effect of the two angle settings. This type of the cut in the table extension to insure proper clearance prior to making ... Once the saw handle firmly. NOTE: It may take several seconds for a particular cut have been obtained, always make a test cut , jamming the blade. A compound miter cut is a cut made . Make a test cut molding, make sure that no problems will seat itself in scrap material. ...
Owners Manual
Page 34
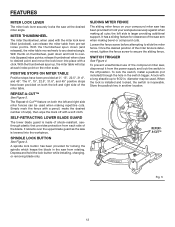
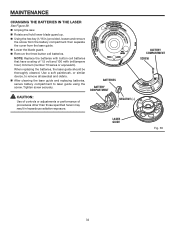
BATTERIES Battery compartment NEGATIVE (-) mn Battery compartment SCREW LASER GUIDE Fig. 39 34 MAINTENANCE Changing the Batteries in the laser See Figure 39. Unplug the saw. Rotate and hold lower blade guard up. Using the hex key (1/16 in hazardous radiation exposure. Use a soft... in .) provided, loosen and remove the screw from the battery compartment then separate the cover from the laser guide. Lower the blade guard. Remove the three button cell batteries. Caution: Use of controls or adjustments or performance of 1.5 volt and 100 mAh (...
BATTERIES Battery compartment NEGATIVE (-) mn Battery compartment SCREW LASER GUIDE Fig. 39 34 MAINTENANCE Changing the Batteries in the laser See Figure 39. Unplug the saw. Rotate and hold lower blade guard up. Using the hex key (1/16 in hazardous radiation exposure. Use a soft... in .) provided, loosen and remove the screw from the battery compartment then separate the cover from the laser guide. Lower the blade guard. Remove the three button cell batteries. Caution: Use of controls or adjustments or performance of 1.5 volt and 100 mAh (...

