
Owners Manual
Page 10
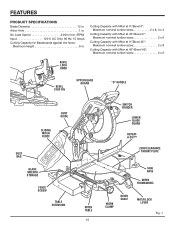
FEATURES Product Specifications Blade Diameter 12 in . No Load Speed 4,000 r/min. (RPM) Input 120 V, AC Only, 60 Hz, 15 Amps Cutting Capacity for Baseboards against the fence: Maximum ... at 45°/Bevel 45°: Maximum nominal lumber sizes 2 x 6 BEVEL LOCK KNOB BEVEL STOP PIN Upper Blade Guard "D" HANDLE Dust GUIDE sliding MITER Fence Dust bag BLADE WRENCH STORAGE Fence Screw table extension Switch Trigger Lower blade guard REPEATA-CUT™ zero clearance throat plate Miter Table 10 SAW BASE MITER thumbwheel WORK CLAMP Miter...
FEATURES Product Specifications Blade Diameter 12 in . No Load Speed 4,000 r/min. (RPM) Input 120 V, AC Only, 60 Hz, 15 Amps Cutting Capacity for Baseboards against the fence: Maximum ... at 45°/Bevel 45°: Maximum nominal lumber sizes 2 x 6 BEVEL LOCK KNOB BEVEL STOP PIN Upper Blade Guard "D" HANDLE Dust GUIDE sliding MITER Fence Dust bag BLADE WRENCH STORAGE Fence Screw table extension Switch Trigger Lower blade guard REPEATA-CUT™ zero clearance throat plate Miter Table 10 SAW BASE MITER thumbwheel WORK CLAMP Miter...
Owners Manual
Page 12
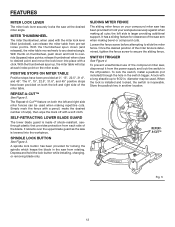
... cuts. A lock with a long shackle up , the miter table will stop at 0°, 15°, 22.5°, 31.6°, and 45°. SELF-RETRACTING LOWER BLADE GUARD The lower blade guard is lowered into place with the miter lock lever lifted (unlocked), can release the miter table from each index point on both the left and right...
... cuts. A lock with a long shackle up , the miter table will stop at 0°, 15°, 22.5°, 31.6°, and 45°. SELF-RETRACTING LOWER BLADE GUARD The lower blade guard is lowered into place with the miter lock lever lifted (unlocked), can release the miter table from each index point on both the left and right...
Owners Manual
Page 17
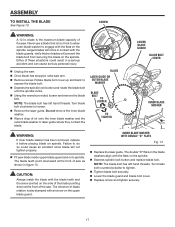
... the flats on the spindle. Larger blades will come in . Lower blade guard Blade BOLT cover Unplug the saw. Once blade has stopped, raise saw . Turn blade bolt clockwise to tighten. Tighten blade bolt securely. Lower the blade guard and blade bolt cover. Replace screw and tighten securely. 17 NOTE: The blade bolt has left hand threads. Either...
... the flats on the spindle. Larger blades will come in . Lower blade guard Blade BOLT cover Unplug the saw. Once blade has stopped, raise saw . Turn blade bolt clockwise to tighten. Tighten blade bolt securely. Lower the blade guard and blade bolt cover. Replace screw and tighten securely. 17 NOTE: The blade bolt has left hand threads. Either...
Owners Manual
Page 32
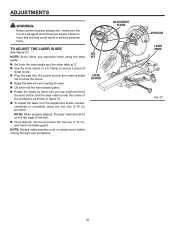
... source and make sure the tool is near the center of the kerf. Once aligned, remove and store the hex key (1/16 in.), and lower the blade guard. NOTE: Always make practice cuts on the left edge of the workpiece as shown in figure 37. To adjust the laser, turn the... table at 0°. Use the work clamp or a C-clamp to secure a piece of scrap wood. Plug the saw . Lift and hold the lower blade guard. Rotate the blade by hand until you can push and hold the laser button and the laser mark is unplugged from the power supply.
... source and make sure the tool is near the center of the kerf. Once aligned, remove and store the hex key (1/16 in.), and lower the blade guard. NOTE: Always make practice cuts on the left edge of the workpiece as shown in figure 37. To adjust the laser, turn the... table at 0°. Use the work clamp or a C-clamp to secure a piece of scrap wood. Plug the saw . Lift and hold the lower blade guard. Rotate the blade by hand until you can push and hold the laser button and the laser mark is unplugged from the power supply.
Owners Manual
Page 34
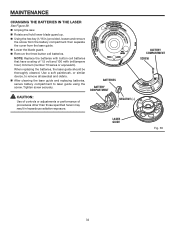
MAINTENANCE Changing the Batteries in the laser See Figure 39. Unplug the saw. Rotate and hold lower blade guard up. Using the hex key (1/16 in hazardous radiation exposure. Note: Replace the batteries with button cell batteries that have a ...specified herein may result in .) provided, loosen and remove the screw from the battery compartment then separate the cover from the laser guide. Lower the blade guard. Remove the three button cell batteries. Use a soft paintbrush, or similar device, to remove all sawdust and debris. After ...
MAINTENANCE Changing the Batteries in the laser See Figure 39. Unplug the saw. Rotate and hold lower blade guard up. Using the hex key (1/16 in hazardous radiation exposure. Note: Replace the batteries with button cell batteries that have a ...specified herein may result in .) provided, loosen and remove the screw from the battery compartment then separate the cover from the laser guide. Lower the blade guard. Remove the three button cell batteries. Use a soft paintbrush, or similar device, to remove all sawdust and debris. After ...


