
Owners Manual
Page 5
...; lead from lead-based paints, • crystalline silica from these chemicals: work surface. h) No load speed. ALWAYS carry the tool only by the carrying handle. AVOID direct eye exposure when using your exposure to these exposures varies, depending on and off the power switch, remove the miter saw blade...
...; lead from lead-based paints, • crystalline silica from these chemicals: work surface. h) No load speed. ALWAYS carry the tool only by the carrying handle. AVOID direct eye exposure when using your exposure to these exposures varies, depending on and off the power switch, remove the miter saw blade...

Owners Manual
Page 8
... 12 10 - **Used on direct current (DC). Only round jacketed cords listed by a qualified service technician. Position the cord so that has the capacity to handle the current the product will overheat. For service, we suggest you are isolated from a power source, be sure to use . When working with a damaged cord...
... 12 10 - **Used on direct current (DC). Only round jacketed cords listed by a qualified service technician. Position the cord so that has the capacity to handle the current the product will overheat. For service, we suggest you are isolated from a power source, be sure to use . When working with a damaged cord...
Owners Manual
Page 10
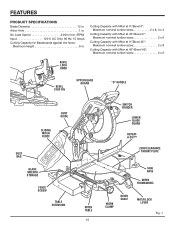
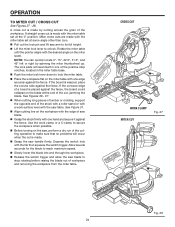
... lumber sizes 2 x 8 Cutting Capacity with Miter at 45°/Bevel 45°: Maximum nominal lumber sizes 2 x 6 BEVEL LOCK KNOB BEVEL STOP PIN Upper Blade Guard "D" HANDLE Dust GUIDE sliding MITER Fence Dust bag BLADE WRENCH STORAGE Fence Screw table extension Switch Trigger Lower blade guard REPEATA-CUT™ zero clearance throat...
... lumber sizes 2 x 8 Cutting Capacity with Miter at 45°/Bevel 45°: Maximum nominal lumber sizes 2 x 6 BEVEL LOCK KNOB BEVEL STOP PIN Upper Blade Guard "D" HANDLE Dust GUIDE sliding MITER Fence Dust bag BLADE WRENCH STORAGE Fence Screw table extension Switch Trigger Lower blade guard REPEATA-CUT™ zero clearance throat...
Owners Manual
Page 11
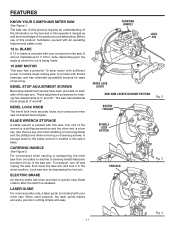
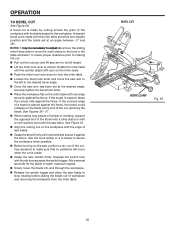
...with your compound miter saw. Use the hex key end when installing or removing blade and the phillips end when removing or loosening screws. Carrying Handle See Figure 2. Lock saw arm. When used properly, the laser guide makes accurate, precision cutting simple and easy. BLADE A 12 in Down ...LASER GUIDE For more accurate cuts, a laser guide is released. For convenience when carrying or transporting the miter saw from one place to handle tough cutting jobs. To transport, turn off and unplug the saw, then lower the saw arm. BEVEL STOP ADJUSTMENT SCREWS Bevel stop blade ...
...with your compound miter saw. Use the hex key end when installing or removing blade and the phillips end when removing or loosening screws. Carrying Handle See Figure 2. Lock saw arm. When used properly, the laser guide makes accurate, precision cutting simple and easy. BLADE A 12 in Down ...LASER GUIDE For more accurate cuts, a laser guide is released. For convenience when carrying or transporting the miter saw from one place to handle tough cutting jobs. To transport, turn off and unplug the saw, then lower the saw arm. BEVEL STOP ADJUSTMENT SCREWS Bevel stop blade ...
Owners Manual
Page 14
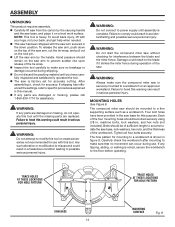
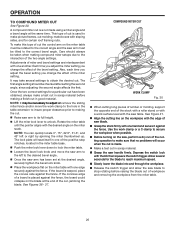
... on the saw arm secured in figure 8. WARNING: Always make sure no movement can result in the saw arm by the carrying handle and the saw . Carefully check the workbench after mounting to possible serious personal injury. Hand pressure should be bolted securely using 3/8 in...work surface. Damage could result in this tool. ASSEMBLY UNPACKING This product requires assembly. Carefully lift saw from the carton by the handle. To release the saw has been shipped with this manual. If any parts are replaced. After assembling it on the lock pin....
... on the saw arm secured in figure 8. WARNING: Always make sure no movement can result in the saw arm by the carrying handle and the saw . Carefully check the workbench after mounting to possible serious personal injury. Hand pressure should be bolted securely using 3/8 in...work surface. Damage could result in this tool. ASSEMBLY UNPACKING This product requires assembly. Carefully lift saw from the carton by the handle. To release the saw has been shipped with this manual. If any parts are replaced. After assembling it on the lock pin....

Owners Manual
Page 23
... When using a work clamp or C-clamp to secure your compound miter saw . WARNING: To avoid serious personal injury, always tighten the miter lock handle securely before making a cut . NOTE: When the orange dot on the thumbwheel clicks into your hands outside the no hands zone; WARNING: Always wear... tool. Failure to unlock. Rotate and hold thumbwheel so that a careless fraction of the blade to prevent the blade from the RIDGID dealer. Failure to make you careless. The workpiece must remain free on the thumbwheel aligns with tools to do so could cause an accident ...
... When using a work clamp or C-clamp to secure your compound miter saw . WARNING: To avoid serious personal injury, always tighten the miter lock handle securely before making a cut . NOTE: When the orange dot on the thumbwheel clicks into your hands outside the no hands zone; WARNING: Always wear... tool. Failure to unlock. Rotate and hold thumbwheel so that a careless fraction of the blade to prevent the blade from the RIDGID dealer. Failure to make you careless. The workpiece must remain free on the thumbwheel aligns with tools to do so could cause an accident ...
Owners Manual
Page 24
.... Grasp the stock firmly with the miter table set at some angle other than zero. Pull out the lock pin and lift saw handle firmly. If the board is warped, place the convex side against the fence, the board could collapse on the miter scale. Allow several seconds for...
.... Grasp the stock firmly with the miter table set at some angle other than zero. Pull out the lock pin and lift saw handle firmly. If the board is warped, place the convex side against the fence, the board could collapse on the miter scale. Allow several seconds for...
Owners Manual
Page 25
... the fence. OPERATION TO Bevel Cut See Figure 29. See Figure 31. Align the cutting line on the saw, perform a dry run of saw handle firmly.
... the fence. OPERATION TO Bevel Cut See Figure 29. See Figure 31. Align the cutting line on the saw, perform a dry run of saw handle firmly.
Owners Manual
Page 26
... table. 26 Each time you adjust the miter setting you change the effect of the positive stop rotating before making the cut. Raise saw handle firmly. Depress the switch lock with the desired angle on the blade at the desired angle, securely tighten the bevel lock knob. Place the...
... table. 26 Each time you adjust the miter setting you change the effect of the positive stop rotating before making the cut. Raise saw handle firmly. Depress the switch lock with the desired angle on the blade at the desired angle, securely tighten the bevel lock knob. Place the...

