

Owners Manual
Page 1
OPERATOR'S MANUAL 12 in. COMPOUND MITER SAW with Laser R4120 - SAVE THIS MANUAL FOR FUTURE REFERENCE Thank you years of rugged, trouble-free performance. Double Insulated Your miter saw has been engineered and manufactured to our high standard for buying a RIDGID® product. WARNING: To reduce the risk of operation, and operator safety. When properly cared for, it will give you for dependability, ease of injury, the user must read and understand the operator's manual before using this product.
OPERATOR'S MANUAL 12 in. COMPOUND MITER SAW with Laser R4120 - SAVE THIS MANUAL FOR FUTURE REFERENCE Thank you years of rugged, trouble-free performance. Double Insulated Your miter saw has been engineered and manufactured to our high standard for buying a RIDGID® product. WARNING: To reduce the risk of operation, and operator safety. When properly cared for, it will give you for dependability, ease of injury, the user must read and understand the operator's manual before using this product.

Owners Manual
Page 4
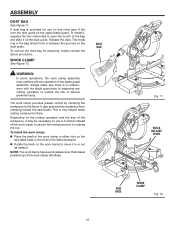
...DOUBLE CHECK ALL SETUPS. Always use the fence. 4 Inspect for and remove all adjustments are included with saw with incorrect size holes. Never start the saw or workpiece before starting cut on the miter table and position it well away from oil and grease. NEVER hold onto or bind the free scrap... end of the electric cord or plug is 12 in any reason. If a work or in a polarized...
...DOUBLE CHECK ALL SETUPS. Always use the fence. 4 Inspect for and remove all adjustments are included with saw with incorrect size holes. Never start the saw or workpiece before starting cut on the miter table and position it well away from oil and grease. NEVER hold onto or bind the free scrap... end of the electric cord or plug is 12 in any reason. If a work or in a polarized...
Owners Manual
Page 10
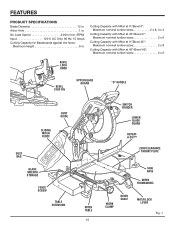
...12 in . Cutting Capacity with Miter at 0°/Bevel 0°: Maximum nominal lumber sizes 2 x 8, 4 x 4 Cutting Capacity with Miter at 45°/Bevel 0°: Maximum nominal lumber sizes 2 x 6 Cutting Capacity with Miter at 0°/Bevel 45°: Maximum nominal lumber sizes 2 x 8 Cutting Capacity with Miter... WRENCH STORAGE Fence Screw table extension Switch Trigger Lower blade guard REPEATA-CUT™ zero clearance throat plate Miter Table 10 SAW BASE MITER thumbwheel WORK CLAMP Miter Scale Miter Lock lever Fig. 1 Arbor Hole 1 in . No Load Speed 4,000 r/min. (RPM) Input...
...12 in . Cutting Capacity with Miter at 0°/Bevel 0°: Maximum nominal lumber sizes 2 x 8, 4 x 4 Cutting Capacity with Miter at 45°/Bevel 0°: Maximum nominal lumber sizes 2 x 6 Cutting Capacity with Miter at 0°/Bevel 45°: Maximum nominal lumber sizes 2 x 8 Cutting Capacity with Miter... WRENCH STORAGE Fence Screw table extension Switch Trigger Lower blade guard REPEATA-CUT™ zero clearance throat plate Miter Table 10 SAW BASE MITER thumbwheel WORK CLAMP Miter Scale Miter Lock lever Fig. 1 Arbor Hole 1 in . No Load Speed 4,000 r/min. (RPM) Input...
Owners Manual
Page 11
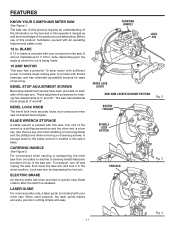
... is packed with all operating features and safety rules. 12 in. ELECTRIC BRAKE An electric brake has been provided to handle tough cutting jobs. BEVEL STOP ADJUSTMENT SCREWS Bevel stop blade rotation after the switch is included with your miter saw arm by depressing the lock pin. LASER GUIDE For more accurate cuts...
... is packed with all operating features and safety rules. 12 in. ELECTRIC BRAKE An electric brake has been provided to handle tough cutting jobs. BEVEL STOP ADJUSTMENT SCREWS Bevel stop blade rotation after the switch is included with your miter saw arm by depressing the lock pin. LASER GUIDE For more accurate cuts...
Owners Manual
Page 12
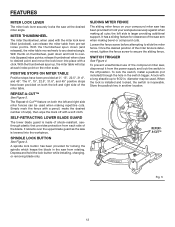
... is determined, tighten the fence screw to 9/32 in the saw at each side of the compound miter saw is larger providing additional support. REPEAT-A-CUT™ See Figure 5. SLIDING MITER FENCE The sliding miter fence on the miter scale. Once the desired position of cut(s), then wipe the... and move the lock lever into the workpiece. diameter may be used . REPEATA-CUT™ Fig. 5 12 release thumbwheel when close to hold your compound miter saw arm when making repetitive cuts. Loosen the fence screw before attempting to any desired angle. SWITCH TRIGGER See Figure...
... is determined, tighten the fence screw to 9/32 in the saw at each side of the compound miter saw is larger providing additional support. REPEAT-A-CUT™ See Figure 5. SLIDING MITER FENCE The sliding miter fence on the miter scale. Once the desired position of cut(s), then wipe the... and move the lock lever into the workpiece. diameter may be used . REPEATA-CUT™ Fig. 5 12 release thumbwheel when close to hold your compound miter saw arm when making repetitive cuts. Loosen the fence screw before attempting to any desired angle. SWITCH TRIGGER See Figure...
Owners Manual
Page 16
... blade guard prior to beginning any cutting operation to making the cut. Release the clips. WORK CLAMP See Figure 12. Always make sure there is very helpful when cutting compound miters. This is no interference with the operation of the work clamp in or out as needed. A dust bag ...to secure the workpiece prior to reduce the risk of the workpiece, it in either hole on the saw . It also prevents the workpiece from creeping toward the saw BasE Work Clamp Fig. 12 16 The work clamp effortless. NOTE: The work clamp has a quick release lever that makes positioning of...
... blade guard prior to beginning any cutting operation to making the cut. Release the clips. WORK CLAMP See Figure 12. Always make sure there is very helpful when cutting compound miters. This is no interference with the operation of the work clamp in or out as needed. A dust bag ...to secure the workpiece prior to reduce the risk of the workpiece, it in either hole on the saw . It also prevents the workpiece from creeping toward the saw BasE Work Clamp Fig. 12 16 The work clamp effortless. NOTE: The work clamp has a quick release lever that makes positioning of...

Owners Manual
Page 29
With the crown molding laying flat, cut at the following chart illustrates the miter and bevel angle settings of the miter saw for both 52˚/38˚ and 45˚/45˚ crown molding, when the angle between the walls run from 67˚ to 146&#.../27.94 31.58/27.64 31.13/27.34 30.68/27.03 30.24/26.73 29.80/26.42 29.36/26.12 28.92/25.81 28.48/25.50 28.05/25.19 wall angle 107 108 109 110 111 112 113 114 115 116 117.../18.31 14.65/17.93 14.30/17.55 13.97/17.17 13.63/16.79 13.30/16.40 12.96/16.02 12.63/15.64 12.30/15.25 11.97/14.87 11.64/14.48 11.31/14.09 10.99/13.71 10.66/13...
With the crown molding laying flat, cut at the following chart illustrates the miter and bevel angle settings of the miter saw for both 52˚/38˚ and 45˚/45˚ crown molding, when the angle between the walls run from 67˚ to 146&#.../27.94 31.58/27.64 31.13/27.34 30.68/27.03 30.24/26.73 29.80/26.42 29.36/26.12 28.92/25.81 28.48/25.50 28.05/25.19 wall angle 107 108 109 110 111 112 113 114 115 116 117.../18.31 14.65/17.93 14.30/17.55 13.97/17.17 13.63/16.79 13.30/16.40 12.96/16.02 12.63/15.64 12.30/15.25 11.97/14.87 11.64/14.48 11.31/14.09 10.99/13.71 10.66/13...

Owners Manual
Page 36
...12 in the space provided below. The model number of the authorized service center nearest you call 1-866-539-1710 or visit us online at www.ridgid.com. When ordering repair parts, always give the following information: Model No. Be sure to the motor housing. Please record the serial number in . COMPOUND MITER SAW... with Laser R4120 -
...12 in the space provided below. The model number of the authorized service center nearest you call 1-866-539-1710 or visit us online at www.ridgid.com. When ordering repair parts, always give the following information: Model No. Be sure to the motor housing. Please record the serial number in . COMPOUND MITER SAW... with Laser R4120 -

