Owners Manual
Page 2
... OF CONTENTS Introduction...2 General Safety Rules...3-4 Specific Safety Rules...5 Symbols...6 Electrical...7-8 Features...9-10 Tools Needed...10 Loose Parts...11 Assembly...12-20 Operation...21-25 Adjustments...26-27 Maintenance...27-28 Warranty...29 ...
... OF CONTENTS Introduction...2 General Safety Rules...3-4 Specific Safety Rules...5 Symbols...6 Electrical...7-8 Features...9-10 Tools Needed...10 Loose Parts...11 Assembly...12-20 Operation...21-25 Adjustments...26-27 Maintenance...27-28 Warranty...29 ...
Owners Manual
Page 3
... and be carefully checked to rain. Learn the saw while it was designed. USE RIGHT TOOL. A wire gauge size (A.W.G.) of parts, mounting and any tool. USE RECOMMENDED ACCESSORIES. Keep tools sharp and clean for lubricating and changing accessories. DISCONNECT TOOLS. .... The smaller the gauge number, the heavier the cord. DRESS PROPERLY. Be sure switch is unintentionally contacted. CHECK DAMAGED PARTS. A guard or other conditions that is dusty. PROTECT YOUR HEARING. Wear a face or dust mask if the cutting operation is ...
... and be carefully checked to rain. Learn the saw while it was designed. USE RIGHT TOOL. A wire gauge size (A.W.G.) of parts, mounting and any tool. USE RECOMMENDED ACCESSORIES. Keep tools sharp and clean for lubricating and changing accessories. DISCONNECT TOOLS. .... The smaller the gauge number, the heavier the cord. DRESS PROPERLY. Be sure switch is unintentionally contacted. CHECK DAMAGED PARTS. A guard or other conditions that is dusty. PROTECT YOUR HEARING. Wear a face or dust mask if the cutting operation is ...
Owners Manual
Page 4
...254 mm). Before making a cut material when wheel is the equipment-grounding conductor. The conductor with or without yellow stripes is moving parts during use. NEVER START A TOOL WHEN ANY ROTATiNG COMPONENT IS IN CONTACT WITH THE WORKPIECE. DO NOT operate A ...61550; NEVER USE IN AN EXPLOSIVE ATMOSPHERE. If it should be sure all adjustments are secure. Never touch WHEEL or other parts may cause the risk of accessories are defective or incorrect. Never use brake fluids, gasoline, petroleum-based products, or any medication. ...
...254 mm). Before making a cut material when wheel is the equipment-grounding conductor. The conductor with or without yellow stripes is moving parts during use. NEVER START A TOOL WHEN ANY ROTATiNG COMPONENT IS IN CONTACT WITH THE WORKPIECE. DO NOT operate A ...61550; NEVER USE IN AN EXPLOSIVE ATMOSPHERE. If it should be sure all adjustments are secure. Never touch WHEEL or other parts may cause the risk of accessories are defective or incorrect. Never use brake fluids, gasoline, petroleum-based products, or any medication. ...
Owners Manual
Page 5
... a well ventilated area, and work with approved safety equipment, such as those dust masks that no obstructions will interfere with safe operation BEFORE performing any part of your body in line with the path of the wheel. NEVER attempt to free a stalled wheel without first turning the saw OFF and...
... a well ventilated area, and work with approved safety equipment, such as those dust masks that no obstructions will interfere with safe operation BEFORE performing any part of your body in line with the path of the wheel. NEVER attempt to free a stalled wheel without first turning the saw OFF and...
Owners Manual
Page 8
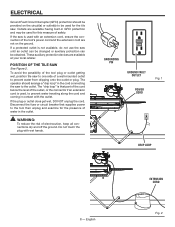
... in contact with wet hands. If the plug or outlet does get wet, DO NOT unplug the cord. Disconnect the fuse or circuit breaker that part of the cord below the level of the outlet, or the connector if an extension cord is used, to prevent water from dripping onto the...
... in contact with wet hands. If the plug or outlet does get wet, DO NOT unplug the cord. Disconnect the fuse or circuit breaker that part of the cord below the level of the outlet, or the connector if an extension cord is used, to prevent water from dripping onto the...
Owners Manual
Page 11
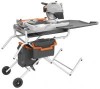
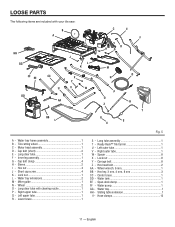
... table extension 1 II - English Lower brace 1 S - Ready Rack™ Tile Carrier 1 U - Wheel wrench, 6 mm 1 BB - Center brace 1 DD - Hex key, 3 mm, 4 mm, 8 mm 3 CC - LOOSE PARTS The following items are included with cleaning nozzle 1 P - Water tray extensions 2 M - Right upper tube 1 Q - Hex head bolt 2 AA - Water tray 1 HH - Cap bolt (short 2 E - Lock...
... table extension 1 II - English Lower brace 1 S - Ready Rack™ Tile Carrier 1 U - Wheel wrench, 6 mm 1 BB - Center brace 1 DD - Hex key, 3 mm, 4 mm, 8 mm 3 CC - LOOSE PARTS The following items are included with cleaning nozzle 1 P - Water tray extensions 2 M - Right upper tube 1 Q - Hex head bolt 2 AA - Water tray 1 HH - Cap bolt (short 2 E - Lock...
Owners Manual
Page 12
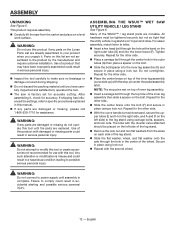
... result in serious personal injury. Inspect the tool carefully to the product by the manufacturer and require customer installation. Parts on the Loose Parts List are not assembled to make sure no breakage or damage occurred during shipping. Do not discard the packing material... create accessories not recommended for the other side. Place a carriage bolt through the center hole in this manual. If any parts are damaged or missing, please call 1‑866‑539-1710 for accuracy. WARNING: Do not connect to letter. Insert a hex...
... result in serious personal injury. Inspect the tool carefully to the product by the manufacturer and require customer installation. Parts on the Loose Parts List are not assembled to make sure no breakage or damage occurred during shipping. Do not discard the packing material... create accessories not recommended for the other side. Place a carriage bolt through the center hole in this manual. If any parts are damaged or missing, please call 1‑866‑539-1710 for accuracy. WARNING: Do not connect to letter. Insert a hex...
Owners Manual
Page 23
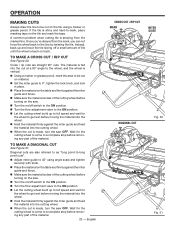
... the saw OFF. Wait for the cutting wheel to come to a complete stop before removing any part of the material. 23 - Wait for the cutting wheel to come to a complete stop before removing any part of the material. If the tile is shiny and hard-to the line by twisting the tile...
... the saw OFF. Wait for the cutting wheel to come to a complete stop before removing any part of the material. 23 - Wait for the cutting wheel to come to a complete stop before removing any part of the material. If the tile is shiny and hard-to the line by twisting the tile...
Owners Manual
Page 24
... position. Let the cutting wheel build up to full speed and wait for the cutting wheel to come to a complete stop before removing any part of the cutting wheel before turning on the saw. Turn the on/off switch to the on position. Turn the flow adjustment valve... Fig. 33 Miter cuts are used for cutting outside and inside corners on material, decorative chair rail, and base molding with the material at any part of molding and are cuts that remove a piece of tile to fit in place, and tighten the lock knob. Place the material on the...
... position. Let the cutting wheel build up to full speed and wait for the cutting wheel to come to a complete stop before removing any part of the cutting wheel before turning on the saw. Turn the on/off switch to the on position. Turn the flow adjustment valve... Fig. 33 Miter cuts are used for cutting outside and inside corners on material, decorative chair rail, and base molding with the material at any part of molding and are cuts that remove a piece of tile to fit in place, and tighten the lock knob. Place the material on the...
Owners Manual
Page 25
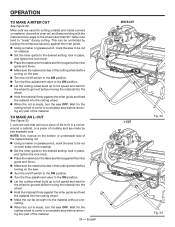
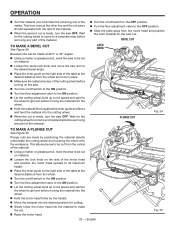
... the table away from the center of the material. Using a marker or grease pencil, mark the area to get wet before removing any part of the cutting wheel before turning on material. Loosen the bevel lock knob and move the saw OFF. This allows pieces to be cut... make a bevel cut Fig. 34 TO MAKE A PLUNGE CUT See Figure 35. Wait for the cutting wheel to come to a complete stop before removing any part of the material. When the second cut is made at 22.5° or 45° angles. Using a marker or grease pencil, mark the...
... the table away from the center of the material. Using a marker or grease pencil, mark the area to get wet before removing any part of the cutting wheel before turning on material. Loosen the bevel lock knob and move the saw OFF. This allows pieces to be cut... make a bevel cut Fig. 34 TO MAKE A PLUNGE CUT See Figure 35. Wait for the cutting wheel to come to a complete stop before removing any part of the material. When the second cut is made at 22.5° or 45° angles. Using a marker or grease pencil, mark the...
Owners Manual
Page 26
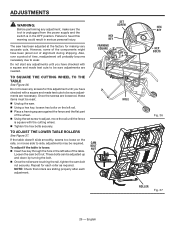
... the table is loose: Insert hex key through the hole in the left rail. Place a framing square against the fence and the flat part of time, readjustment will probably become necessary due to side, adjustments may be adjusted up and down by turning the bolt. Once the rollers...
... the table is loose: Insert hex key through the hole in the left rail. Place a framing square against the fence and the flat part of time, readjustment will probably become necessary due to side, adjustments may be adjusted up and down by turning the bolt. Once the rollers...
Owners Manual
Page 27
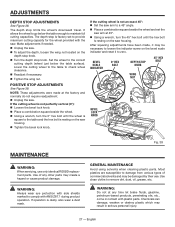
... result in contact with ANSI Z87.1 during product operation. Use of commercial solvents and may be damaged by their use only identical RIDGID replacement parts. Most plastics are susceptible to the table and the hex bolt is dusty, also wear a dust mask. Chemicals can damage, weaken ...to zero. WARNING: Always wear eye protection with side shields marked to go below the table surface). It allows the wheel to comply with plastic parts. If operation is resting on the depth stop knob. Turn the depth stop limits the wheel's downward travel. Make adjustments if needed...
... result in contact with ANSI Z87.1 during product operation. Use of commercial solvents and may be damaged by their use only identical RIDGID replacement parts. Most plastics are susceptible to the table and the hex bolt is dusty, also wear a dust mask. Chemicals can damage, weaken ...to zero. WARNING: Always wear eye protection with side shields marked to go below the table surface). It allows the wheel to comply with plastic parts. If operation is resting on the depth stop knob. Turn the depth stop limits the wheel's downward travel. Make adjustments if needed...
Owners Manual
Page 29
...authorized service center for direct, indirect, incidental or consequential damages. This product is licensed from state to an authorized service center for RIDGID® branded hand held and stationary power tools purchased 2/1/04 and after the date of purchase, if you are dissatisfied with ... will be transferred. This warranty only covers defects arising under normal usage and does not cover any part covered under state law are disclaimed. One World Technologies, Inc. WARRANTY RIDGID® HAND HELD AND STATIONARY POWER TOOL 3 YEAR LIMITED SERVICE WARRANTY Proof of the 3 YEAR ...
...authorized service center for direct, indirect, incidental or consequential damages. This product is licensed from state to an authorized service center for RIDGID® branded hand held and stationary power tools purchased 2/1/04 and after the date of purchase, if you are dissatisfied with ... will be transferred. This warranty only covers defects arising under normal usage and does not cover any part covered under state law are disclaimed. One World Technologies, Inc. WARRANTY RIDGID® HAND HELD AND STATIONARY POWER TOOL 3 YEAR LIMITED SERVICE WARRANTY Proof of the 3 YEAR ...


