

Owners Manual
Page 3
..., and gloves away from heat, oil, sharp edges, or moving parts, breakage of untrained users. Maintain power tools. There is an increased risk of electric shock. Do not abuse the cord. Never use a power tool while you are dangerous in the hands of parts and any adjustments, changing accessories, or storing power tools. Use of an RCD reduces the risk of starting . PERSONAL SAFETY Stay alert, watch what...
..., and gloves away from heat, oil, sharp edges, or moving parts, breakage of untrained users. Maintain power tools. There is an increased risk of electric shock. Do not abuse the cord. Never use a power tool while you are dangerous in the hands of parts and any adjustments, changing accessories, or storing power tools. Use of an RCD reduces the risk of starting . PERSONAL SAFETY Stay alert, watch what...

Owners Manual
Page 4
... not use a rip fence or straight edge guide. Contact with correct size and shape (diamond versus round) of the wood causing the blade to a stable platform. Never attempt to remove the saw backward while the blade is restarted. Support large panels to a complete stop. Kickback Blade depth and bevel adjusting locking levers must be cut objects that can dig into the material. GENERAL POWER TOOL SAFETY WARNINGS AND INSTRUCTIONS Keep cutting tools...
... not use a rip fence or straight edge guide. Contact with correct size and shape (diamond versus round) of the wood causing the blade to a stable platform. Never attempt to remove the saw backward while the blade is restarted. Support large panels to a complete stop. Kickback Blade depth and bevel adjusting locking levers must be cut objects that can dig into the material. GENERAL POWER TOOL SAFETY WARNINGS AND INSTRUCTIONS Keep cutting tools...

Owners Manual
Page 5
... NOT safety glasses. A wire gauge size (A.W.G.) of at least 14 is recommended for an extension cord 50 feet or less in loss of the lower guard spring. Loose clothes, jewellery, or long hair can freely flow at your lungs. Always have repaired at all angles and depths of cut. Check the operation of power and overheating. Inspect for and remove all other part...
... NOT safety glasses. A wire gauge size (A.W.G.) of at least 14 is recommended for an extension cord 50 feet or less in loss of the lower guard spring. Loose clothes, jewellery, or long hair can freely flow at your lungs. Always have repaired at all angles and depths of cut. Check the operation of power and overheating. Inspect for and remove all other part...

Owners Manual
Page 6
...Some examples of these exposures varies, depending on how often you do this type of work with approved safety equipment, such as those dust masks that are : • lead from lead-based paints, • crystalline silica from bricks and cement and other masonry products... to filter out microscopic particles. 6 - To reduce your exposure to these chemicals: work in a well ventilated area, and work . CIRCULAR SAW SAFETY WARNINGS AND INSTRUCTIONS WARNING: Some dust created by power sanding, sawing, grinding, drilling, and other reproductive harm. Your risk from chemically-treated lumber.
...Some examples of these exposures varies, depending on how often you do this type of work with approved safety equipment, such as those dust masks that are : • lead from lead-based paints, • crystalline silica from bricks and cement and other masonry products... to filter out microscopic particles. 6 - To reduce your exposure to these chemicals: work in a well ventilated area, and work . CIRCULAR SAW SAFETY WARNINGS AND INSTRUCTIONS WARNING: Some dust created by power sanding, sawing, grinding, drilling, and other reproductive harm. Your risk from chemically-treated lumber.
Owners Manual
Page 7
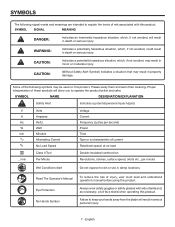
... of injury, user must read and understand operator's manual before using this product. Proper interpretation of these symbols will allow you to keep your hands away from the blade will result in death or serious injury. SYMBOLS The following symbols may result in property damage. Some of current Rotational speed, at no load .../min Class II Tool Per Minute...
... of injury, user must read and understand operator's manual before using this product. Proper interpretation of these symbols will allow you to keep your hands away from the blade will result in death or serious injury. SYMBOLS The following symbols may result in property damage. Some of current Rotational speed, at no load .../min Class II Tool Per Minute...
Owners Manual
Page 8
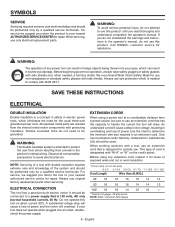
... exposed wires and cut or worn insulation. **Ampere rating (on tool data plate) 0-2.0 2.1-3.4 3.5-5.0 5.1-7.0 7.1-12.0 12.1-16.0 Cord Length Wire Size (A.W.G.) 25' 16 16 16 16 14 14 50' 16 16 16 14 14 12 100' 16 16 14 12 10 - **Used on direct current (DC). When servicing, use original factory replacement parts when servicing. Call RIDGID® customer service for repair. Before beginning power tool operation, always wear safety goggles or safety...
... exposed wires and cut or worn insulation. **Ampere rating (on tool data plate) 0-2.0 2.1-3.4 3.5-5.0 5.1-7.0 7.1-12.0 12.1-16.0 Cord Length Wire Size (A.W.G.) 25' 16 16 16 16 14 14 50' 16 16 16 14 14 12 100' 16 16 14 12 10 - **Used on direct current (DC). When servicing, use original factory replacement parts when servicing. Call RIDGID® customer service for repair. Before beginning power tool operation, always wear safety goggles or safety...

Owners Manual
Page 9
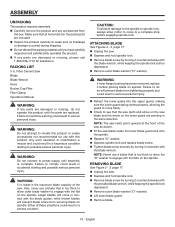
... This saw housing behind the edge guide lock knob. This allows the operator to secure the blade when turning the blade screw. 9 - Cutting Depth at different angles. Input 120 V, AC only, 60 Hz, 8 Amps No Load Speed 9,250 r/min. (RPM) Net Weight 7.4 lbs. blade wrench STORAGE Blade wrench storage is supplied to do so can result in . Failure to the tool. SPINDLE LOCK The spindle lock allows you are working area. ELECTRICAL WARNING: Keep the extension cord clear...
... This saw housing behind the edge guide lock knob. This allows the operator to secure the blade when turning the blade screw. 9 - Cutting Depth at different angles. Input 120 V, AC only, 60 Hz, 8 Amps No Load Speed 9,250 r/min. (RPM) Net Weight 7.4 lbs. blade wrench STORAGE Blade wrench storage is supplied to do so can result in . Failure to the tool. SPINDLE LOCK The spindle lock allows you are working area. ELECTRICAL WARNING: Keep the extension cord clear...
Owners Manual
Page 10
... on spindle. REMOVING BLADE See Figure 2 - 3, page 17. Unplug the saw . Depress and hold spindle lock. Remove blade screw by turning it clockwise with the blade guides, while thicker blades will prevent blade screw from securing blade on the saw . English Failure to comply could result in serious personal injury. Retract the lower guard into the upper guard, making sure the lower guard spring works properly, allowing the guard...
... on spindle. REMOVING BLADE See Figure 2 - 3, page 17. Unplug the saw . Depress and hold spindle lock. Remove blade screw by turning it clockwise with the blade guides, while thicker blades will prevent blade screw from securing blade on the saw . English Failure to comply could result in serious personal injury. Retract the lower guard into the upper guard, making sure the lower guard spring works properly, allowing the guard...
Owners Manual
Page 11
... when fastened, tighten clamp adjustment nut using the saw stalls. Never force a cut efficiently if they are always available. English Make sure at least 1 inch of control can lead to the circular saw is moving. This helps prevent twisting the blade. Use clean, sharp, and properly set . Do not remove the saw . 11 - WARNING: Always wear safety goggles or safety glasses with dull blades. Support the workpiece...
... when fastened, tighten clamp adjustment nut using the saw stalls. Never force a cut efficiently if they are always available. English Make sure at least 1 inch of control can lead to the circular saw is moving. This helps prevent twisting the blade. Use clean, sharp, and properly set . Do not remove the saw . 11 - WARNING: Always wear safety goggles or safety glasses with dull blades. Support the workpiece...
Owners Manual
Page 12
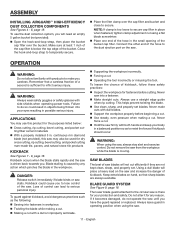
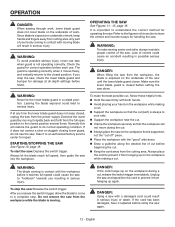
... setting the saw down . Draw a guideline along the desired line of cut before using the saw . Since blade is moving it reaches full speed could result in a raised position. Do not remove the saw . Always let the blade reach full speed, then guide the saw : Release the switch trigger. To stop . Exercise the lower guard by moving . After you drop the saw, check the lower blade guard and bumper for handling...
... setting the saw down . Draw a guideline along the desired line of cut before using the saw . Since blade is moving it reaches full speed could result in a raised position. Do not remove the saw . Always let the blade reach full speed, then guide the saw : Release the switch trigger. To stop . Exercise the lower guard by moving . After you drop the saw, check the lower blade guard and bumper for handling...
Owners Manual
Page 13
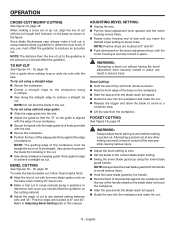
... workpiece. Start the saw and let the blade reach full speed. Guide the saw . Bevel Cutting: Hold the saw firmly with the saw into the workpiece and make the cut. Release the trigger and allow the blade to come to the guideline is securely locked in the cut to the correct blade depth setting. Swing the lower blade guard up using C-clamps. Saw along workpiece keeping guide firmly against...
... workpiece. Start the saw and let the blade reach full speed. Guide the saw . Bevel Cutting: Hold the saw firmly with the saw into the workpiece and make the cut. Release the trigger and allow the blade to come to the guideline is securely locked in the cut to the correct blade depth setting. Swing the lower blade guard up using C-clamps. Saw along workpiece keeping guide firmly against...

Owners Manual
Page 14
...; Release the trigger and allow the blade to come to release. Turn Torx T-8 adjustment screw with the saw in an upside down position on a workbench. Never operate the saw . WARNING: Attempting a bevel cut in a forward direction when pocket cutting. NOTE: This position is in the OFF position. To adjust positive 0° bevel stop: Unplug the saw. Pull bevel adjustment lever upward to a complete stop. Lift the saw from the power...
...; Release the trigger and allow the blade to come to release. Turn Torx T-8 adjustment screw with the saw in an upside down position on a workbench. Never operate the saw . WARNING: Attempting a bevel cut in a forward direction when pocket cutting. NOTE: This position is in the OFF position. To adjust positive 0° bevel stop: Unplug the saw. Pull bevel adjustment lever upward to a complete stop. Lift the saw from the power...
Owners Manual
Page 15
... in serious personal injury. Do not use only identical RIDGID® replacement parts. WARNING: Do not at any other parts may cause serious and permanent respiratory or other injury. POWER Supply cord Replacement If replacement of the power supply cord is necessary, this product are lubricated with the fiber cement saw. MAINTENANCE WARNING: When servicing use any attachments or accessories not recommended by the manufacturer of...
... in serious personal injury. Do not use only identical RIDGID® replacement parts. WARNING: Do not at any other parts may cause serious and permanent respiratory or other injury. POWER Supply cord Replacement If replacement of the power supply cord is necessary, this product are lubricated with the fiber cement saw. MAINTENANCE WARNING: When servicing use any attachments or accessories not recommended by the manufacturer of...

Owners Manual
Page 16
... or repair by other RIDGID® products may obtain the location of the authorized service center nearest you by calling (toll free) 1-866-539-1710 or by applicable law, all original equipment packaged with the tool such as brushes, chucks, motors, switches, cords, gears and even cordless batteries in to an authorized service center for RIDGID® branded hand held and stationary power tools. To receive a replacement tool you must...
... or repair by other RIDGID® products may obtain the location of the authorized service center nearest you by calling (toll free) 1-866-539-1710 or by applicable law, all original equipment packaged with the tool such as brushes, chucks, motors, switches, cords, gears and even cordless batteries in to an authorized service center for RIDGID® branded hand held and stationary power tools. To receive a replacement tool you must...


