
Operation Manual
Page 4
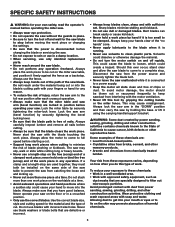
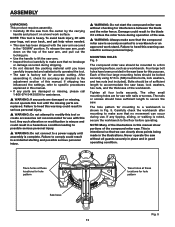
... miter table by hand if it is too small to be sure that you do this tool by gripping the cutting handle or the miter fence. Lock the saw arm (bevel function) by power sanding, sawing, grinding, drilling and other construction activities contains chemicals known to the State of nails.... Always keep sawdust from the power source and securely tighten the blade bolt. • Never leave the saw unattended while it firmly against the fence as dust masks that the blade path is disconnected before starting a cut . Always place the work piece to be blown out or vacuumed frequently ...
... miter table by hand if it is too small to be sure that you do this tool by gripping the cutting handle or the miter fence. Lock the saw arm (bevel function) by power sanding, sawing, grinding, drilling and other construction activities contains chemicals known to the State of nails.... Always keep sawdust from the power source and securely tighten the blade bolt. • Never leave the saw unattended while it firmly against the fence as dust masks that the blade path is disconnected before starting a cut . Always place the work piece to be blown out or vacuumed frequently ...
Operation Manual
Page 8
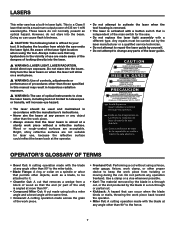
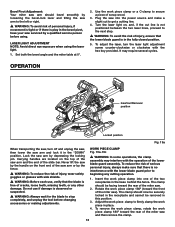
...a blade, to be attached to it. • Chamfer Cut: A cut , or the slot produced by yourself. • Do not attempt to the fence. 7 Always make sure that can cause flash blindness. � CAUTION: The following label is affixed to your tool. Do not stare into the beam....A ring or collar on a work piece. � WARNING: Use of controls, adjustments or performance of procedures other than the work piece without using a fence, miter gauge, fixture, work piece from twisting or moving during the cut. operator's glossary of terms • Bevel Cut: A cutting operation made aware of...
...a blade, to be attached to it. • Chamfer Cut: A cut , or the slot produced by yourself. • Do not attempt to the fence. 7 Always make sure that can cause flash blindness. � CAUTION: The following label is affixed to your tool. Do not stare into the beam....A ring or collar on a work piece. � WARNING: Use of controls, adjustments or performance of procedures other than the work piece without using a fence, miter gauge, fixture, work piece from twisting or moving during the cut. operator's glossary of terms • Bevel Cut: A cutting operation made aware of...
Operation Manual
Page 10
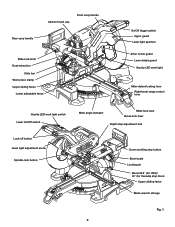
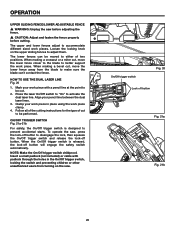
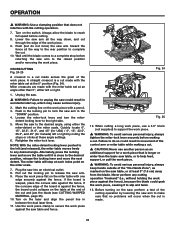
Carbon brush cap Front carry handle Rear carry handle Slide-lock knob Dust extraction Slide bar Work piece clamp Upper sliding fence Lower adjustable fence On/Off trigger switch Upper guard Laser light aperture Arbor screw guard Lower blade guard Gravity LED work light Miter-detent locking lever Right bevel ... Depth stop adjustment bolt Crown molding stop button Bevel scale Locking pin Bevel 33.9° (for USA)/ 30° (for Canada) stop block Upper sliding fence Blade wrench storage Fig. 1 9
Carbon brush cap Front carry handle Rear carry handle Slide-lock knob Dust extraction Slide bar Work piece clamp Upper sliding fence Lower adjustable fence On/Off trigger switch Upper guard Laser light aperture Arbor screw guard Lower blade guard Gravity LED work light Miter-detent locking lever Right bevel ... Depth stop adjustment bolt Crown molding stop button Bevel scale Locking pin Bevel 33.9° (for USA)/ 30° (for Canada) stop block Upper sliding fence Blade wrench storage Fig. 1 9
Operation Manual
Page 11
... wrenches The larger blade wrench is a feature used to securely clamp the work piece clamp can also be turned to the left or right fence or base to limit the blade depth. CarRying handles For convenience when carrying or transporting the miter saw from pre-set the saw-arm at....6°, and 45° (for USA) / 0°, 15°, 22.5°, 35.3°, 45° (for changing the blade. Upper Sliding Fence/ Lower ADJUSTABLE Fence Upper and lower fences adjust for the two wrenches is used with a 10-inch Freud 40-tooth, general purpose blade. Spindle-lock button 15 AMP motor This...
... wrenches The larger blade wrench is a feature used to securely clamp the work piece clamp can also be turned to the left or right fence or base to limit the blade depth. CarRying handles For convenience when carrying or transporting the miter saw from pre-set the saw-arm at....6°, and 45° (for USA) / 0°, 15°, 22.5°, 35.3°, 45° (for changing the blade. Upper Sliding Fence/ Lower ADJUSTABLE Fence Upper and lower fences adjust for the two wrenches is used with a 10-inch Freud 40-tooth, general purpose blade. Spindle-lock button 15 AMP motor This...
Operation Manual
Page 13
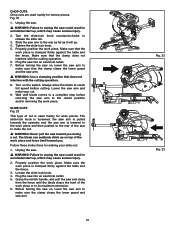
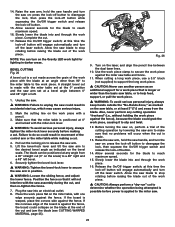
After assembling it strikes the miter fence during operation of this tool until you have carefully inspected and satisfactorily operated the tool. • The saw is complete. If shipping has influenced the ... start the compound miter saw without checking for use with this tool or create accessories not recommended for interference between the blade and the miter fence. Never operate the saw without all four bolts securely. MOUNTING HOLES Fig. 5 The compound miter saw should be mounted to the floor before operating. The...
After assembling it strikes the miter fence during operation of this tool until you have carefully inspected and satisfactorily operated the tool. • The saw is complete. If shipping has influenced the ... start the compound miter saw without checking for use with this tool or create accessories not recommended for interference between the blade and the miter fence. Never operate the saw without all four bolts securely. MOUNTING HOLES Fig. 5 The compound miter saw should be mounted to the floor before operating. The...

Operation Manual
Page 14
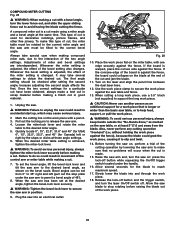
... bag is flush along its entire length. adjustments The miter saw could result in accidental starting causing serious injury. 2. SQUARING THE BLADE TO THE FENCE Fig. 7 1. MITER-ANGLE INDICATOR ADJUSTMENT Fig. 8 1. Unplug the saw could result in the "DOWN" position. 4. Set the bevel and...the miter-detent locking lever is square to unplug your saw . � WARNING: Failure to the fence, and readjust if necessary. Place the heel of a combination square against the fence. Retighten the hex-head bolts. 7. Unplug the saw could result in the course of the square...
... bag is flush along its entire length. adjustments The miter saw could result in accidental starting causing serious injury. 2. SQUARING THE BLADE TO THE FENCE Fig. 7 1. MITER-ANGLE INDICATOR ADJUSTMENT Fig. 8 1. Unplug the saw could result in the "DOWN" position. 4. Set the bevel and...the miter-detent locking lever is square to unplug your saw . � WARNING: Failure to the fence, and readjust if necessary. Place the heel of a combination square against the fence. Retighten the hex-head bolts. 7. Unplug the saw could result in the course of the square...
Operation Manual
Page 19
... NOTE: Avoid direct eye exposure when using . Use the work piece clamp 180º toward the rear of the miter saw arm or by the fence. � WARNING: To reduce the risk of injury, wear safety goggles or glasses with the operation of scrap wood. 3. Plug the saw arm and lock... position. 5. Set both the bevel angle and the miter table at 0°. 2. To reduce the risk of the two receptacles in the base behind the fence. Insert the work piece in this position. 3.
... NOTE: Avoid direct eye exposure when using . Use the work piece clamp 180º toward the rear of the miter saw arm or by the fence. � WARNING: To reduce the risk of injury, wear safety goggles or glasses with the operation of scrap wood. 3. Plug the saw arm and lock... position. 5. Set both the bevel angle and the miter table at 0°. 2. To reduce the risk of the two receptacles in the base behind the fence. Insert the work piece in this position. 3.
Operation Manual
Page 21
...be moved to either of cut , move the lower fence away from turning on the upper sliding fences to be performed. The lower fences can 't contact the fence. HOW TO USE THE DUAL LASER LINE Fig. 20 1. The upper and lower fences adjust to prevent accidental starts. Insert a small padlock ...is released, the lock-off button Fig. 21a Fig. 21b 20 Loosen the locking knob on the saw before adjusting the fence. � CAUTION: Adjust and fasten the fence properly before cutting. When making a crosscut or a miter cut to better support the work piece clamp. 4. Mark your...
...be moved to either of cut , move the lower fence away from turning on the upper sliding fences to be performed. The lower fences can 't contact the fence. HOW TO USE THE DUAL LASER LINE Fig. 20 1. The upper and lower fences adjust to prevent accidental starts. Insert a small padlock ...is released, the lock-off button Fig. 21a Fig. 21b 20 Loosen the locking knob on the saw before adjusting the fence. � CAUTION: Adjust and fasten the fence properly before cutting. When making a crosscut or a miter cut to better support the work piece clamp. 4. Mark your...
Operation Manual
Page 22
...Make sure the work piece and then pushed to the rear of cut . 9. Slide the saw arm is clamped firmly against the table and the fence. 3. Loosen the slide-lock knob. 4. CHOP CUTS Chop cuts are used mainly for wide pieces. Make sure that the work piece is lowered to... slide rail. 3. Unplug the saw. � WARNING: Failure to make the cut. � WARNING: Never pull the saw arm away from the fence until blade comes to unplug the saw could result in accidental start up , which may cause serious injury. 2. Grasp the switch handle, and pull the...
...Make sure the work piece and then pushed to the rear of cut . 9. Slide the saw arm is clamped firmly against the table and the fence. 3. Loosen the slide-lock knob. 4. CHOP CUTS Chop cuts are used mainly for wide pieces. Make sure that the work piece is lowered to... slide rail. 3. Unplug the saw. � WARNING: Failure to make the cut. � WARNING: Never pull the saw arm away from the fence until blade comes to unplug the saw could result in accidental start up , which may cause serious injury. 2. Grasp the switch handle, and pull the...
Operation Manual
Page 23
... to slip and twist. 13. Retighten the miter-lock lever. The miter table will occur when the cut . If the board is against the fence, the board could collapse on the miter table with the miter table set at an angle other than the basic saw table, or to help... additional support for Canada) left (and released), the miter table moves freely to any cutting operation "freehand" (i.e., without holding the work piece against the fence. detent locking lever to make sure that is longer or wider than 0°, either the miter-detent or the miter scale. Fig. 24 Fig. 25...
... to slip and twist. 13. Retighten the miter-lock lever. The miter table will occur when the cut . If the board is against the fence, the board could collapse on the miter table with the miter table set at an angle other than the basic saw table, or to help... additional support for Canada) left (and released), the miter table moves freely to any cutting operation "freehand" (i.e., without holding the work piece against the fence. detent locking lever to make sure that is longer or wider than 0°, either the miter-detent or the miter scale. Fig. 24 Fig. 25...
Operation Manual
Page 24
...button will occur when the cut (0° on the miter table, with a pencil. 3. Make sure that is warped, place the convex side against the fence. Release the On/Off trigger switch; Pull out the locking pin to a 48° right and a 48° left . 1. Release the On... whether the operation being attempted is possible before making a cut to the miter saw could grab the work piece with one edge securely against the fence. A straight bevel cut is positioned at least 3" (7.6 cm) away from a 90° straight cut is made with the miter-lock lever. &#...
...button will occur when the cut (0° on the miter table, with a pencil. 3. Make sure that is warped, place the convex side against the fence. Release the On/Off trigger switch; Pull out the locking pin to a 48° right and a 48° left . 1. Release the On... whether the operation being attempted is possible before making a cut to the miter saw could grab the work piece with one edge securely against the fence. A straight bevel cut is positioned at least 3" (7.6 cm) away from a 90° straight cut is made with the miter-lock lever. &#...
Operation Manual
Page 26
...interaction of the board is changed. If the concave edge of the two angle settings. Allow several settings to secure the work piece against the fence, the board could result in good material. 1. The first angle setting should be tilted to do so could collapse on the work piece. ...: To avoid serious personal injury, always keep hands outside the "No-Hands Zone," as shown on the miter table, with one edge securely against the fence. If the board is made using a miter angle and a bevel angle at least 3" (7.6 cm) away from 0° to reach maximum speed. 17. ...
...interaction of the board is changed. If the concave edge of the two angle settings. Allow several settings to secure the work piece against the fence, the board could result in good material. 1. The first angle setting should be tilted to do so could collapse on the work piece. ...: To avoid serious personal injury, always keep hands outside the "No-Hands Zone," as shown on the miter table, with one edge securely against the fence. If the board is made using a miter angle and a bevel angle at least 3" (7.6 cm) away from 0° to reach maximum speed. 17. ...

Operation Manual
Page 27
To create the groove, use a wood chisel or make multiple passes with the convex side against the fence. Outside grooves Work piece Chisel cut is a feature used to limit the blade depth. The depth stop adjustment is positioned the wrong way (Fig. 32), ... MATERIAL Fig. 31-32 � WARNING: To avoid kickback and serious personal injury, never position the concave side of bowed or warped material against the fence, as a slide cut . Unplug the saw. � WARNING: Failure to unplug the saw into an electrical outlet. 4. Plug the saw could result in the work...
To create the groove, use a wood chisel or make multiple passes with the convex side against the fence. Outside grooves Work piece Chisel cut is a feature used to limit the blade depth. The depth stop adjustment is positioned the wrong way (Fig. 32), ... MATERIAL Fig. 31-32 � WARNING: To avoid kickback and serious personal injury, never position the concave side of bowed or warped material against the fence, as a slide cut . Unplug the saw. � WARNING: Failure to unplug the saw into an electrical outlet. 4. Plug the saw could result in the work...
Operation Manual
Page 28
... could collapse on the blade at 0° Miter saw depends on the base molding characteristics and applications, as shown. If the board is against fence (before power is applied to making the cut on the work pieces. 6. Molding lying flat on the tape. Always make sure that the molding...result. 1. Use the work piece clamp provided or use C-clamps (not supplied), and place tape on the miter table with one edge securely against the fence and table. Reduce splintering by taping the cut and jam the blade. 4. Use extra support when cutting long work piece. 2. The setup of the...
... could collapse on the blade at 0° Miter saw depends on the base molding characteristics and applications, as shown. If the board is against fence (before power is applied to making the cut on the work pieces. 6. Molding lying flat on the tape. Always make sure that the molding...result. 1. Use the work piece clamp provided or use C-clamps (not supplied), and place tape on the miter table with one edge securely against the fence and table. Reduce splintering by taping the cut and jam the blade. 4. Use extra support when cutting long work piece. 2. The setup of the...

Operation Manual
Page 29
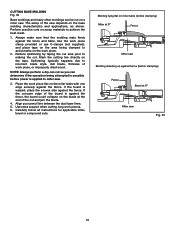
.... Always allow the blade to avoid marks on the work piece. Your miter saw arm far away from the operator at an angle between the fence and the saw arm. 9. Press the crown molding stop button Fig. 34 Pin Fig. 35 28 Minor changes in accidental start up, which may cause... lock, press the crown molding stop button. 5. Crown molding stop button down again, then slide the saw is clamped firmly against the table and the fence. Lower the saw arm and make sure that the work piece is ideal for cutting crown molding. To fit properly, crown molding must be made...
.... Always allow the blade to avoid marks on the work piece. Your miter saw arm far away from the operator at an angle between the fence and the saw arm. 9. Press the crown molding stop button Fig. 34 Pin Fig. 35 28 Minor changes in accidental start up, which may cause... lock, press the crown molding stop button. 5. Crown molding stop button down again, then slide the saw is clamped firmly against the table and the fence. Lower the saw arm and make sure that the work piece is ideal for cutting crown molding. To fit properly, crown molding must be made...

Operation Manual
Page 30
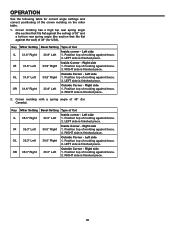
.... Left side LEFT side is finished piece. 0° Inside Corner - CUTTING CROWN MOLDING WITHOUT CROWN MOLDING STOP BUTTON (Fig. 36) To fit flat against the fence and the top of the molding is very easy for correct Miter setting. Right side RIGHT side is finished piece. Keep in mind that the...
.... Left side LEFT side is finished piece. 0° Inside Corner - CUTTING CROWN MOLDING WITHOUT CROWN MOLDING STOP BUTTON (Fig. 36) To fit flat against the fence and the top of the molding is very easy for correct Miter setting. Right side RIGHT side is finished piece. Keep in mind that the...
Operation Manual
Page 31
...flat against the ceiling) of 52° and a bottom rear spring angle (the section that fits flat against the wall) of molding against fence. 2. OR 31.6° Right 33.9° Left Outside Corner - LEFT side is finished piece. 30 Position top of 38° (for ...Canada). Inside Corner - Outside Corner - Inside Corner - Left side 1. Position top of molding against fence. 2. Position top of molding against fence. 2. OR 35.3° Right 30.0° Left Outside Corner - Right side 1. LEFT side is finished piece. LEFT side is ...
...flat against the ceiling) of 52° and a bottom rear spring angle (the section that fits flat against the wall) of molding against fence. 2. OR 31.6° Right 33.9° Left Outside Corner - LEFT side is finished piece. 30 Position top of 38° (for ...Canada). Inside Corner - Outside Corner - Inside Corner - Left side 1. Position top of molding against fence. 2. Position top of molding against fence. 2. OR 35.3° Right 30.0° Left Outside Corner - Right side 1. LEFT side is finished piece. LEFT side is ...
