
Operation Manual
Page 3
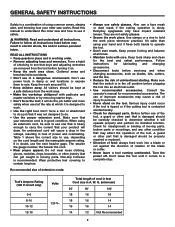
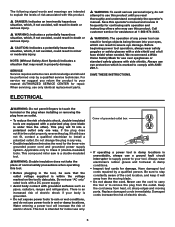
... safety instructions Safety is a combination of using common sense, staying alert, and knowing how your miter saw and how to contain long hair. Read this manual to understand this miter saw works. READ ALL INSTRUCTIONS • Keep guards in place and in electric shock, fire and/or ... of power and overheating. A guard or other jewelry that may cause a risk of cord in feet Cord size in moving parts, broken parts or mountings, and any other part that keys and adjusting wrenches are not safety glasses. • Secure the work area. • Make the workshop childproof with...
... safety instructions Safety is a combination of using common sense, staying alert, and knowing how your miter saw and how to contain long hair. Read this manual to understand this miter saw works. READ ALL INSTRUCTIONS • Keep guards in place and in electric shock, fire and/or ... of power and overheating. A guard or other jewelry that may cause a risk of cord in feet Cord size in moving parts, broken parts or mountings, and any other part that keys and adjusting wrenches are not safety glasses. • Secure the work area. • Make the workshop childproof with...
Operation Manual
Page 4
...material and the type of cut more than one work . Sharp blades minimize stalling and kickback. • Do not use solvents to clean plastic parts. Bent blades can break easily or cause kickback. • Never hold onto or bind the free (scrap) end of blade pinching or kickback.... on the same side of work piece on the worktable at a time. Lock the saw blade. Do not use only identical replacement parts. • Never reach around the saw from interfering with sufficient set. Always lock the saw arm in a damp location. • When servicing, use blades with soap and water...
...material and the type of cut more than one work . Sharp blades minimize stalling and kickback. • Do not use solvents to clean plastic parts. Bent blades can break easily or cause kickback. • Never hold onto or bind the free (scrap) end of blade pinching or kickback.... on the same side of work piece on the worktable at a time. Lock the saw blade. Do not use only identical replacement parts. • Never reach around the saw from interfering with sufficient set. Always lock the saw arm in a damp location. • When servicing, use blades with soap and water...
Operation Manual
Page 5
.... Following this rule will operate properly and perform its intended function. Check for misalignment or binding of moving parts, broken parts, and any other part that the operator of the saw wears. • Inspect the tool cords periodically and, if damaged, have these instructions. Always use eye ... and/or disburse dust, which is damaged should be properly repaired or replaced by a qualified person. • Always check the tool for damaged parts. Before further use them repaired by a qualified person. • Save these instructions also. 4 Wear a face mask or a dust mask if...
.... Following this rule will operate properly and perform its intended function. Check for misalignment or binding of moving parts, broken parts, and any other part that the operator of the saw wears. • Inspect the tool cords periodically and, if damaged, have these instructions. Always use eye ... and/or disburse dust, which is damaged should be properly repaired or replaced by a qualified person. • Always check the tool for damaged parts. Before further use them repaired by a qualified person. • Save these instructions also. 4 Wear a face mask or a dust mask if...
Operation Manual
Page 7
...than the other). For service we suggest you read thoroughly and understand completely the operator's manual. When servicing, use only identical replacement parts. � WARNING: To avoid serious personal injury, do not use this tool. • Before plugging in property damage. Call customer.... Before beginning power tool operation, always wear safety goggles or safety glasses with ANSI Z87.1. SAVE THESE INSTRUCTIONS. This compound miter saw is unavoidable, always use a ground fault circuit interrupter to supply power to your body is grounded. • Do not expose ...
...than the other). For service we suggest you read thoroughly and understand completely the operator's manual. When servicing, use only identical replacement parts. � WARNING: To avoid serious personal injury, do not use this tool. • Before plugging in property damage. Call customer.... Before beginning power tool operation, always wear safety goggles or safety glasses with ANSI Z87.1. SAVE THESE INSTRUCTIONS. This compound miter saw is unavoidable, always use a ground fault circuit interrupter to supply power to your body is grounded. • Do not expose ...
Operation Manual
Page 8
...location from a block of wood so that the end (or part of the end) is aimed at any parts of the main switch for laser use of optical instruments to... operation made aware of the dangers of looking directly into the laser. � WARNING: LASER LIGHT. lasers This miter saw has a built-in a non-through or partial cut. • Kickback: A hazard that can cause flash blindness. ... Always make sure that any operation freehand. Wood or rough-coated surfaces are not suitable for the saw emits the laser light. However, do not normally present an optical hazard. Do not stare into the...
...location from a block of wood so that the end (or part of the end) is aimed at any parts of the main switch for laser use of optical instruments to... operation made aware of the dangers of looking directly into the laser. � WARNING: LASER LIGHT. lasers This miter saw has a built-in a non-through or partial cut. • Kickback: A hazard that can cause flash blindness. ... Always make sure that any operation freehand. Wood or rough-coated surfaces are not suitable for the saw emits the laser light. However, do not normally present an optical hazard. Do not stare into the...
Operation Manual
Page 12
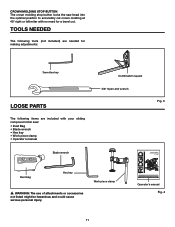
... Hex key Loose parts The following tools (not included) are needed for buying a RIDGID product. 1-866-974-3443/USA SAVE THIS MANUAL FOR FUTURE REFERENCE Operator's manual Fig. 4 11 Tools needed The following items are included with your sliding compound miter saw head into the ...piece clamp • Operator's manual Blade wrench Combination square 3/8" Open-end wrench Fig. 3 OPERATOR'S MANUAL 10 INCH SLIDING COMPOUND MITER SAW WITH DUAL LASER MS255SR Dust bag Hex key � WARNING: The use of injury, the user must read and understand the operator's manual before using this...
... Hex key Loose parts The following tools (not included) are needed for buying a RIDGID product. 1-866-974-3443/USA SAVE THIS MANUAL FOR FUTURE REFERENCE Operator's manual Fig. 4 11 Tools needed The following items are included with your sliding compound miter saw head into the ...piece clamp • Operator's manual Blade wrench Combination square 3/8" Open-end wrench Fig. 3 OPERATOR'S MANUAL 10 INCH SLIDING COMPOUND MITER SAW WITH DUAL LASER MS255SR Dust bag Hex key � WARNING: The use of injury, the user must read and understand the operator's manual before using this...
Operation Manual
Page 13
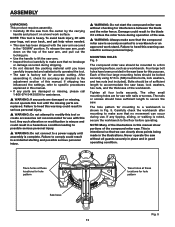
... Always make sure that no breakage or damage occurred during use with the saw without checking for interference between the blade and the miter fence. Damage could result in this manual. • If any parts are damaged or missing, please call 1-866-974-3443/USA for this manual... inspected and satisfactorily operated the tool. • The saw . Four large bolt holes have sufficient length to modify this tool until the missing parts are for accurate cutting. The other small mounting holes are replaced. If any parts are damaged or missing, do not operate this tool...
... Always make sure that no breakage or damage occurred during use with the saw without checking for interference between the blade and the miter fence. Damage could result in this manual. • If any parts are damaged or missing, please call 1-866-974-3443/USA for this manual... inspected and satisfactorily operated the tool. • The saw . Four large bolt holes have sufficient length to modify this tool until the missing parts are for accurate cutting. The other small mounting holes are replaced. If any parts are damaged or missing, do not operate this tool...

Operation Manual
Page 30
... 29 Key IR IL OR OL Miter Setting 45° Right 45° Left 45° Right 45° Left Bevel Setting Type of the saw (Fig 34). changing one also changes the other. Keep in mind that the settings are interdependent; Left side LEFT side is finished piece. 0° Outside... molding, the bevel angle should be tested on the base of Cut 0° Inside corner - Angle the molding so the bottom of the molding (the part which goes against the wall when installed) is against the ceiling and the wall, the sum of the angles of precisely 90°, therefore, you...
... 29 Key IR IL OR OL Miter Setting 45° Right 45° Left 45° Right 45° Left Bevel Setting Type of the saw (Fig 34). changing one also changes the other. Keep in mind that the settings are interdependent; Left side LEFT side is finished piece. 0° Outside... molding, the bevel angle should be tested on the base of Cut 0° Inside corner - Angle the molding so the bottom of the molding (the part which goes against the wall when installed) is against the ceiling and the wall, the sum of the angles of precisely 90°, therefore, you...
Operation Manual
Page 33
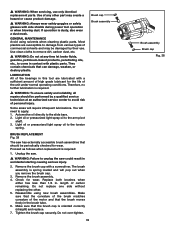
Most plastics are lubricated with plastic parts. Light oil or pressurized light spray oil to damage from various types of any time let brake fluids, gasoline, petroleum-based products, penetrating oils, etc., to unplug the saw could result in accidental starting causing ... WARNING: Do not at an authorized service center to apply: 1. Unplug the saw has externally accessible brush assemblies that the brush moves freely in . Reassemble using solvents when cleaning plastic parts. Check for the life of the unit under normal operating conditions. � ...
Most plastics are lubricated with plastic parts. Light oil or pressurized light spray oil to damage from various types of any time let brake fluids, gasoline, petroleum-based products, penetrating oils, etc., to unplug the saw could result in accidental starting causing ... WARNING: Do not at an authorized service center to apply: 1. Unplug the saw has externally accessible brush assemblies that the brush moves freely in . Reassemble using solvents when cleaning plastic parts. Check for the life of the unit under normal operating conditions. � ...
Operation Manual
Page 34
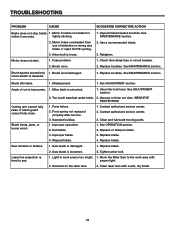
...1. Replace brushes. Brush worn/damaged. Replace brushes. Misalignment. 1. Improper operation. 2. Clean and lubricate moving parts. 1. See OPERATION section. 2. Move the Miter Saw to see. 1. Arbor bolt is loosened. 2. See MAINTENANCE section. See ADJUSTMENT section. Cutting arm cannot fully... line projection is inaccurate. 1. See MAINTENANCE section. Improper blade. 4. Inspect/clean/replace brushes. Brush sparks excessively 1. Parts failure. 2. Replace blade. 4. Replace blade. 2. Motor brake overheated from use of cut is hard to the work...
...1. Replace brushes. Brush worn/damaged. Replace brushes. Misalignment. 1. Improper operation. 2. Clean and lubricate moving parts. 1. See OPERATION section. 2. Move the Miter Saw to see. 1. Arbor bolt is loosened. 2. See MAINTENANCE section. See ADJUSTMENT section. Cutting arm cannot fully... line projection is inaccurate. 1. See MAINTENANCE section. Improper blade. 4. Inspect/clean/replace brushes. Brush sparks excessively 1. Parts failure. 2. Replace blade. 4. Replace blade. 2. Motor brake overheated from use of cut is hard to the work...

Operation Manual
Page 36
When ordering repair parts, always give the following information: Model No. Serial No. OPERATOR'S MANUAL 10 INCH SLIDING COMPOUND MITER SAW WITH DUAL LASER MS255SR CUSTOMER SERVICE INFORMATION For parts or service, call . MS255SR 35 Please record the serial number in the space provided below. Be sure to the motor housing. The model number of this tool is found on a plate attached to provide all relevant information when you call 1-866-974-3443.
When ordering repair parts, always give the following information: Model No. Serial No. OPERATOR'S MANUAL 10 INCH SLIDING COMPOUND MITER SAW WITH DUAL LASER MS255SR CUSTOMER SERVICE INFORMATION For parts or service, call . MS255SR 35 Please record the serial number in the space provided below. Be sure to the motor housing. The model number of this tool is found on a plate attached to provide all relevant information when you call 1-866-974-3443.


