
Owners Manual
Page 4
...cord immediately. This plug will fit in the outlet, reverse the plug. Always use common sense. Never use only identical replacement parts. The maximum blade capacity of the saw or workpiece before connecting to power supply. FIRMLY CLAMP OR BOLT the tool to a workbench or table at a ...outlet only one blade is necessary, do not connect the equipment-grounding conductor to come up . NEVER cut more than the other moving parts during use. NEVER START A TOOL WHEN ANY ROTATING COMPONENT IS IN CONTACT WITH THE WORKPIECE. DO NOT OPERATE A TOOL ...
...cord immediately. This plug will fit in the outlet, reverse the plug. Always use common sense. Never use only identical replacement parts. The maximum blade capacity of the saw or workpiece before connecting to power supply. FIRMLY CLAMP OR BOLT the tool to a workbench or table at a ...outlet only one blade is necessary, do not connect the equipment-grounding conductor to come up . NEVER cut more than the other moving parts during use. NEVER START A TOOL WHEN ANY ROTATING COMPONENT IS IN CONTACT WITH THE WORKPIECE. DO NOT OPERATE A TOOL ...

Owners Manual
Page 5
... risk. ALWAYS STAY ALERT! f) Turn off the power switch, remove the miter saw without guards in a crouched position. NEVER stand or have any part of the saw blade to power supply. Some examples of saw blade c) Do not operate saw plug from chemically-treated lumber. ALWAYS make sure you while making a cut. ...
... risk. ALWAYS STAY ALERT! f) Turn off the power switch, remove the miter saw without guards in a crouched position. NEVER stand or have any part of the saw blade to power supply. Some examples of saw blade c) Do not operate saw plug from chemically-treated lumber. ALWAYS make sure you while making a cut. ...

Owners Manual
Page 9
...cut without the workpiece being done. These aids help control the workpiece by a spinning object in the workpiece (requires a special blade). Through Sawing Any cutting operation where the blade extends completely through the thickness of the workpiece. Bevel Cut A cutting operation made across the grain or the ...width of the workpiece. Dado Cut A non-through the saw blade tooth is bent (or set) outward from a block so the end (or part of a workpiece by a fence, miter gauge, or other than at either end of the end) is...
...cut without the workpiece being done. These aids help control the workpiece by a spinning object in the workpiece (requires a special blade). Through Sawing Any cutting operation where the blade extends completely through the thickness of the workpiece. Bevel Cut A cutting operation made across the grain or the ...width of the workpiece. Dado Cut A non-through the saw blade tooth is bent (or set) outward from a block so the end (or part of a workpiece by a fence, miter gauge, or other than at either end of the end) is...

Owners Manual
Page 14
LOOSE PARTS The following items are included with your miter saw: Dust Bag Dust Bag Frame Dust Guide Work Clamp DUST BAG Blade Wrench Hex Key, 1/16 in. Laser Guide Flat Head Socket Cap Screw Operator's Manual (not shown) WORK CLAMP HEX KEY, 1/16 in this manual might be hazardous and could cause serious personal injury. 14 DUST BAG FRAME FLAT HEAD SOCKET CAP SCREW LASER GUIDE DUST GUIDE BLADE WRENCH Fig. 7 WARNING: The use of attachments or accessories not listed in .
LOOSE PARTS The following items are included with your miter saw: Dust Bag Dust Bag Frame Dust Guide Work Clamp DUST BAG Blade Wrench Hex Key, 1/16 in. Laser Guide Flat Head Socket Cap Screw Operator's Manual (not shown) WORK CLAMP HEX KEY, 1/16 in this manual might be hazardous and could cause serious personal injury. 14 DUST BAG FRAME FLAT HEAD SOCKET CAP SCREW LASER GUIDE DUST GUIDE BLADE WRENCH Fig. 7 WARNING: The use of attachments or accessories not listed in .
Owners Manual
Page 15
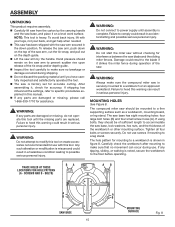
...to power supply until assembly is securely mounted to heed this manual. If any parts are damaged or missing, do not operate this tool. WARNING: Always make sure the compound miter saw is complete. MOUNTING HOLES See Figure 8. Tighten all four bolts or screws securely. Failure to...; Do not discard the packing material until the missing parts are damaged or missing, please call 1-866-539-1710 for accuracy. Damage could result in serious personal injury. If using bolts, they should be of the saw. To release the saw arm, push down position. WARNING: Do not attempt ...
...to power supply until assembly is securely mounted to heed this manual. If any parts are damaged or missing, do not operate this tool. WARNING: Always make sure the compound miter saw is complete. MOUNTING HOLES See Figure 8. Tighten all four bolts or screws securely. Failure to...; Do not discard the packing material until the missing parts are damaged or missing, please call 1-866-539-1710 for accuracy. Damage could result in serious personal injury. If using bolts, they should be of the saw. To release the saw arm, push down position. WARNING: Do not attempt ...

Owners Manual
Page 22
... pushing it may be parallel as shown in figure 20. If the front or back edge of saw has several scale indicators. Place one leg of the square against the flat part of the saw blade angles away from the square as shown in figures 21 and 22, adjustments are needed. ...; Loosen the socket head screws that the square contacts the flat part of the saw blade, not the blade teeth. The edge of the square and the saw blade should be necessary to loosen the indicator screws and reset them to -fence alignment.
... pushing it may be parallel as shown in figure 20. If the front or back edge of saw has several scale indicators. Place one leg of the square against the flat part of the saw blade angles away from the square as shown in figures 21 and 22, adjustments are needed. ...; Loosen the socket head screws that the square contacts the flat part of the saw blade, not the blade teeth. The edge of the square and the saw blade should be necessary to loosen the indicator screws and reset them to -fence alignment.

Owners Manual
Page 24
..., ADJUSTMENTS ARE REQUIRED Fig. 30 24 NOTE: The above procedure can be used to check blade squareness of saw blade. NOTE: Make sure that the square contacts the flat part of the square and the saw blade should be necessary to loosen the indicator screws and reset them to zero. Your...at 0°. Lock the miter lock lever by pushing it down. Place a combination square against the miter table and the flat part of the saw blade to the miter table at several scale indicators. Retighten the socket head screws. Retighten the bevel lock lever by hand and check...
..., ADJUSTMENTS ARE REQUIRED Fig. 30 24 NOTE: The above procedure can be used to check blade squareness of saw blade. NOTE: Make sure that the square contacts the flat part of the square and the saw blade should be necessary to loosen the indicator screws and reset them to zero. Your...at 0°. Lock the miter lock lever by pushing it down. Place a combination square against the miter table and the flat part of the saw blade to the miter table at several scale indicators. Retighten the socket head screws. Retighten the bevel lock lever by hand and check...

Owners Manual
Page 36
...SCREW Fig. 51 If operation is required: Unplug the saw has externally accessible brush assemblies that can damage, weaken or destroy plastic. GENERAL MAINTENANCE Avoid using solvents when cleaning plastic parts. LUBRICATION All of commercial solvents and may create a hazard or ...damaged by a qualified service technician at an authorized service center to damage from various types of the bearings in contact with plastic parts. Therefore, no further lubrication is required. MAINTENANCE WARNING: When servicing, use . Use of any time let brake fluids, gasoline...
...SCREW Fig. 51 If operation is required: Unplug the saw has externally accessible brush assemblies that can damage, weaken or destroy plastic. GENERAL MAINTENANCE Avoid using solvents when cleaning plastic parts. LUBRICATION All of commercial solvents and may create a hazard or ...damaged by a qualified service technician at an authorized service center to damage from various types of the bearings in contact with plastic parts. Therefore, no further lubrication is required. MAINTENANCE WARNING: When servicing, use . Use of any time let brake fluids, gasoline...

Owners Manual
Page 40
... of the authorized service center nearest you call 1-866-539-1710 or visit us online at www.ridgid.com. SLIDING COMPOUND MITER SAW WITH LASER Double Insulated MS1290LZA CUSTOMER SERVICE INFORMATION For parts or service, contact your nearest RIDGID authorized service center. For the location of this tool is found on a plate attached to provide...
... of the authorized service center nearest you call 1-866-539-1710 or visit us online at www.ridgid.com. SLIDING COMPOUND MITER SAW WITH LASER Double Insulated MS1290LZA CUSTOMER SERVICE INFORMATION For parts or service, contact your nearest RIDGID authorized service center. For the location of this tool is found on a plate attached to provide...


