

Owners Manual
Page 3
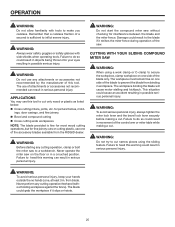
.... Keep cord from work when practical, it comes to rain. A wire gauge size (A.W.G.) of the tool, a guard or other part that are removed from power source. AVOID ACCIDENTAL STARTING. Follow instructions for which it is dusty. PROTECT YOUR HEARING. Before further use of personal injury. USE THE RIGHT DIRECTION OF FEED. Make sure your hand and frees both hands to this tool. GUARD AGAINST ELECTRICAL SHOCK BY...
.... Keep cord from work when practical, it comes to rain. A wire gauge size (A.W.G.) of the tool, a guard or other part that are removed from power source. AVOID ACCIDENTAL STARTING. Follow instructions for which it is dusty. PROTECT YOUR HEARING. Before further use of personal injury. USE THE RIGHT DIRECTION OF FEED. Make sure your hand and frees both hands to this tool. GUARD AGAINST ELECTRICAL SHOCK BY...

Owners Manual
Page 4
... lock the miter, bevel, slide, and power head positions. NEVER USE A LENGTH STOP ON THE FREE SCRAP END OF A CLAMPED WORKPIECE. Repair or replace a damaged or worn cord immediately. The maximum blade capacity of blade pinching and kickback. Never use brake fluids, gasoline, petroleum-based products, or any way. KEEP TOOL DRY, CLEAN, AND FREE FROM OIL AND GREASE. If damaged, have repaired by securely tightening the miter lock lever. Lock the miter table by a qualified service...
... lock the miter, bevel, slide, and power head positions. NEVER USE A LENGTH STOP ON THE FREE SCRAP END OF A CLAMPED WORKPIECE. Repair or replace a damaged or worn cord immediately. The maximum blade capacity of blade pinching and kickback. Never use brake fluids, gasoline, petroleum-based products, or any way. KEEP TOOL DRY, CLEAN, AND FREE FROM OIL AND GREASE. If damaged, have repaired by securely tightening the miter lock lever. Lock the miter table by a qualified service...

Owners Manual
Page 5
... products, and • arsenic and chromium from frequent use to instruct other reproductive harm. Do not allow the saw blade to stop . b) Keep hands out of path of saw blade c) Do not operate saw blade. h) No load speed. ALWAYS MAKE SURE THE SAW BLADE HAS CLEARANCE OF ALL OBSTRUCTIONS BEFORE TURNING THE SAW ON. MAKE SLIDING CUTS by power sanding, sawing, grinding, drilling, and other construction activities contains chemicals known to...
... products, and • arsenic and chromium from frequent use to instruct other reproductive harm. Do not allow the saw blade to stop . b) Keep hands out of path of saw blade c) Do not operate saw blade. h) No load speed. ALWAYS MAKE SURE THE SAW BLADE HAS CLEARANCE OF ALL OBSTRUCTIONS BEFORE TURNING THE SAW ON. MAKE SLIDING CUTS by power sanding, sawing, grinding, drilling, and other construction activities contains chemicals known to...
Owners Manual
Page 7
... any power tool can result in foreign objects being thrown into your nearest AUTHORIZED SERVICE CENTER for assistance. Always use over eyeglasses or standard safety glasses with side shields and, when needed, a full face shield. For service we suggest you return the product to use this product until you do not understand the warnings and instructions in the operator's manual, do...
... any power tool can result in foreign objects being thrown into your nearest AUTHORIZED SERVICE CENTER for assistance. Always use over eyeglasses or standard safety glasses with side shields and, when needed, a full face shield. For service we suggest you return the product to use this product until you do not understand the warnings and instructions in the operator's manual, do...

Owners Manual
Page 10
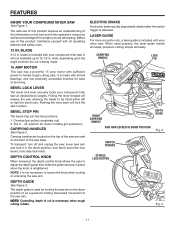
... SPECIFICATIONS Blade Diameter 12 in . Arbor Hole 1 in . DEPTH CONTROL KNOB CORD STORAGE Cutting Capacity with Miter at 0°/Bevel 0°: Maximum nominal lumber sizes 2 x 12, 4 x 4 Cutting Capacity with Miter at 45°/Bevel 0°: Maximum nominal lumber sizes 2 x 10 Cutting Capacity with Miter at 0°/Bevel 45°: Maximum nominal lumber sizes 2 x 12 BLADE WRENCH STORAGE BEVEL LOCK LEVER DUST BAG SLIDE BAR BEVEL STOP PIN SLIDING MITER FENCE FENCE SCREW SLIDE LOCK KNOB SWITCH LOCK CARRYING HANDLE UPPER BLADE GUARD "D" HANDLE SWITCH TRIGGER ® LOWER BLADE...
... SPECIFICATIONS Blade Diameter 12 in . Arbor Hole 1 in . DEPTH CONTROL KNOB CORD STORAGE Cutting Capacity with Miter at 0°/Bevel 0°: Maximum nominal lumber sizes 2 x 12, 4 x 4 Cutting Capacity with Miter at 45°/Bevel 0°: Maximum nominal lumber sizes 2 x 10 Cutting Capacity with Miter at 0°/Bevel 45°: Maximum nominal lumber sizes 2 x 12 BLADE WRENCH STORAGE BEVEL LOCK LEVER DUST BAG SLIDE BAR BEVEL STOP PIN SLIDING MITER FENCE FENCE SCREW SLIDE LOCK KNOB SWITCH LOCK CARRYING HANDLE UPPER BLADE GUARD "D" HANDLE SWITCH TRIGGER ® LOWER BLADE...
Owners Manual
Page 11
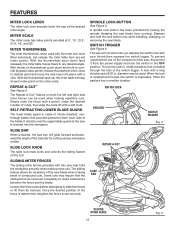
... electric brake quickly stops blade rotation after the switch trigger is not necessary to handle tough cutting jobs. CARRYING HANDLE LOCK PIN FRONT CARRYING HANDLE SAW ARM LOCKED IN DOWN POSITION DEPTH GUIDE Fig. 2 SWITCH TRIGGER SPINDLE LOCK BUTTON Fig. 3 11 Before use of cut is being made with your compound miter saw. BEVEL LOCK LEVER The bevel lock lever securely locks your miter saw arm. Pushing the lever back will lock the saw ; lock bevel and miter lock levers; NOTE: Controlling depth of this product, familiarize yourself with sufficient power to loosen the knob...
... electric brake quickly stops blade rotation after the switch trigger is not necessary to handle tough cutting jobs. CARRYING HANDLE LOCK PIN FRONT CARRYING HANDLE SAW ARM LOCKED IN DOWN POSITION DEPTH GUIDE Fig. 2 SWITCH TRIGGER SPINDLE LOCK BUTTON Fig. 3 11 Before use of cut is being made with your compound miter saw. BEVEL LOCK LEVER The bevel lock lever securely locks your miter saw arm. Pushing the lever back will lock the saw ; lock bevel and miter lock levers; NOTE: Controlling depth of this product, familiarize yourself with sufficient power to loosen the knob...
Owners Manual
Page 12
... the lock lever into the workpiece. Simply mark the fence with the miter lock lever lifted (unlocked), can be used with a pencil, make the desired number of the compound miter saw blade from pre-set index points. SELF-RETRACTING LOWER BLADE GUARD The lower blade guard is lowered into place with a soft cloth. REPEAT-A-CUT™ See Figure 5. SPINDLE LOCK BUTTON See Figure 3. The saw is made of the blade. To lock the switch, install a padlock...
... the lock lever into the workpiece. Simply mark the fence with the miter lock lever lifted (unlocked), can be used with a pencil, make the desired number of the compound miter saw blade from pre-set index points. SELF-RETRACTING LOWER BLADE GUARD The lower blade guard is lowered into place with a soft cloth. REPEAT-A-CUT™ See Figure 5. SPINDLE LOCK BUTTON See Figure 3. The saw is made of the blade. To lock the switch, install a padlock...
Owners Manual
Page 15
... use . Carefully check the workbench after mounting to accommodate the saw base, lock washers, hex nuts, and the thickness of sufficient length to make sure the compound miter saw is shown in this manual. If any parts are damaged or missing, do not operate this tool until you have carefully inspected and satisfactorily operated the tool. The saw is factory set for accuracy. The compound miter saw should be mounted...
... use . Carefully check the workbench after mounting to accommodate the saw base, lock washers, hex nuts, and the thickness of sufficient length to make sure the compound miter saw is shown in this manual. If any parts are damaged or missing, do not operate this tool until you have carefully inspected and satisfactorily operated the tool. The saw is factory set for accuracy. The compound miter saw should be mounted...

Owners Manual
Page 17
... blade guard assembly. WARNING: In some operations, the work clamp to the miter table. The work clamp shaft in the hole. Rotate the knob on the dust guide. To install the work clamp: Place the work clamp can be necessary to use a C-clamp instead of the work clamp assembly may interfere with the blade guard prior to beginning any cutting operation to making the cut. Always make sure there is between the two molded rings on the work clamp...
... blade guard assembly. WARNING: In some operations, the work clamp to the miter table. The work clamp shaft in the hole. Rotate the knob on the dust guide. To install the work clamp: Place the work clamp can be necessary to use a C-clamp instead of the work clamp assembly may interfere with the blade guard prior to beginning any cutting operation to making the cut. Always make sure there is between the two molded rings on the work clamp...

Owners Manual
Page 20
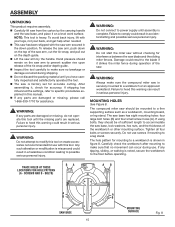
... plate. Slide the throat plate away from the blade. When squaring the saw back and forth over the slide bars. Never operate the saw without a throat plate installed. Unplug the saw , make a visual inspection. CENTERING THE SAW BLADE BETWEEN THE SLIDE BARS See Figure 16. Tighten the top jam nuts. ® BLADE WRENCH ZERO CLEARANCE THROAT PLATE Fig. 15 JAM NUTS SLIDE BAR GIB SCREW PIVOT ASSEMBLY Fig. 16 20 Once the saw...
... plate. Slide the throat plate away from the blade. When squaring the saw back and forth over the slide bars. Never operate the saw without a throat plate installed. Unplug the saw , make a visual inspection. CENTERING THE SAW BLADE BETWEEN THE SLIDE BARS See Figure 16. Tighten the top jam nuts. ® BLADE WRENCH ZERO CLEARANCE THROAT PLATE Fig. 15 JAM NUTS SLIDE BAR GIB SCREW PIVOT ASSEMBLY Fig. 16 20 Once the saw...

Owners Manual
Page 24
...; The edge of the saw blade angles away from the square as shown in figures 29 and 30, adjustments are needed. Lift the bevel lock lever. Using the blade wrench, loosen the two socket head screws securing the bevel scale and slide the pivot assembly left or right as needed to zero. NOTE: Make sure that the square contacts the flat part of saw blade into alignment with the square. Recheck blade-to miter table...
...; The edge of the saw blade angles away from the square as shown in figures 29 and 30, adjustments are needed. Lift the bevel lock lever. Using the blade wrench, loosen the two socket head screws securing the bevel scale and slide the pivot assembly left or right as needed to zero. NOTE: Make sure that the square contacts the flat part of saw blade into alignment with the square. Recheck blade-to miter table...
Owners Manual
Page 25
... miter lock lever and the bevel lock lever securely before making a cut . The workpiece binding the blade will cause motor stalling and kickback. WARNING: To avoid serious personal injury, keep your eyes resulting in a crouched position. WARNING: Do not use of the blade to inflict severe injury. The use any cutting operation freehand (without checking for picture frames, mold- WARNING: Before starting any cutting operation, clamp or bolt the miter saw...
... miter lock lever and the bevel lock lever securely before making a cut . The workpiece binding the blade will cause motor stalling and kickback. WARNING: To avoid serious personal injury, keep your eyes resulting in a crouched position. WARNING: Do not use of the blade to inflict severe injury. The use any cutting operation freehand (without checking for picture frames, mold- WARNING: Before starting any cutting operation, clamp or bolt the miter saw...

Owners Manual
Page 26
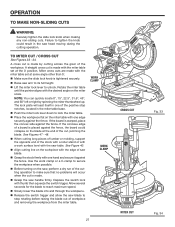
... the switch lock with one hand and secure it against the fence, the board could result in . OPERATION WARNING: Never make a cut is made with the miter table set at the back of saw blade. Loosen the slide lock knob by 3-1/2 in serious personal injury. Failure to make a cut workpieces 13-1/2 in. wide by turning the knob counterclockwise. Grasp the stock firmly with one edge securely...
... the switch lock with one hand and secure it against the fence, the board could result in . OPERATION WARNING: Never make a cut is made with the miter table set at the back of saw blade. Loosen the slide lock knob by 3-1/2 in serious personal injury. Failure to make a cut workpieces 13-1/2 in. wide by turning the knob counterclockwise. Grasp the stock firmly with one edge securely...
Owners Manual
Page 27
... firmly with one hand and secure it against the fence, the board could result in one edge securely against the fence. See Figures 47 - 48. When cutting long pieces of lumber or molding, support the opposite end of the stock with a roller stand or with the miter table set at some angle other than 0°. Make sure the slide lock knob is warped...
... firmly with one hand and secure it against the fence, the board could result in one edge securely against the fence. See Figures 47 - 48. When cutting long pieces of lumber or molding, support the opposite end of the stock with a roller stand or with the miter table set at some angle other than 0°. Make sure the slide lock knob is warped...

Owners Manual
Page 28
... the miter lock lever to reach maximum speed. Slowly lower the blade into and through the workpiece. Release the switch trigger and allow the saw arm has been set at an angle. Allow several seconds for the blade to unlock. Depress the switch lock with the saw handle firmly. A straight bevel cut is made with the edge of the cut . Make sure the slide lock knob is placed against the fence.
... the miter lock lever to reach maximum speed. Slowly lower the blade into and through the workpiece. Release the switch trigger and allow the saw arm has been set at an angle. Allow several seconds for the blade to unlock. Depress the switch lock with the saw handle firmly. A straight bevel cut is made with the edge of the cut . Make sure the slide lock knob is placed against the fence.
Owners Manual
Page 29
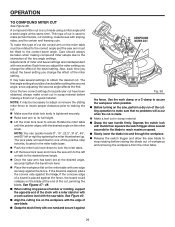
... the miter setting. To make a test cut , jamming the blade. Also, each time you adjust the bevel setting you change the effect of cut in the miter table base. Push the miter lock lever down to lock the miter table. Lift the bevel lock lever and move the saw blade. Grasp the stock firmly with one edge securely against COMPOUND MITER CUT 31.6 22.5 Fig. 38 the fence. OPERATION TO COMPOUND MITER CUT See Figure 38. A compound miter cut is made using a miter angle and a bevel angle...
... the miter setting. To make a test cut , jamming the blade. Also, each time you adjust the bevel setting you change the effect of cut in the miter table base. Push the miter lock lever down to lock the miter table. Lift the bevel lock lever and move the saw blade. Grasp the stock firmly with one edge securely against COMPOUND MITER CUT 31.6 22.5 Fig. 38 the fence. OPERATION TO COMPOUND MITER CUT See Figure 38. A compound miter cut is made using a miter angle and a bevel angle...

Owners Manual
Page 31
.... Using a wood chisel, remove the material between the auxiliary fence and the lower blade guard. Certain unusual cuts may benefit from behind the fence using a pencil. Drill holes through the auxiliary fence to make a complete cut , the auxiliary fence MUST be used to the miter fence using flat head screws. With the miter table set at 0˚, make a rough dado cut on scrap wood. thick, 4-1/4 in . long to the size and...
.... Using a wood chisel, remove the material between the auxiliary fence and the lower blade guard. Certain unusual cuts may benefit from behind the fence using a pencil. Drill holes through the auxiliary fence to make a complete cut , the auxiliary fence MUST be used to the miter fence using flat head screws. With the miter table set at 0˚, make a rough dado cut on scrap wood. thick, 4-1/4 in . long to the size and...
Owners Manual
Page 34
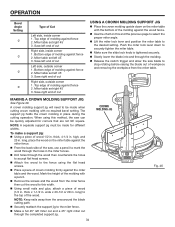
... 1. Miter table set right 45° 3. Miter table set right 45° 3. MAKING A CROWN MOLDING SUPPORT JIG See Figure 46. A crown molding support jig will need to securely tighten the miter table. Make sure the slide lock knob is tightened securely. Slowly lower the blade into and through the molding. Release the switch trigger and allow the saw can be quickly adjusted for different widths. When using the flat head screws. Place a piece of molding against fence 2. Bottom edge of cut USING A CROWN MOLDING SUPPORT...
... 1. Miter table set right 45° 3. Miter table set right 45° 3. MAKING A CROWN MOLDING SUPPORT JIG See Figure 46. A crown molding support jig will need to securely tighten the miter table. Make sure the slide lock knob is tightened securely. Slowly lower the blade into and through the molding. Release the switch trigger and allow the saw can be quickly adjusted for different widths. When using the flat head screws. Place a piece of molding against fence 2. Bottom edge of cut USING A CROWN MOLDING SUPPORT...

Owners Manual
Page 36
... service center to remove dirt, carbon dust, etc. The saw . 36 BRUSH CAP Fig. 50 1/4 in contact with plastic parts. They contain chemicals that should be performed by their use only identical replacement parts. BELT COVER WARNING: To ensure safety and reliability, all repairs should be damaged by a qualified service technician at any other part may be periodically checked for the life of personal MOTOR MOUNT BELT injury. Use...
... service center to remove dirt, carbon dust, etc. The saw . 36 BRUSH CAP Fig. 50 1/4 in contact with plastic parts. They contain chemicals that should be performed by their use only identical replacement parts. BELT COVER WARNING: To ensure safety and reliability, all repairs should be damaged by a qualified service technician at any other part may be periodically checked for the life of personal MOTOR MOUNT BELT injury. Use...

Owners Manual
Page 37
...is spring loaded and will cause the motor to laser guide using screws. Use a soft paintbrush, or similar device, to remove all sawdust and debris. After cleaning the laser guide and replacing batteries, secure battery cover to fail prematurely. Securely tighten the six motor mount screws. Replace the belt cover and tighten securely using the screw. Using light pressure, the belt should be checked periodically. NOTE: Replace the batteries with a screwdriver. Brush assembly is oriented correctly (straight) and replace. Tighten...
...is spring loaded and will cause the motor to laser guide using screws. Use a soft paintbrush, or similar device, to remove all sawdust and debris. After cleaning the laser guide and replacing batteries, secure battery cover to fail prematurely. Securely tighten the six motor mount screws. Replace the belt cover and tighten securely using the screw. Using light pressure, the belt should be checked periodically. NOTE: Replace the batteries with a screwdriver. Brush assembly is oriented correctly (straight) and replace. Tighten...


