

Owners Manual
Page 1
K-75A/B K-1500A/B Drain Cleaning K-1500SP Machines OPERATOR'S MANUAL • Français - 15 • Castellano - Failure to understand and follow the contents of this tool. Read this Operator's Manual carefully before using this manual may result in electrical shock, fire and/or serious personal injury. pág. 31 WARNING!
K-75A/B K-1500A/B Drain Cleaning K-1500SP Machines OPERATOR'S MANUAL • Français - 15 • Castellano - Failure to understand and follow the contents of this tool. Read this Operator's Manual carefully before using this manual may result in electrical shock, fire and/or serious personal injury. pág. 31 WARNING!
Owners Manual
Page 2
...Cleaner Safety ...3 Description, Specifications and Standard Equipment Description ...4 Specifications ...4 Standard Equipment...4 Machine Inspection ...5 Machine Set-Up...6 Operating Instructions ...7 Special Procedures Reverse Operation ...8 Cable Applications...8 Storing and Transporting Cable ("A" Frame Models 9 Accessories Cable Selection ...9 Accessories and Tools Available For Cables ...10 Maintenance Instructions Lubrication ...11 Cables ...11 Clutch Jaws Replacement...11 Removing Clutch End Play...11 V-Belt Adjustment...12 Machine Storage ...12 Service and Repair ...12 Wiring Diagram...
...Cleaner Safety ...3 Description, Specifications and Standard Equipment Description ...4 Specifications ...4 Standard Equipment...4 Machine Inspection ...5 Machine Set-Up...6 Operating Instructions ...7 Special Procedures Reverse Operation ...8 Cable Applications...8 Storing and Transporting Cable ("A" Frame Models 9 Accessories Cable Selection ...9 Accessories and Tools Available For Cables ...10 Maintenance Instructions Lubrication ...11 Cables ...11 Clutch Jaws Replacement...11 Removing Clutch End Play...11 V-Belt Adjustment...12 Machine Storage ...12 Service and Repair ...12 Wiring Diagram...

Owners Manual
Page 3
Serial No. K-75A/B, K-1500A/B & K-1500SP Drain Cleaning Machines Drain Cleaning Machines Record Serial Number below and retain product serial number which is located on nameplate.
Serial No. K-75A/B, K-1500A/B & K-1500SP Drain Cleaning Machines Drain Cleaning Machines Record Serial Number below and retain product serial number which is located on nameplate.
Owners Manual
Page 4
... all instructions. There is operating correctly. Minimum Wire Gauge for outdoor use common sense when operating a power tool. Reduces the risk of inattention while operating power tools may ignite the dust or fumes. • Keep bystanders, children, and visitors away while operating a tool. Personal Safety • Stay alert, watch what you are rated for Extension Cord Nameplate Amps Total Length (in the presence of power. Failure to carry electricity...
... all instructions. There is operating correctly. Minimum Wire Gauge for outdoor use common sense when operating a power tool. Reduces the risk of inattention while operating power tools may ignite the dust or fumes. • Keep bystanders, children, and visitors away while operating a tool. Personal Safety • Stay alert, watch what you are rated for Extension Cord Nameplate Amps Total Length (in the presence of power. Failure to carry electricity...

Owners Manual
Page 5
... is difficult to back tool out of unauthorized parts or failure to follow the contents of this operator's manual carefully before turning the tool ON. Specific Safety Information WARNING Read this manual may cause twisting or kinking or breaking of the machine. • Use Rear Guide Hose. Never grasp a rotating cable with the FOR/OFF/REV Switch. Use Front End Guide Hose when it ON or...
... is difficult to back tool out of unauthorized parts or failure to follow the contents of this operator's manual carefully before turning the tool ON. Specific Safety Information WARNING Read this manual may cause twisting or kinking or breaking of the machine. • Use Rear Guide Hose. Never grasp a rotating cable with the FOR/OFF/REV Switch. Use Front End Guide Hose when it ON or...
Owners Manual
Page 6
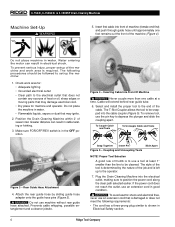
... Depends on the use the K-75 to clean drain lines up to 4″ in diameter and the K-1500 machine up to use sectional-type cable that have a grounded electrical system. Every machine model includes as standard equipment: • A-1 Operator's Mitt • A-12 Pin Key • A-34-12 Rear Guide Hose Chart 1 Model No. Description, Specifications and Standard Equipment Description The RIDGID K-75A/B, K-1500A/B & K-1500SP...
... Depends on the use the K-75 to clean drain lines up to 4″ in diameter and the K-1500 machine up to use sectional-type cable that have a grounded electrical system. Every machine model includes as standard equipment: • A-1 Operator's Mitt • A-12 Pin Key • A-34-12 Rear Guide Hose Chart 1 Model No. Description, Specifications and Standard Equipment Description The RIDGID K-75A/B, K-1500A/B & K-1500SP...
Owners Manual
Page 7
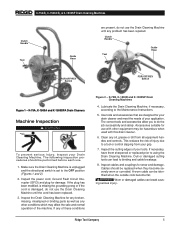
... binding and cable breakage. 8. If necessary, have them sharpened or replaced prior to the Maintenance Instructions. 5. Inspect the Drain Cleaning Machine for any broken, missing, misaligned or binding parts as well as any problem has been repaired. Use tools and accessories that are present, do not use . 1. Accessories suitable for use the Drain Cleaning Machine until any other equipment may be identified...
... binding and cable breakage. 8. If necessary, have them sharpened or replaced prior to the Maintenance Instructions. 5. Inspect the Drain Cleaning Machine for any broken, missing, misaligned or binding parts as well as any problem has been repaired. Use tools and accessories that are present, do not use . 1. Accessories suitable for use the Drain Cleaning Machine until any other equipment may be identified...
Owners Manual
Page 8
.../OFF/REV switch is damaged or does not meet the following procedures should be snapped into the cable coupler (Figure 5). WARNING Do not use the pin key to the electrical outlet that does not contain any sources of the machine (Figure 4). If the power cord does not reach the outlet, use an extension cord in Electrical Safety section. 6 Ridge Tool Company WARNING...
.../OFF/REV switch is damaged or does not meet the following procedures should be snapped into the cable coupler (Figure 5). WARNING Do not use the pin key to the electrical outlet that does not contain any sources of the machine (Figure 4). If the power cord does not reach the outlet, use an extension cord in Electrical Safety section. 6 Ridge Tool Company WARNING...
Owners Manual
Page 9
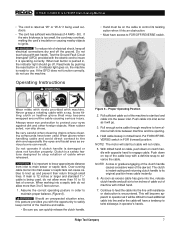
... in FOR (forward) position. If the wire thickness is too small, the cord may become apparent to operator as it is operating correctly. Clutch is a safety feature designed to feed the cable into the line until resistance or obstruction is encountered. Continue to stop rotation of cable when released. The motor will start tool and cable into the sewer inlet...
... in FOR (forward) position. If the wire thickness is too small, the cord may become apparent to operator as it is operating correctly. Clutch is a safety feature designed to feed the cable into the line until resistance or obstruction is encountered. Continue to stop rotation of cable when released. The motor will start tool and cable into the sewer inlet...
Owners Manual
Page 10
... all cables. After motor comes to a complete stop the cable rotating and releases the torque. Cable Applications Standard Cable Standard 7/8″ or 11/4″ cable can happen quickly and without warning, so proceed slowly and carefully as required. 10. To add cable, the following proce- Unplug power cord and remove guide hose. Special Procedures Reverse Operation Running machine in reverse...
... all cables. After motor comes to a complete stop the cable rotating and releases the torque. Cable Applications Standard Cable Standard 7/8″ or 11/4″ cable can happen quickly and without warning, so proceed slowly and carefully as required. 10. To add cable, the following proce- Unplug power cord and remove guide hose. Special Procedures Reverse Operation Running machine in reverse...
Owners Manual
Page 11
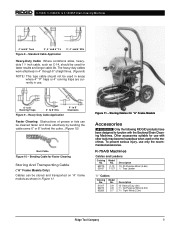
...type cable should be cleaned faster and more effectively by bending the cable some 6″ or 8″ behind the cutter. (Figure 10) Bent Cable Figure 10 - Heavy Duty Cable Application 4″ to 8″ Cleanouts Faster Cleaning Obstructions of grease or fats can be stored and transported on "A" frame models... On "A" Frame Models Accessories WARNING Only the following RIDGID products have been designed to 8″ Ells Figure 9 - To prevent serious injury, use with the Sectional Drain Cleaning Machines. The heavy-duty cables work effectively in use. 6″ to...
...type cable should be cleaned faster and more effectively by bending the cable some 6″ or 8″ behind the cutter. (Figure 10) Bent Cable Figure 10 - Heavy Duty Cable Application 4″ to 8″ Cleanouts Faster Cleaning Obstructions of grease or fats can be stored and transported on "A" frame models... On "A" Frame Models Accessories WARNING Only the following RIDGID products have been designed to 8″ Ells Figure 9 - To prevent serious injury, use with the Sectional Drain Cleaning Machines. The heavy-duty cables work effectively in use. 6″ to...
Owners Manual
Page 12
...-8 A-34-10 A-34-12 Description Tool Box Left-Hand Mitt Right-Hand Mitt Pin Key, 7/8″ Cable Pin Key, 5/8″ Cable Cable Carrier (Five Sections/C-10) Cable Carrier (Three Sections/C-10) Cable Caddy Jawset Adapts K-75 to 5/8″ Cable 7/8″ Replacement Jawset 8′ Rear Guide Hose 10′ Rear Guide Hose 12′ Rear Guide Hose Tools for complete list of tools and accessories. 10 Ridge Tool Company K-75A/B, K-1500A/B, & K-1500SP...
...-8 A-34-10 A-34-12 Description Tool Box Left-Hand Mitt Right-Hand Mitt Pin Key, 7/8″ Cable Pin Key, 5/8″ Cable Cable Carrier (Five Sections/C-10) Cable Carrier (Three Sections/C-10) Cable Caddy Jawset Adapts K-75 to 5/8″ Cable 7/8″ Replacement Jawset 8′ Rear Guide Hose 10′ Rear Guide Hose 12′ Rear Guide Hose Tools for complete list of tools and accessories. 10 Ridge Tool Company K-75A/B, K-1500A/B, & K-1500SP...
Owners Manual
Page 13
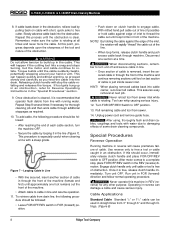
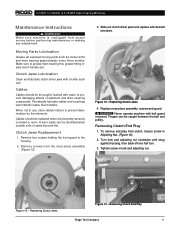
... screw in Adjusting Nut. (Figure 14). 2. Replacing Clutch Jaws Figure 14 - A worn cable can be identified when outside coils of sediment and drain cleaning compounds. Remove four screws holding the front guard to grease main bearing thru grease fitting inside clutch handle slot. WARNING Never operate machine with desired size jaws. Fingers can be caught between the belt and pulley. Turn lock and adjusting nut clockwise...
... screw in Adjusting Nut. (Figure 14). 2. Replacing Clutch Jaws Figure 14 - A worn cable can be identified when outside coils of sediment and drain cleaning compounds. Remove four screws holding the front guard to grease main bearing thru grease fitting inside clutch handle slot. WARNING Never operate machine with desired size jaws. Fingers can be caught between the belt and pulley. Turn lock and adjusting nut clockwise...
Owners Manual
Page 14
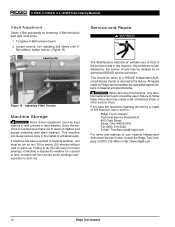
... in the hands of children and people unfamiliar with drain cleaners. To tighten V-Belt remove Guard. 2. If machine is out of reach of untrained users. Store the machine in rainy weather. Adjusting Nut Figure 15 - Loosen locknut, turn adjusting bolt slowly until V- This machine can cause serious injury in frozen bearings. Service and Repair WARNING The "Maintenance Instructions" will form across motor windings causing motor to...
... in the hands of children and people unfamiliar with drain cleaners. To tighten V-Belt remove Guard. 2. If machine is out of reach of untrained users. Store the machine in rainy weather. Adjusting Nut Figure 15 - Loosen locknut, turn adjusting bolt slowly until V- This machine can cause serious injury in frozen bearings. Service and Repair WARNING The "Maintenance Instructions" will form across motor windings causing motor to...
Owners Manual
Page 15
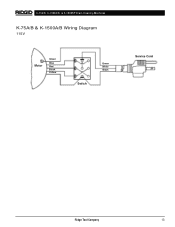
K-75A/B, K-1500A/B, & K-1500SP Drain Cleaning Machines K-75A/B & K-1500A/B Wiring Diagram 115V Motor Green Blue Red Black Yellow Switch Green White Black Service Cord Ridge Tool Company 13
K-75A/B, K-1500A/B, & K-1500SP Drain Cleaning Machines K-75A/B & K-1500A/B Wiring Diagram 115V Motor Green Blue Red Black Yellow Switch Green White Black Service Cord Ridge Tool Company 13
Owners Manual
Page 16
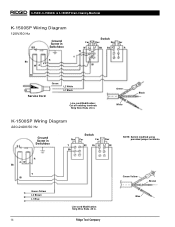
... L1 Bk W U1 Y U2 Bk Z1 1 R Bl Bl Service Cord Green L2 White L1 Black Line cord Modification: Cut off existing terminals Strip Wire Ends .25 in . Ridge Tool Company NOTE: Switch modified using provided jumper terminals. Green White Black K-1500SP Wiring Diagram 220-240V/50 Hz Ground Screw in Switchbox Rev Y Bk Switch For For Rev Bl Br L2 L1 Bl...
... L1 Bk W U1 Y U2 Bk Z1 1 R Bl Bl Service Cord Green L2 White L1 Black Line cord Modification: Cut off existing terminals Strip Wire Ends .25 in . Ridge Tool Company NOTE: Switch modified using provided jumper terminals. Green White Black K-1500SP Wiring Diagram 220-240V/50 Hz Ground Screw in Switchbox Rev Y Bk Switch For For Rev Bl Br L2 L1 Bl...


