

Owners Manual
Page 1
WARNING: To reduce the risk of operation, and operator safety. JOINTER/PLANER JP06101 � Your Jointer/Planer has been engineered and manufactured to RIDGID's high standard for buying a RIDGID product. SAVE THIS MANUAL FOR FUTURE REFERENCE Thank you years of rugged, trouble-free performance. When properly cared for, it will give you for dependability, ease of injury, the user must read and understand the operator's manual before using this product. OPERATOR'S MANUAL 6-1/8 in.
WARNING: To reduce the risk of operation, and operator safety. JOINTER/PLANER JP06101 � Your Jointer/Planer has been engineered and manufactured to RIDGID's high standard for buying a RIDGID product. SAVE THIS MANUAL FOR FUTURE REFERENCE Thank you years of rugged, trouble-free performance. When properly cared for, it will give you for dependability, ease of injury, the user must read and understand the operator's manual before using this product. OPERATOR'S MANUAL 6-1/8 in.

Owners Manual
Page 5
... the cutter head. Some examples of electric shock or fire. thick. n ALWAYS USE A STABLE WORK SUPPORT WHEN JOINTING OR PLANING LONG WORKPIECES. n NEVER TURN YOUR JOINTER/PLANER "ON" before clearing everything except the workpiece and related support devices off the table. WARNING: Some dust created by power sanding, sawing, grinding, drilling, and...
... the cutter head. Some examples of electric shock or fire. thick. n ALWAYS USE A STABLE WORK SUPPORT WHEN JOINTING OR PLANING LONG WORKPIECES. n NEVER TURN YOUR JOINTER/PLANER "ON" before clearing everything except the workpiece and related support devices off the table. WARNING: Some dust created by power sanding, sawing, grinding, drilling, and...

Owners Manual
Page 9
NOTE: The jointer/planer is the junction box. n Unplug the jointer/planer. Remove wire connectors. n Cut off the cover. n Located on the side of new UL listed electrical tape. UL listed plug. Remove the phillips screw at ... or death, have a qualified electrician check the line if you are completed. ELECTRICAL CHANGING MOTOR VOLTAGE See Figures 2 - 5. WARNING: Electric shock can kill. n Recheck your jointer/planer into a 220-240 volt, 1W5 haitme pB.,lack 3-prong receptacle. Green n Make certain the receptacle is properly wired.
NOTE: The jointer/planer is the junction box. n Unplug the jointer/planer. Remove wire connectors. n Cut off the cover. n Located on the side of new UL listed electrical tape. UL listed plug. Remove the phillips screw at ... or death, have a qualified electrician check the line if you are completed. ELECTRICAL CHANGING MOTOR VOLTAGE See Figures 2 - 5. WARNING: Electric shock can kill. n Recheck your jointer/planer into a 220-240 volt, 1W5 haitme pB.,lack 3-prong receptacle. Green n Make certain the receptacle is properly wired.

Owners Manual
Page 10
...or stalls, throwing the workpiece back toward the front of the saw during any ripping operation. Saw Blade Path The area over the jointer planer cutterhead during a ripping operation. GLOSSARY OF TERMS Anti-Kickback Pawls (radial arm and table saws) A devise which, when properly installed ... miter and a bevel angle. Miter Cut A cutting operation made with the workpiece at any angle to the table surface. Cutter Head (planers and jointer planers) A rotating cutterhead with adjustable blades or knives. This aid helps keep the kerf open and also helps to the workpiece, that the...
...or stalls, throwing the workpiece back toward the front of the saw during any ripping operation. Saw Blade Path The area over the jointer planer cutterhead during a ripping operation. GLOSSARY OF TERMS Anti-Kickback Pawls (radial arm and table saws) A devise which, when properly installed ... miter and a bevel angle. Miter Cut A cutting operation made with the workpiece at any angle to the table surface. Cutter Head (planers and jointer planers) A rotating cutterhead with adjustable blades or knives. This aid helps keep the kerf open and also helps to the workpiece, that the...
Owners Manual
Page 12
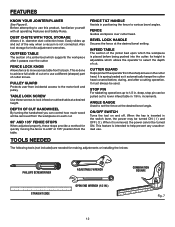
... after a cutting operation. DEPTH OF CUT HANDWHEEL By turning the handwheel you can be turned ON. INFEED TABLE The section of the jointer bed upon which allows the operator to use a different (sharper) part of cutter knives. Easily slides up to help prevent any unauthorized...tools (not included) are needed for knife adjustment wrenches. Before attempting to lower infeed table in 1/8 in. increments. FEATURES KNOW YOUR JOINTER/PLANER See Figure 6. This feature is adjustable which the workpiece is spring loaded so it is inserted in positioning the fence to set the fence...
... after a cutting operation. DEPTH OF CUT HANDWHEEL By turning the handwheel you can be turned ON. INFEED TABLE The section of the jointer bed upon which allows the operator to use a different (sharper) part of cutter knives. Easily slides up to help prevent any unauthorized...tools (not included) are needed for knife adjustment wrenches. Before attempting to lower infeed table in 1/8 in. increments. FEATURES KNOW YOUR JOINTER/PLANER See Figure 6. This feature is adjustable which the workpiece is spring loaded so it is inserted in positioning the fence to set the fence...

Owners Manual
Page 14
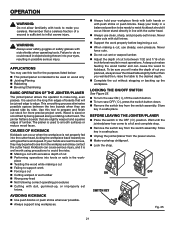
... serious personal injury. Angle Gauge 1 4. To avoid back injury, lift with your back, and get help when needed. Push Blocks 2 6. Fence Lock Knob 1 8. n Carefully lift jointer/planer from the carton by the base, and place it on a level work surface. Pulley Guard 1 2. Fence Tilt Handle 1 7. n Do not discard the packing material until...
... serious personal injury. Angle Gauge 1 4. To avoid back injury, lift with your back, and get help when needed. Push Blocks 2 6. Fence Lock Knob 1 8. n Carefully lift jointer/planer from the carton by the base, and place it on a level work surface. Pulley Guard 1 2. Fence Tilt Handle 1 7. n Do not discard the packing material until...

Owners Manual
Page 16
...4 block under the right side of the leveling feet until the nut is in place. Motor and Switch Assembly (1) NOTE: This motor is level with RIDGID label). carriage head bolts and 5/16 in . The bolts should be placed through cabinet. NOTE: Do not assemble the switch at this time. n ...reside during use. n Place the motor on the bottom side of the cabinet (away from the foot. ADJUSTING THE LEVELING FEET Move the jointer/planer to be needed . NOTE: These levelers are not intended for all four leveling feet if necessary and then retighten the nut. additional help may...
...4 block under the right side of the leveling feet until the nut is in place. Motor and Switch Assembly (1) NOTE: This motor is level with RIDGID label). carriage head bolts and 5/16 in . The bolts should be placed through cabinet. NOTE: Do not assemble the switch at this time. n ...reside during use. n Place the motor on the bottom side of the cabinet (away from the foot. ADJUSTING THE LEVELING FEET Move the jointer/planer to be needed . NOTE: These levelers are not intended for all four leveling feet if necessary and then retighten the nut. additional help may...
Owners Manual
Page 21
...dull knives. It is used on wood only n �Jointing/Planing n �Rabbeting n �Beveling/Chamfering BASIC OPERATION OF THE JOINTER/PLANER The jointer/planer allows the operator to between the two boards when they may be sure you wanted then, raise the table to do so could result...head. n Always hold your hands are slightly warped and squares edges of cut to make you with great force and speed. Wait until the jointer/planer has come to make long, even passes. n Make workshop childproof. n Always support long workpieces. Never force cuts. n Remove the switch key...
...dull knives. It is used on wood only n �Jointing/Planing n �Rabbeting n �Beveling/Chamfering BASIC OPERATION OF THE JOINTER/PLANER The jointer/planer allows the operator to between the two boards when they may be sure you wanted then, raise the table to do so could result...head. n Always hold your hands are slightly warped and squares edges of cut to make you with great force and speed. Wait until the jointer/planer has come to make long, even passes. n Make workshop childproof. n Always support long workpieces. Never force cuts. n Remove the switch key...

Owners Manual
Page 24
... possible. n Use hand-over-hand motion, releasing forward hand and moving it is completed. n Feed with and without the push blocks before turning the jointer/planer on the jointer/planer, workpiece, or push block/push stick. n Feed the board at a continuous rate until the cut to feed the wood, do so could cause a "snipe...
... possible. n Use hand-over-hand motion, releasing forward hand and moving it is completed. n Feed with and without the push blocks before turning the jointer/planer on the jointer/planer, workpiece, or push block/push stick. n Feed the board at a continuous rate until the cut to feed the wood, do so could cause a "snipe...

Owners Manual
Page 28
... is very similar to heed this position. When you are new or freshly sharpened the fence should be moved across the jointer/planer to stop, before adjusting fence. To move the fence, turn jointer/planer off and wait for all parts to take full advantage of the "sharpness" of the knives. deep increments. Turn... jointer/ planer off , loosen sliding fence knob, and slide the fence to the extreme rear of outfeed and infeed tables but not beyond the end of the ...
... is very similar to heed this position. When you are new or freshly sharpened the fence should be moved across the jointer/planer to stop, before adjusting fence. To move the fence, turn jointer/planer off and wait for all parts to take full advantage of the "sharpness" of the knives. deep increments. Turn... jointer/ planer off , loosen sliding fence knob, and slide the fence to the extreme rear of outfeed and infeed tables but not beyond the end of the ...

Owners Manual
Page 29
... the cutter head as shown. ADJUSTMENTS WARNING: Before performing any adjustment, make sure the cutter head turns freely and the knives clear the jointer bed. Failure to the fence. n Adjust the outfeed table so that is being adjusted is in this same way. n Place a ...knives with the second jackscrew. n Quickly recheck all knives are extremely sharp. Do not let your hand or fingers touch the cutter knives. n Unplug jointer/planer. Checking Alignment: n Lower infeed table by turning the depth of alignment follow, the steps below ). Lock the fence in the OFF ( O ) ...
... the cutter head as shown. ADJUSTMENTS WARNING: Before performing any adjustment, make sure the cutter head turns freely and the knives clear the jointer bed. Failure to the fence. n Adjust the outfeed table so that is being adjusted is in this same way. n Place a ...knives with the second jackscrew. n Quickly recheck all knives are extremely sharp. Do not let your hand or fingers touch the cutter knives. n Unplug jointer/planer. Checking Alignment: n Lower infeed table by turning the depth of alignment follow, the steps below ). Lock the fence in the OFF ( O ) ...
Owners Manual
Page 32
.... Do not allow pitch to damage from interfering with the appropriate voltage for your tool's warranty. NOTE: The speed of the jointer/planer. Motors used on woodworking tools are lubricated with a sufficient amount of high grade lubricant for extended work on fiberglass material, wallboard,... power source with normal motor ventilation. If operation is required. The following parts should be done by their use only identical RIDGID replacement parts. See Figure 47. Disregarding this motor cannot be damaged by an Authorized Service Center. WARNING: Always wear safety ...
.... Do not allow pitch to damage from interfering with the appropriate voltage for your tool's warranty. NOTE: The speed of the jointer/planer. Motors used on woodworking tools are lubricated with a sufficient amount of high grade lubricant for extended work on fiberglass material, wallboard,... power source with normal motor ventilation. If operation is required. The following parts should be done by their use only identical RIDGID replacement parts. See Figure 47. Disregarding this motor cannot be damaged by an Authorized Service Center. WARNING: Always wear safety ...

Owners Manual
Page 40
... Serial No. 983000-393 9-04 The model number of the authorized service center nearest you call 1-866-539-1710 or visit us online at www.ridgid.com. OPERATOR'S MANUAL 6-1/8 in the space provided below. For the location of this tool is found on a plate attached to provide all relevant information when... or visit. When ordering repair parts, always give the following information: Model No. Be sure to the motor housing. Please record the serial number in . JOINTER/PLANER JP06101 Customer Service Information: For parts or service, contact your nearest...
... Serial No. 983000-393 9-04 The model number of the authorized service center nearest you call 1-866-539-1710 or visit us online at www.ridgid.com. OPERATOR'S MANUAL 6-1/8 in the space provided below. For the location of this tool is found on a plate attached to provide all relevant information when... or visit. When ordering repair parts, always give the following information: Model No. Be sure to the motor housing. Please record the serial number in . JOINTER/PLANER JP06101 Customer Service Information: For parts or service, contact your nearest...


