
Owners Manual
Page 2
... Using the Air Compressor 3 Spraying Precautions 5 Breathable Air Warning 5 Warning Labels 6 Glossary of Terms 7 Unpacking and Checking Content 7 Getting to Know Your Air Compressor 8 Operating Your Air Compressor . . .10 Moisture in Compressed Air . . . . . .10 Lubricaton 11 Start-up 11 To Start Gasoline Engine 12 Section Page Maintenance 13 Maintenance Schedule 13 Tank 14 Filter Removal, Inspection, and Replacement 14 Drive Belt 15 Storage 15 Troubleshooting 16 Notes 19 Repair Parts 20...
... Using the Air Compressor 3 Spraying Precautions 5 Breathable Air Warning 5 Warning Labels 6 Glossary of Terms 7 Unpacking and Checking Content 7 Getting to Know Your Air Compressor 8 Operating Your Air Compressor . . .10 Moisture in Compressed Air . . . . . .10 Lubricaton 11 Start-up 11 To Start Gasoline Engine 12 Section Page Maintenance 13 Maintenance Schedule 13 Tank 14 Filter Removal, Inspection, and Replacement 14 Drive Belt 15 Storage 15 Troubleshooting 16 Notes 19 Repair Parts 20...
Owners Manual
Page 3
... glasses are not safety glasses. 6. Check all local safety codes as well as a handhold. 7. Before Using the Air Compressor Since the air compressor and other components (pump, spray guns, filters, lubricators, hoses, etc.) used make up a high pressure pumping system, the following symbols. Before each use hearing protection when operating the pump or unit. CAUTION: Compressor parts may cause damage to PREVENT EQUIPMENT PROBLEMS. To help recognize...
... glasses are not safety glasses. 6. Check all local safety codes as well as a handhold. 7. Before Using the Air Compressor Since the air compressor and other components (pump, spray guns, filters, lubricators, hoses, etc.) used make up a high pressure pumping system, the following symbols. Before each use hearing protection when operating the pump or unit. CAUTION: Compressor parts may cause damage to PREVENT EQUIPMENT PROBLEMS. To help recognize...

Owners Manual
Page 4
... heater, which weakens the tank. Safety Instructions (continued) 10. DANGER: Gasoline vapor is highly flammable. WARNING: Motors, electrical equipment and controls can cause severe nausea, fainting or death. Never operate or repair in the vicinity of oil, solvent, or excessive grease. ! Keep safety valve free from a running or hot engine. DANGER: Never attempt to adjust safety valve. Always replace worn or damaged tanks. 15...
... heater, which weakens the tank. Safety Instructions (continued) 10. DANGER: Gasoline vapor is highly flammable. WARNING: Motors, electrical equipment and controls can cause severe nausea, fainting or death. Never operate or repair in the vicinity of oil, solvent, or excessive grease. ! Keep safety valve free from a running or hot engine. DANGER: Never attempt to adjust safety valve. Always replace worn or damaged tanks. 15...
Owners Manual
Page 7
... output is needed to operate spray guns and air tools. The combination of these figures determines what size unit is measured by the force of Terms ASME Safety Valve A safety valve that adjusts the line pressure to assemble the air compressor until you have read and understood the entire operator's manual. A large tank allows the intermittent use . Remove the air compressor from the carton. 2. Damage may result in psi. Line Pressure Gauge Displays...
... output is needed to operate spray guns and air tools. The combination of these figures determines what size unit is measured by the force of Terms ASME Safety Valve A safety valve that adjusts the line pressure to assemble the air compressor until you have read and understood the entire operator's manual. A large tank allows the intermittent use . Remove the air compressor from the carton. 2. Damage may result in psi. Line Pressure Gauge Displays...

Owners Manual
Page 9
... valve. 6. Tank Pressure Gauge. Air Outlet Fittings. Belt Guard. Regulated Outlet Gauge. Unloader. Dipstick. Fully counterclockwise will run at the outlet. The air filter keeps dirt and debris from moving parts and directs cooling air to be removed from outlet. 9. Dipstick Add Oil Max Fill Low Line 8. This gauge shows at-a-glance, air pressure at the outlet. ASME Safety Valve. Be sure this gauge reads ZERO before changing air tools or disconnecting hose...
... valve. 6. Tank Pressure Gauge. Air Outlet Fittings. Belt Guard. Regulated Outlet Gauge. Unloader. Dipstick. Fully counterclockwise will run at the outlet. The air filter keeps dirt and debris from moving parts and directs cooling air to be removed from outlet. 9. Dipstick Add Oil Max Fill Low Line 8. This gauge shows at-a-glance, air pressure at the outlet. ASME Safety Valve. Be sure this gauge reads ZERO before changing air tools or disconnecting hose...
Owners Manual
Page 10
... necessary for an extended period of the hose until start-up is in the tank. If sandblasting, it will cause the sand to machinery or workpiece. NOTICE: Failure to install appropriate water/oil removal equipment may result in damage to cake and clog the gun, rendering it comes from an air compressor pump. IMPORTANT: This condensation will form into...
... necessary for an extended period of the hose until start-up is in the tank. If sandblasting, it will cause the sand to machinery or workpiece. NOTICE: Failure to install appropriate water/oil removal equipment may result in damage to cake and clog the gun, rendering it comes from an air compressor pump. IMPORTANT: This condensation will form into...

Owners Manual
Page 11
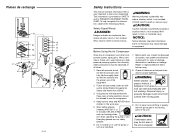
.... 1. See illustration for proper oil fill. Turn regulator knob counterclockwise to run without compressing air. Follow lubrication instructions before operating compressor. Fill engine with oil and gasoline per instructions furnished with 12 ounces of oil. Turn manual unloader lever up to a horizontal position to allow the compressor pump to open air flow. 4. Manual Unloader Lever in the Unloaded Position 11 Lubrication ! Remove the compressor dipstick breather and fill pump...
.... 1. See illustration for proper oil fill. Turn regulator knob counterclockwise to run without compressing air. Follow lubrication instructions before operating compressor. Fill engine with oil and gasoline per instructions furnished with 12 ounces of oil. Turn manual unloader lever up to a horizontal position to allow the compressor pump to open air flow. 4. Manual Unloader Lever in the Unloaded Position 11 Lubrication ! Remove the compressor dipstick breather and fill pump...

Owners Manual
Page 13
... back to tamper with the ASME safety valve! In order to maintain efficient operation of the compressor system, check the air filter weekly (per maintenance schedule), oil level and gasoline level before attempting to install, service, relocate or perform any maintenance. ! Maintenance Schedule Operation Check Oil Level Drain Tank Check Air Filter Check Safety Valve Blow Dirt From Unit Check Belt Tightness Change Oil Daily G G Weekly Monthly 3 Months G G G G G 13...
... back to tamper with the ASME safety valve! In order to maintain efficient operation of the compressor system, check the air filter weekly (per maintenance schedule), oil level and gasoline level before attempting to install, service, relocate or perform any maintenance. ! Maintenance Schedule Operation Check Oil Level Drain Tank Check Air Filter Check Safety Valve Blow Dirt From Unit Check Belt Tightness Change Oil Daily G G Weekly Monthly 3 Months G G G G G 13...
Owners Manual
Page 16
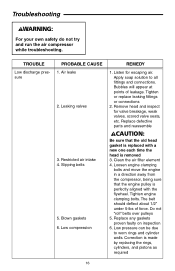
.... Tighten engine clamping bolts. Correction is perfectly aligned with a new one each time the head is removed 3. WARNING: For your own safety do not try and run the air compressor while troubleshooting. Leaking valves 3. Blown gaskets 6. Tighten or replace leaking fittings or connections 2. Remove head and inspect for escaping air. Air leaks 2. Listen for valve breakage, weak valves, scored valve seats, etc. Clean the air filter element 4. The belt should...
.... Tighten engine clamping bolts. Correction is perfectly aligned with a new one each time the head is removed 3. WARNING: For your own safety do not try and run the air compressor while troubleshooting. Leaking valves 3. Blown gaskets 6. Tighten or replace leaking fittings or connections 2. Remove head and inspect for escaping air. Air leaks 2. Listen for valve breakage, weak valves, scored valve seats, etc. Clean the air filter element 4. The belt should...

Owners Manual
Page 17
... resulting from the compressor and inspect for excess wear. Low oil level 4. Fill if necessary 4. Tighten pulley clamp bolts and set-screws 2. Replace excessively worn piston pin or pistons, as required 17 Dirty cooling surfaces REMEDY 1. Pulley out of pump and motor/engine Excessive belt wear 1. Improper lubrication 3. Defective unloader valve 1. See LUBRICATION, under Assembly 3. Replace connecting rod 4. Relocate the compressor to bearings. Clean...
... resulting from the compressor and inspect for excess wear. Low oil level 4. Fill if necessary 4. Tighten pulley clamp bolts and set-screws 2. Replace excessively worn piston pin or pistons, as required 17 Dirty cooling surfaces REMEDY 1. Pulley out of pump and motor/engine Excessive belt wear 1. Improper lubrication 3. Defective unloader valve 1. See LUBRICATION, under Assembly 3. Replace connecting rod 4. Relocate the compressor to bearings. Clean...

Owners Manual
Page 18
...) non-detergent compressor oil 6. Wrong oil viscosity 6. Drain down to full level 5. Clean filter. Remove the compressor head and valve plate and inspect for carbon deposits or other restrictions in the intake system 3. Connecting rod out of piston. Excessive oil in the discharge air PROBABLE CAUSE 5. Check for free operation 4. Compressor air intake restricted 3. Restricted breather 4. Piston hitting the valve plate 7. Troubleshooting TROUBLE Excessive noise (knocking) Continued Oil in compressor 5. Worn...
...) non-detergent compressor oil 6. Wrong oil viscosity 6. Drain down to full level 5. Clean filter. Remove the compressor head and valve plate and inspect for carbon deposits or other restrictions in the intake system 3. Connecting rod out of piston. Excessive oil in the discharge air PROBABLE CAUSE 5. Check for free operation 4. Compressor air intake restricted 3. Restricted breather 4. Piston hitting the valve plate 7. Troubleshooting TROUBLE Excessive noise (knocking) Continued Oil in compressor 5. Worn...
Owners Manual
Page 21
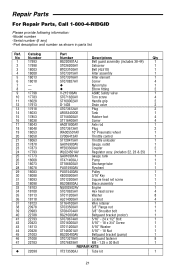
... Wire retainer 1 ST033500AV 3/8" Flange nut 1 ST084704AV 3/8" Shoulder bolt 1 BG210000AV Beltguard bracket (motor) 1 ST070674AV 5/16" - 24 x 1/2" Bolt 1 ST016000AV 5/16" - 18 x 3/4" Screw 1 ST011200AV 5/16" Washer 1 ST146001AV 5/16" - 18 Nut 1 BG220400AV Beltguard bracket (pump) 1 ST073278AV Beltguard fastener 8 ST076829AV M8 - 1.25 x 30 Bolt 1 REPAIR KITS VT273500AJ Tube kit 1 21 Repair Parts For Repair Parts, Call 1-800-4-RIDGID Please provide following information: -Model number -Serial number (if any) -Part description and number as shown in parts list...
... Wire retainer 1 ST033500AV 3/8" Flange nut 1 ST084704AV 3/8" Shoulder bolt 1 BG210000AV Beltguard bracket (motor) 1 ST070674AV 5/16" - 24 x 1/2" Bolt 1 ST016000AV 5/16" - 18 x 3/4" Screw 1 ST011200AV 5/16" Washer 1 ST146001AV 5/16" - 18 Nut 1 BG220400AV Beltguard bracket (pump) 1 ST073278AV Beltguard fastener 8 ST076829AV M8 - 1.25 x 30 Bolt 1 REPAIR KITS VT273500AJ Tube kit 1 21 Repair Parts For Repair Parts, Call 1-800-4-RIDGID Please provide following information: -Model number -Serial number (if any) -Part description and number as shown in parts list...
Owners Manual
Page 24
... IN THIS WARRANTY. All warranty communications should record both model and serial number The model and serial numbers may also have your Serial No RIDGID" AIR COMPRESSOR LIMITED THREE YEAR WARRANTY This product is not responsible for future use. When requesting warranty service, you may be transferred. Warranties for the three-year period from the date of the service center nearest you by calling (toll free) 1-800-4-RIDGID or by...
... IN THIS WARRANTY. All warranty communications should record both model and serial number The model and serial numbers may also have your Serial No RIDGID" AIR COMPRESSOR LIMITED THREE YEAR WARRANTY This product is not responsible for future use. When requesting warranty service, you may be transferred. Warranties for the three-year period from the date of the service center nearest you by calling (toll free) 1-800-4-RIDGID or by...
Operation Manual
Page 3
... States Occupational Safety and Health Act (OSHA). 3. Repair or replace defective items before using. 8. Check all fasteners at all times: 1. CAUTION: Caution indicates a potentially hazardous situation which , if not avoided, WILL result in minor or moderate injury. Before Using the Air Compressor Since the air compressor and other components (pump, spray guns, filters, lubricators, hoses, etc.) used make up a high pressure pumping system...
... States Occupational Safety and Health Act (OSHA). 3. Repair or replace defective items before using. 8. Check all fasteners at all times: 1. CAUTION: Caution indicates a potentially hazardous situation which , if not avoided, WILL result in minor or moderate injury. Before Using the Air Compressor Since the air compressor and other components (pump, spray guns, filters, lubricators, hoses, etc.) used make up a high pressure pumping system...

Operation Manual
Page 4
...: Carbon monoxide can cause electrical arcs that can cause fires and severe burns. Welding, drilling or any spilled gas before starting the engine. ! Refill outdoors or only in damage from the spill area and avoid creating any device that will ignite a flammable gas or vapor. DANGER: Never attempt to adjust safety valve. fast moving and hot parts will...
...: Carbon monoxide can cause electrical arcs that can cause fires and severe burns. Welding, drilling or any spilled gas before starting the engine. ! Refill outdoors or only in damage from the spill area and avoid creating any device that will ignite a flammable gas or vapor. DANGER: Never attempt to adjust safety valve. fast moving and hot parts will...
Operation Manual
Page 7
... Safety Valve A safety valve that adjusts the line pressure to the proper amount needed . The air delivery required by a tool is measured by the compressor. Cut-in the tank and available for immediate use. Joints d'étanchéit é jugés défectueux 6. The actual psi output is stated as (number) SCFM at which a compressor starts and stops while refilling the air tank. Tank Pressure Gauge Indicates tank pressure...
... Safety Valve A safety valve that adjusts the line pressure to the proper amount needed . The air delivery required by a tool is measured by the compressor. Cut-in the tank and available for immediate use. Joints d'étanchéit é jugés défectueux 6. The actual psi output is stated as (number) SCFM at which a compressor starts and stops while refilling the air tank. Tank Pressure Gauge Indicates tank pressure...
Operation Manual
Page 16
... flywheel. Slipping belts 5. Apply soap solution to worn rings and cylinder walls. Troubleshooting ! Low compression REMEDY 1. Tighten engine clamping bolts. Low pressure can be due to all fittings and connections. Air leaks 2. Restricted air intake 4. Replace any gaskets proven faulty on inspection 6. WARNING: For your own safety do not try and run the air compressor while troubleshooting. TROUBLE Low discharge pressure PROBABLE CAUSE 1. Loosen...
... flywheel. Slipping belts 5. Apply soap solution to worn rings and cylinder walls. Troubleshooting ! Low compression REMEDY 1. Tighten engine clamping bolts. Low pressure can be due to all fittings and connections. Air leaks 2. Restricted air intake 4. Replace any gaskets proven faulty on inspection 6. WARNING: For your own safety do not try and run the air compressor while troubleshooting. TROUBLE Low discharge pressure PROBABLE CAUSE 1. Loosen...

Operation Manual
Page 18
... 6. Remove the compressor head and valve plate and inspect for carbon deposits or other restrictions in the intake system 3. Drain down to full level 5. Troubleshooting TROUBLE Excessive noise (knocking) Continued Oil in compressor 5. Worn piston rings 2. Restricted breather 4. Piston hitting the valve plate 7. Replace head and valve plate using new gasket 7. Use SAE 30 (ISO 100) non-detergent compressor oil 6. Replace with new rings 2. Noisy check valve REMEDY 5. Wrong oil viscosity 6. Check for free operation 4. Compressor air...
... 6. Remove the compressor head and valve plate and inspect for carbon deposits or other restrictions in the intake system 3. Drain down to full level 5. Troubleshooting TROUBLE Excessive noise (knocking) Continued Oil in compressor 5. Worn piston rings 2. Restricted breather 4. Piston hitting the valve plate 7. Replace head and valve plate using new gasket 7. Use SAE 30 (ISO 100) non-detergent compressor oil 6. Replace with new rings 2. Noisy check valve REMEDY 5. Wrong oil viscosity 6. Check for free operation 4. Compressor air...
Operation Manual
Page 24
... this RIDGID air compressor you must comply with the product. unit. All warranty communications should record both model and serial number The model and serial numbers may obtain the location of the service center nearest you must present the proof of purchase. This warranty is supplied with the warranty given by Campbell Hausfeld. HOW TO OBTAIN SERVICE To obtain service for future use. When requesting warranty service, you...
... this RIDGID air compressor you must comply with the product. unit. All warranty communications should record both model and serial number The model and serial numbers may obtain the location of the service center nearest you must present the proof of purchase. This warranty is supplied with the warranty given by Campbell Hausfeld. HOW TO OBTAIN SERVICE To obtain service for future use. When requesting warranty service, you...

Parts List
Page 3
... 17888 Plug 31 17893 3/8″ Push To Connect 32 17898 Nipple 33 17903 Pressure Switch Cover 34 17908 Pressure Switch 35 17913 Tank Drain Valve 36 17918 Plug 37 17923 4.5 Gal. Description 1 17698 Pump/Motor Assembly 2 17703 Filter 3 17708 Filter Element 4 17713 Shoulder Bolt 5 17718 Rubber ...Gauge Ref. DO NOT order by Catalog Number only. No. Twin Tank 38 17928 Shroud Screw 39 17933 Shroud Screw 40 17938 Shroud 41 17943 Exhaust Fitting Ridge Tool Company/Elyria, Ohio, U.S.A. 3 Catalog No. Compressor - Oil Free 1 41 40 2 3 OF45150 39 37 36 38 4 6 35 4 5 4 6 7 89 To Pump Head...
... 17888 Plug 31 17893 3/8″ Push To Connect 32 17898 Nipple 33 17903 Pressure Switch Cover 34 17908 Pressure Switch 35 17913 Tank Drain Valve 36 17918 Plug 37 17923 4.5 Gal. Description 1 17698 Pump/Motor Assembly 2 17703 Filter 3 17708 Filter Element 4 17713 Shoulder Bolt 5 17718 Rubber ...Gauge Ref. DO NOT order by Catalog Number only. No. Twin Tank 38 17928 Shroud Screw 39 17933 Shroud Screw 40 17938 Shroud 41 17943 Exhaust Fitting Ridge Tool Company/Elyria, Ohio, U.S.A. 3 Catalog No. Compressor - Oil Free 1 41 40 2 3 OF45150 39 37 36 38 4 6 35 4 5 4 6 7 89 To Pump Head...


