
User Guide
Page 7
... 2 Recording Sound ...97 Playing Back Sound ...98 Other Functions Available in Playback Mode 99 Playback Setting Menu 99 Using the Playback Setting Menu 99 Displaying Photos in Order Automatically (SLIDE SHOW 100 Write-protecting Files (PROTECT 101 Using a Printing Service (DPOF 104 Changing the Image Size (RESIZE 107 Copying the Contents...
... 2 Recording Sound ...97 Playing Back Sound ...98 Other Functions Available in Playback Mode 99 Playback Setting Menu 99 Using the Playback Setting Menu 99 Displaying Photos in Order Automatically (SLIDE SHOW 100 Write-protecting Files (PROTECT 101 Using a Printing Service (DPOF 104 Changing the Image Size (RESIZE 107 Copying the Contents...

User Guide
Page 8
... Step Zooming Setting (STEP ZOOM 125 Displaying a Settings Change Warning (SHTG STGS WARNG 126 Changing the USB Setting (USB CONNECTION 127 Enlarging Icon Display (ENLGE PHOTO ICON 131 Registering the Power-on Use ...177 I. Number of the LCD Monitor (LCD BRIGHTNESS 114 Assigning a Function to 10.4 159 Chapter 5 Troubleshooting Troubleshooting 162...
... Step Zooming Setting (STEP ZOOM 125 Displaying a Settings Change Warning (SHTG STGS WARNG 126 Changing the USB Setting (USB CONNECTION 127 Enlarging Icon Display (ENLGE PHOTO ICON 131 Registering the Power-on Use ...177 I. Number of the LCD Monitor (LCD BRIGHTNESS 114 Assigning a Function to 10.4 159 Chapter 5 Troubleshooting Troubleshooting 162...
User Guide
Page 25
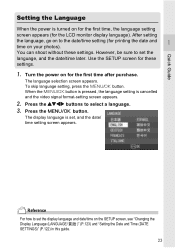
... can shoot without these settings. 1. The language selection screen appears. Press the C/D button. Quick Guide Setting the Language When the power is turned on your photos). To skip language setting, press the M/O button. Turn the power on the SETUP screen, see "Changing the Display Language (LANGUAGE/ )" (P.123) and "Setting the Date...
... can shoot without these settings. 1. The language selection screen appears. Press the C/D button. Quick Guide Setting the Language When the power is turned on your photos). To skip language setting, press the M/O button. Turn the power on the SETUP screen, see "Changing the Display Language (LANGUAGE/ )" (P.123) and "Setting the Date...

User Guide
Page 35
... and press the shutter release button halfway. 33 Switch the Mode Selector to turn the power on Final still image 1. Put the subject of your photo after focusing. (Focus Lock) Example: Taking a photograph of the castle in the background with the camera focused on . Press the POWER button to 5. 3. Quick Guide...
... and press the shutter release button halfway. 33 Switch the Mode Selector to turn the power on Final still image 1. Put the subject of your photo after focusing. (Focus Lock) Example: Taking a photograph of the castle in the background with the camera focused on . Press the POWER button to 5. 3. Quick Guide...
User Guide
Page 44
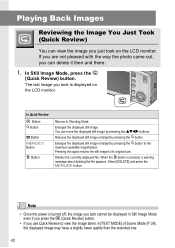
... D Button Returns to its original size. Pressing this again returns the still image to Shooting Mode. If you are not pleased with the way the photo came out, you took on the LCD monitor. You can move the displayed still image by pressing the 8 button to the maximum available magnification. The...
... D Button Returns to its original size. Pressing this again returns the still image to Shooting Mode. If you are not pleased with the way the photo came out, you took on the LCD monitor. You can move the displayed still image by pressing the 8 button to the maximum available magnification. The...

User Guide
Page 48
... the selected image, see P.51. • For information on how to switch to the three-frame view, see P.44. 46 Selected still image Displaying One Photo 1. Press the 9 (Thumbnail Display) button. The screen is displayed. 2. Thumbnail Display You can then select an image to enlarge or delete. 1. You can view your...
... the selected image, see P.51. • For information on how to switch to the three-frame view, see P.44. 46 Selected still image Displaying One Photo 1. Press the 9 (Thumbnail Display) button. The screen is displayed. 2. Thumbnail Display You can then select an image to enlarge or delete. 1. You can view your...
User Guide
Page 56
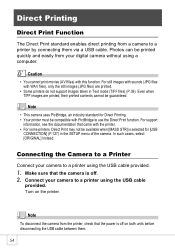
...) with PictBridge to a printer using a computer. Note • This camera uses PictBridge, an industry standard for [USB CONNECTION] (P.127) in Text mode (TIFF files) (P.39). Photos can be compatible with this function. Turn on both units before disconnecting the USB cable between them via a USB cable. In such cases, select [ORIGINAL...
...) with PictBridge to a printer using a computer. Note • This camera uses PictBridge, an industry standard for [USB CONNECTION] (P.127) in Text mode (TIFF files) (P.39). Photos can be compatible with this function. Turn on both units before disconnecting the USB cable between them via a USB cable. In such cases, select [ORIGINAL...

User Guide
Page 82
... compensation is automatically activated, and you can be able to correct the exposure level. Set the exposure level lower (-). The same happens when you take a photo of a subject in the range from -2.0 to change the exposure setting with the correct exposure. buttons set the exposure level higher (+). You can adjust the...
... compensation is automatically activated, and you can be able to correct the exposure level. Set the exposure level lower (-). The same happens when you take a photo of a subject in the range from -2.0 to change the exposure setting with the correct exposure. buttons set the exposure level higher (+). You can adjust the...

User Guide
Page 102
... files are played back in Order Automatically (SLIDE SHOW) You can display the recorded still images, movies, and sound files sequentially on the camera. Displaying Photos in order. To view a slide show in progress, press any button on the screen. Note • Each still image is displayed for three seconds. •...
... files are played back in Order Automatically (SLIDE SHOW) You can display the recorded still images, movies, and sound files sequentially on the camera. Displaying Photos in order. To view a slide show in progress, press any button on the screen. Note • Each still image is displayed for three seconds. •...
User Guide
Page 112
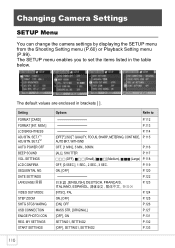
..., [ORIGINAL] P.127 [OFF], ON P.131 SETTING1, SETTING2 P.132 [OFF], SETTING1, SETTING2 P.133 110 SEQUENTIAL NO. SET.2*2 AUTO POWER OFF BEEP SOUND VOL. USB CONNECTION ENLGE PHOTO ICON REG. Setting FORMAT [CARD] FORMAT [INT. Changing Camera Settings SETUP Menu You can change the camera settings by displaying the SETUP menu from the...
..., [ORIGINAL] P.127 [OFF], ON P.131 SETTING1, SETTING2 P.132 [OFF], SETTING1, SETTING2 P.133 110 SEQUENTIAL NO. SET.2*2 AUTO POWER OFF BEEP SOUND VOL. USB CONNECTION ENLGE PHOTO ICON REG. Setting FORMAT [CARD] FORMAT [INT. Changing Camera Settings SETUP Menu You can change the camera settings by displaying the SETUP menu from the...

User Guide
Page 133
... also the C/D button. The Enlarging Icon Display setting is changed. 131 Display the SETUP menu. buttons to select [ENLGE PHOTO ICON] and press the $ button. 3. Changing Camera Settings Enlarging Icon Display (ENLGE PHOTO ICON) You can enlarge the icons displayed on the screen, follow the steps below: 1. This setting is used until...
... also the C/D button. The Enlarging Icon Display setting is changed. 131 Display the SETUP menu. buttons to select [ENLGE PHOTO ICON] and press the $ button. 3. Changing Camera Settings Enlarging Icon Display (ENLGE PHOTO ICON) You can enlarge the icons displayed on the screen, follow the steps below: 1. This setting is used until...

User Guide
Page 135
... [SETTING2], the camera settings made with [REG. MODE COLOR DEPTH IMAGE WITH SOUND DATE IMPRINT EXPOSURE COMP. WHITE BALANCE ISO SETTING SLOW SHUTTER LMT ENLGE PHOTO ICON FLASH Scene Mode Macro DENSITY DISP. Mode 133 Changing Camera Settings Changing the Startup Settings (START SETTINGS) To change the startup settings, use the...
... [SETTING2], the camera settings made with [REG. MODE COLOR DEPTH IMAGE WITH SOUND DATE IMPRINT EXPOSURE COMP. WHITE BALANCE ISO SETTING SLOW SHUTTER LMT ENLGE PHOTO ICON FLASH Scene Mode Macro DENSITY DISP. Mode 133 Changing Camera Settings Changing the Startup Settings (START SETTINGS) To change the startup settings, use the...
User Guide
Page 176
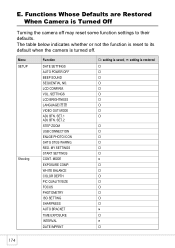
SET.2 STEP ZOOM USB CONNECTION ENLGE PHOTO ICON SHTG STGS WARNG. SETTINGS LCD BRIGHTNESS LANGUAGE/ VIDEO OUT MODE ADJ BTN. Menu SETUP Shooting Function DATE SETTINGS AUTO POWER OFF BEEP SOUND SEQUENTIAL ...
SET.2 STEP ZOOM USB CONNECTION ENLGE PHOTO ICON SHTG STGS WARNG. SETTINGS LCD BRIGHTNESS LANGUAGE/ VIDEO OUT MODE ADJ BTN. Menu SETUP Shooting Function DATE SETTINGS AUTO POWER OFF BEEP SOUND SEQUENTIAL ...

User Guide
Page 184
... 12 Printing 54 PROTECT 101 Q Quick Review Button 13, 42 R Rechargeable Battery 10, 19, 20 REG. Button 13, 25 DPOF 104 E Enlarged View 47 ENLGE PHOTO ICON 131 Error Messages 179 EXPOSURE COMP 80 F Flash 12, 37, 88 Flash Button 13, 37 FOCUS 66 Focus Lock 33 FORMAT [CARD 112 FORMAT...
... 12 Printing 54 PROTECT 101 Q Quick Review Button 13, 42 R Rechargeable Battery 10, 19, 20 REG. Button 13, 25 DPOF 104 E Enlarged View 47 ENLGE PHOTO ICON 131 Error Messages 179 EXPOSURE COMP 80 F Flash 12, 37, 88 Flash Button 13, 37 FOCUS 66 Focus Lock 33 FORMAT [CARD 112 FORMAT...