
Operating Instructions
Page 4
... Projecting an Image...36 Turning Off the Projector...38 Adjusting the Projected Image...39 Adjusting the Angle of the Speaker...43 Switching the Sound Quality...43 Enlarging the Image...44 Temporarily Blanking the Image and Muting the Audio 45 Freezing the Image...45 Switching the Lamp Mode...45 Using the Presentation Timer...46 3. Projecting Images from a USB Memory Device or Digital Camera Requirements for Projecting Images from a USB Device 47 How to Project Images from USB Memory Device 49 Connecting...
... Projecting an Image...36 Turning Off the Projector...38 Adjusting the Projected Image...39 Adjusting the Angle of the Speaker...43 Switching the Sound Quality...43 Enlarging the Image...44 Temporarily Blanking the Image and Muting the Audio 45 Freezing the Image...45 Switching the Lamp Mode...45 Using the Presentation Timer...46 3. Projecting Images from a USB Memory Device or Digital Camera Requirements for Projecting Images from a USB Device 47 How to Project Images from USB Memory Device 49 Connecting...
Operating Instructions
Page 6
Troubleshooting Indicator Display List...143 Common Problems...148 Accessing the Online Knowledge Base 152 9. Maintenance Operating Precautions...153 Cleaning the Projector...155 Cleaning the Air Filter...155 Cleaning the Bottom Air Intake Vent...156 4 Restoring All the Settings to Their Defaults 107 Image Adjustment Menu...108 Display/Sound Settings Menu...112 Energy Saving Settings Menu...116 Default Settings 1 Menu...118 Default Settings 2 Menu...120 USB Settings Menu...123 Settings...123 Display Status...124 Network Settings Menu...125 Wired LAN...125 Wireless LAN...126 LAN Common......
Troubleshooting Indicator Display List...143 Common Problems...148 Accessing the Online Knowledge Base 152 9. Maintenance Operating Precautions...153 Cleaning the Projector...155 Cleaning the Air Filter...155 Cleaning the Bottom Air Intake Vent...156 4 Restoring All the Settings to Their Defaults 107 Image Adjustment Menu...108 Display/Sound Settings Menu...112 Energy Saving Settings Menu...116 Default Settings 1 Menu...118 Default Settings 2 Menu...120 USB Settings Menu...123 Settings...123 Display Status...124 Network Settings Menu...125 Wired LAN...125 Wireless LAN...126 LAN Common......
Operating Instructions
Page 15
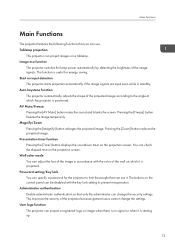
... check the elapsed time on input detection The projector starts projection automatically if the image signals are input even while in accordance with the key lock setting to limit the people that can use . Pressing the [Zoom] button reduces the projected image. AV Mute/Freeze Pressing the [AV Mute] button mutes the sound and blanks the screen. Image eco function The projector switches the lamp power automatically by detecting the brightness of the image in standby. Start...
... check the elapsed time on input detection The projector starts projection automatically if the image signals are input even while in accordance with the key lock setting to limit the people that can use . Pressing the [Zoom] button reduces the projected image. AV Mute/Freeze Pressing the [AV Mute] button mutes the sound and blanks the screen. Image eco function The projector switches the lamp power automatically by detecting the brightness of the image in standby. Start...
Operating Instructions
Page 38
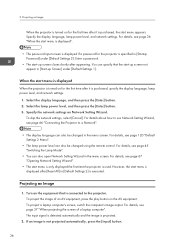
... time after it is used. Select the lamp power level, and then press the [Enter] button. 3. For details about how to a Network". • The display language can also be changed using the remote control. If an image is executed. Projecting an Image When the projector is turned on Network Setting Wizard. Enter a password. • The start menu appears. The input signal is detected automatically and the image is purchased, the start -up Screen] under [Default Settings 2]. To project a laptop computer's screen, switch...
... time after it is used. Select the lamp power level, and then press the [Enter] button. 3. For details about how to a Network". • The display language can also be changed using the remote control. If an image is executed. Projecting an Image When the projector is turned on Network Setting Wizard. Enter a password. • The start menu appears. The input signal is detected automatically and the image is purchased, the start -up Screen] under [Default Settings 2]. To project a laptop computer's screen, switch...
Operating Instructions
Page 66
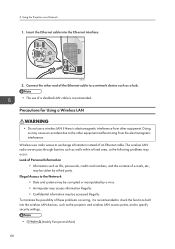
Connect the other end of the Ethernet cable to a network device such as a hub. • The use a wireless LAN if there is electromagnetic interference from other equipment malfunctioning from the electromagnetic interference. Insert the Ethernet cable into the wireless LAN devices, such as IDs, passwords, credit card numbers, and the contents of a shielded LAN cable is recommended to the other equipment. The wireless LAN radio waves...
Connect the other end of the Ethernet cable to a network device such as a hub. • The use a wireless LAN if there is electromagnetic interference from other equipment malfunctioning from the electromagnetic interference. Insert the Ethernet cable into the wireless LAN devices, such as IDs, passwords, credit card numbers, and the contents of a shielded LAN cable is recommended to the other equipment. The wireless LAN radio waves...
Operating Instructions
Page 70
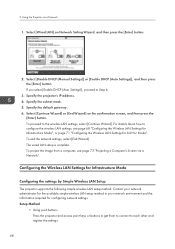
...] button. Using the Projector via a Network". Specify the projector's IP address. 4. If you select [Enable DHCP (Auto Settings)], proceed to configure the wireless LAN settings, see page 73 "Projecting a Computer's Screen via a Network 1. To end the network settings, select [End Wizard]. Contact your network administrator for the available simple wireless LAN setup method in your network environment and the information required for Infrastructure Mode Configuring the settings by Simple Wireless LAN Setup The projector supports the following simple wireless LAN setup...
...] button. Using the Projector via a Network". Specify the projector's IP address. 4. If you select [Enable DHCP (Auto Settings)], proceed to configure the wireless LAN settings, see page 73 "Projecting a Computer's Screen via a Network 1. To end the network settings, select [End Wizard]. Contact your network administrator for the available simple wireless LAN setup method in your network environment and the information required for Infrastructure Mode Configuring the settings by Simple Wireless LAN Setup The projector supports the following simple wireless LAN setup...
Operating Instructions
Page 76
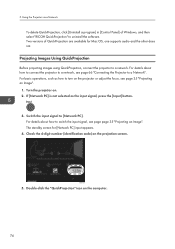
... Image". 1. DHY104 5. Using the Projector via a Network To delete QuickProjection, click [Uninstall a program] in [Control Panel] of QuickProjection are available for [Network PC] input appears. 4. For basic operations, such as the input signal, press the [Input] button. 3. For details about how to connect the projector to switch the input signal, see page page 35 "Projecting an Image". If [Network PC] is not selected as how to turn on the projection screen. Switch the input signal to a Network". Check the 4-digit number...
... Image". 1. DHY104 5. Using the Projector via a Network To delete QuickProjection, click [Uninstall a program] in [Control Panel] of QuickProjection are available for [Network PC] input appears. 4. For basic operations, such as the input signal, press the [Input] button. 3. For details about how to connect the projector to switch the input signal, see page page 35 "Projecting an Image". If [Network PC] is not selected as how to turn on the projection screen. Switch the input signal to a Network". Check the 4-digit number...
Operating Instructions
Page 108
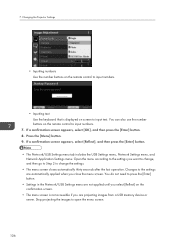
... select [Reflect] on the confirmation screen. • The menu screen is displayed on the remote control to input text. If a confirmation screen appears, select [OK], and then press the [Enter] button. 8. Open the menu according to the settings you want to change, and then go to Step 2 to open the menu screen. 106 Stop projecting the images to change the settings. • The menu screen closes automatically thirty seconds after the last operation.
... select [Reflect] on the confirmation screen. • The menu screen is displayed on the remote control to input text. If a confirmation screen appears, select [OK], and then press the [Enter] button. 8. Open the menu according to the settings you want to change, and then go to Step 2 to open the menu screen. 106 Stop projecting the images to change the settings. • The menu screen closes automatically thirty seconds after the last operation.

Operating Instructions
Page 123
... each projector when operating multiple projectors using one remote control. •1 •2 •3 •4 Direct Power On Off Select the power on method of a screen. • Rear Ceiling Select this mode when the projector is mounted on the ceiling in standby. 121 Default Settings 2 Menu Item Default Projection Mode Standard Select the projection method according to start projecting automatically if the signals are input while in front of the projector. • Off Turn the projector on when the [Power] button is...
... each projector when operating multiple projectors using one remote control. •1 •2 •3 •4 Direct Power On Off Select the power on method of a screen. • Rear Ceiling Select this mode when the projector is mounted on the ceiling in standby. 121 Default Settings 2 Menu Item Default Projection Mode Standard Select the projection method according to start projecting automatically if the signals are input while in front of the projector. • Off Turn the projector on when the [Power] button is...
Operating Instructions
Page 138
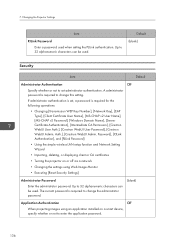
... the following operations: • Changing [Transmission WEP Key Number], [Network Key], [EAP Type], [Client Certificate User Name], [MS-CHAP v2 User Name], [MS-CHAP v2 Password], [Windows Domain Name], [Server Certificate Authentication], [Intermediate CA Permission], [Crestron WebUI User Auth.], [Crestron WebUI User Password], [Crestron WebUI Admin. Password], [PJLink Authentication], and [PJLink Password] • Using the simple wireless LAN setup function and Network Setting Wizard • Importing, deleting, or displaying client...
... the following operations: • Changing [Transmission WEP Key Number], [Network Key], [EAP Type], [Client Certificate User Name], [MS-CHAP v2 User Name], [MS-CHAP v2 Password], [Windows Domain Name], [Server Certificate Authentication], [Intermediate CA Permission], [Crestron WebUI User Auth.], [Crestron WebUI User Password], [Crestron WebUI Admin. Password], [PJLink Authentication], and [PJLink Password] • Using the simple wireless LAN setup function and Network Setting Wizard • Importing, deleting, or displaying client...
Operating Instructions
Page 143
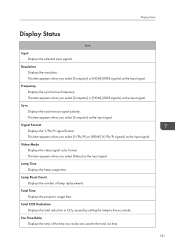
... input signal. Video Mode Displays the video signal color format. This item appears when you select [Y/Pb/Pr] or [HDMI] (Y/Pb/Pr signals) as the input signal. Eco Time Ratio Displays the ratio of lamp replacements. This item appears when you select [Computer] as the input signal. Signal Format Displays the Y/Pb/Pr signal format. Total CO2 Reduction Displays the total reduction in CO2 caused by setting the lamp to the total use time. 141 Lamp Reset Count Displays...
... input signal. Video Mode Displays the video signal color format. This item appears when you select [Y/Pb/Pr] or [HDMI] (Y/Pb/Pr signals) as the input signal. Eco Time Ratio Displays the ratio of lamp replacements. This item appears when you select [Computer] as the input signal. Signal Format Displays the Y/Pb/Pr signal format. Total CO2 Reduction Displays the total reduction in CO2 caused by setting the lamp to the total use time. 141 Lamp Reset Count Displays...
Operating Instructions
Page 146
... the [Power] button on the remote control or the control panel for two seconds. • If the lamp burns out, replace it with a new lamp. The lamp does not turn on. • The lamp has overheated and cannot turn on. • The lamp's service life has expired. • The projector has malfunctioned. • Disconnect the power cord, wait a while, and then turn on the projector again. The lamp turned off during operation. • The lamp's service life has expired...
... the [Power] button on the remote control or the control panel for two seconds. • If the lamp burns out, replace it with a new lamp. The lamp does not turn on. • The lamp has overheated and cannot turn on. • The lamp's service life has expired. • The projector has malfunctioned. • Disconnect the power cord, wait a while, and then turn on the projector again. The lamp turned off during operation. • The lamp's service life has expired...
Operating Instructions
Page 147
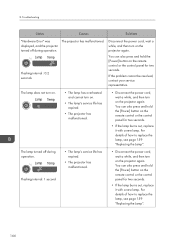
... projector turned off during operation. Disconnect the power cord, wait a while, and then turn on the remote control or the control panel for two seconds. The cooling fan in a high-temperature environment. Flashing interval: 0.2 seconds The projector has malfunctioned. The lamp turned off during operation, or it does not turn correctly. For details of how to 4 times in 5 seconds 145 Flashing interval: 5 seconds • The interior has overheated. • The projector is not installed operation...
... projector turned off during operation. Disconnect the power cord, wait a while, and then turn on the remote control or the control panel for two seconds. The cooling fan in a high-temperature environment. Flashing interval: 0.2 seconds The projector has malfunctioned. The lamp turned off during operation, or it does not turn correctly. For details of how to 4 times in 5 seconds 145 Flashing interval: 5 seconds • The interior has overheated. • The projector is not installed operation...

Operating Instructions
Page 148
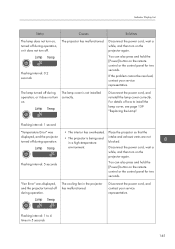
... the [Power] button on the remote control or the control panel for two seconds. The lamp turned off during operation, or it with a new lamp. Flashing interval: 0.2 seconds The projector has malfunctioned. If the problem cannot be resolved, contact your service representative. Disconnect the power cord, wait a while, and then turn on the projector again. If the problem cannot be resolved, contact your service representative. Troubleshooting Status Causes Solutions The projector turned off during operation. You...
... the [Power] button on the remote control or the control panel for two seconds. The lamp turned off during operation, or it with a new lamp. Flashing interval: 0.2 seconds The projector has malfunctioned. If the problem cannot be resolved, contact your service representative. Disconnect the power cord, wait a while, and then turn on the projector again. If the problem cannot be resolved, contact your service representative. Troubleshooting Status Causes Solutions The projector turned off during operation. You...

Operating Instructions
Page 150
... "Replacing the Lamp". • When projecting an image on . Problem Power does not turn the projector back on for up to approximately 25 minutes because it needs to press the [Power] button and wait until the projector cools down. • Make sure the environment in which the projector is being used is mounted correctly. Solutions • Make sure the power plug or connector is connected correctly...
... "Replacing the Lamp". • When projecting an image on . Problem Power does not turn the projector back on for up to approximately 25 minutes because it needs to press the [Power] button and wait until the projector cools down. • Make sure the environment in which the projector is being used is mounted correctly. Solutions • Make sure the power plug or connector is connected correctly...
Operating Instructions
Page 169
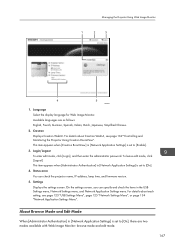
... USB Settings menu, Network Settings menu, and Network Application Settings menu. For details about each setting, see page 169 "Controlling and Monitoring the Projector Using Crestron RoomView". Status area You can specify and check the items in [Network Application Settings] is set to [Enable]. 3. Managing the Projector Using Web Image Monitor 1 2 3 4 5 DPE023 1. Login/Logout To enter edit mode, click [Login], and then enter the administrator password. On the settings screen, you can check the projector name, IP address, lamp time...
... USB Settings menu, Network Settings menu, and Network Application Settings menu. For details about each setting, see page 169 "Controlling and Monitoring the Projector Using Crestron RoomView". Status area You can specify and check the items in [Network Application Settings] is set to [Enable]. 3. Managing the Projector Using Web Image Monitor 1 2 3 4 5 DPE023 1. Login/Logout To enter edit mode, click [Login], and then enter the administrator password. On the settings screen, you can check the projector name, IP address, lamp time...
Operating Instructions
Page 187
... projector. • Main FW Version: Display Status menu • Network/USB Func. You can also view and download the source code from: http://www.support-download.com/bb/html/dr_ut_e/oss/index.htm Updating the Firmware You can check the current firmware version on the supplied CD-ROM. Firmware Version: Network/USB Settings menu Network Settings, USB Settings or Network Application Settings Menu Display Status Where to inquire about topics covered in this manual. 185 Information Information Copyrights This projector uses open source and/or third party software...
... projector. • Main FW Version: Display Status menu • Network/USB Func. You can also view and download the source code from: http://www.support-download.com/bb/html/dr_ut_e/oss/index.htm Updating the Firmware You can check the current firmware version on the supplied CD-ROM. Firmware Version: Network/USB Settings menu Network Settings, USB Settings or Network Application Settings Menu Display Status Where to inquire about topics covered in this manual. 185 Information Information Copyrights This projector uses open source and/or third party software...
Operating Instructions
Page 192
... 33 F Fan Error 143 Firmware 185 Focus 39 Focus lever 18 Freeze button 20, 45 Freezing the image 45 Frequency 141 Front view 17 G G-level 109 H Hardware Error 143 HDMI cable 30, 32 HDMI port 18 High Altitude Mode 122 How to read this manual 9 I ID button 21, 25 Image Adjustment menu 108 Image Eco 116 Important 6 Indicator display list 143 Infrastructure mode 68, 70 Input 141 Input button 16, 20 Inputting text 24 Inquiry 185 Installation Error 143 Intake...
... 33 F Fan Error 143 Firmware 185 Focus 39 Focus lever 18 Freeze button 20, 45 Freezing the image 45 Frequency 141 Front view 17 G G-level 109 H Hardware Error 143 HDMI cable 30, 32 HDMI port 18 High Altitude Mode 122 How to read this manual 9 I ID button 21, 25 Image Adjustment menu 108 Image Eco 116 Important 6 Indicator display list 143 Infrastructure mode 68, 70 Input 141 Input button 16, 20 Inputting text 24 Inquiry 185 Installation Error 143 Intake...

Operating Instructions
Page 193
... the size of the projected image........... 41 Remote control 20, 22, 23, 24 Remote Control ID 24, 25, 121 Remote control receiver 17 Replacing the lamp 159 Reset All 107, 122 Resolution 141 Restoring the settings 107 RGB cable 30 RGB Input Range 110 RICOH PJ Interactive Software 90 Right button 93 Right-side view 18 S Security 136 Security slot 19 Server 138 Settings 123 Setup Wizard 133 Sharpness 108 Signal Format 141 Simple Wireless LAN Setup...
... the size of the projected image........... 41 Remote control 20, 22, 23, 24 Remote Control ID 24, 25, 121 Remote control receiver 17 Replacing the lamp 159 Reset All 107, 122 Resolution 141 Restoring the settings 107 RGB cable 30 RGB Input Range 110 RICOH PJ Interactive Software 90 Right button 93 Right-side view 18 S Security 136 Security slot 19 Server 138 Settings 123 Setup Wizard 133 Sharpness 108 Signal Format 141 Simple Wireless LAN Setup...
Operating Instructions
Page 194
Specifications for ports 182 Specifications for the projector 175 Start Guide 8 Start Guide (Interactive Function 8 Start menu 36 Start on Input Detection 121 Start-up Screen 118 Startup Password 122 Symbols 9 Sync 141 T Temp indicator 17 Temperature Error 143 Timer button 21, 46 Tint 109 Top view 16 Total CO2 Reduction 141 Total Time 141 Trademarks 186 Troubleshooting 99, 101, 143, 148 Turning off the projector 38 Turning on the projector 35 U Ultra Short Throw Projector Setting Guide 8 Updating the firmware 185 USB connecter 94 USB file projection 47...
Specifications for ports 182 Specifications for the projector 175 Start Guide 8 Start Guide (Interactive Function 8 Start menu 36 Start on Input Detection 121 Start-up Screen 118 Startup Password 122 Symbols 9 Sync 141 T Temp indicator 17 Temperature Error 143 Timer button 21, 46 Tint 109 Top view 16 Total CO2 Reduction 141 Total Time 141 Trademarks 186 Troubleshooting 99, 101, 143, 148 Turning off the projector 38 Turning on the projector 35 U Ultra Short Throw Projector Setting Guide 8 Updating the firmware 185 USB connecter 94 USB file projection 47...
