User Guide
Page 4
... Installing Device Software Manager from the Downloaded File 37 Installing the Printer Driver for Network Connection (Windows 41 Installing the PCL 6 Printer Driver from the CD-ROM 41 Installing the PostScript 3 Printer Driver from the CD-ROM 44 Installing the PCL 6/PostScript 3 Printer Driver from the Downloaded File 46 If the Machine Cannot Be Found...47 2 Print Installing the Printer Driver by Entering the User Name and Password 32 Changing the Login Password...33 2. Getting Started Turning On and Off the Power...7 Turning On the Main Power...7 Turning...
... Installing Device Software Manager from the Downloaded File 37 Installing the Printer Driver for Network Connection (Windows 41 Installing the PCL 6 Printer Driver from the CD-ROM 41 Installing the PostScript 3 Printer Driver from the CD-ROM 44 Installing the PCL 6/PostScript 3 Printer Driver from the Downloaded File 46 If the Machine Cannot Be Found...47 2 Print Installing the Printer Driver by Entering the User Name and Password 32 Changing the Login Password...33 2. Getting Started Turning On and Off the Power...7 Turning On the Main Power...7 Turning...
User Guide
Page 5
...Using Web Image Monitor...71 What You Can Do on Envelopes...66 Printing Documents Stored in the Printer from the Control Panel 69 Printing a Locked Print File...69 Printing a Hold Print File...69 Printing a Stored Print File...70 3. Adding Paper and Toner Loading Paper into the Paper Tray...77 Loading Paper into Tray 1 to 5...77 Loading Paper into the Bypass Tray...81 Specifying Regular Sizes Using the Control Panel 83 Specifying a Custom Size Paper Using the Control Panel 83 Specifying Paper Type and Thickness Settings 84 Recommended Paper Sizes and Types...85 Tray 1...85 Paper Feed Unit...
...Using Web Image Monitor...71 What You Can Do on Envelopes...66 Printing Documents Stored in the Printer from the Control Panel 69 Printing a Locked Print File...69 Printing a Hold Print File...69 Printing a Stored Print File...70 3. Adding Paper and Toner Loading Paper into the Paper Tray...77 Loading Paper into Tray 1 to 5...77 Loading Paper into the Bypass Tray...81 Specifying Regular Sizes Using the Control Panel 83 Specifying a Custom Size Paper Using the Control Panel 83 Specifying Paper Type and Thickness Settings 84 Recommended Paper Sizes and Types...85 Tray 1...85 Paper Feed Unit...
User Guide
Page 11
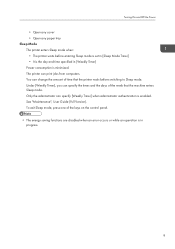
... Sleep mode. See "Maintenance", User Guide (Full Version). Under [Weekly Timer], you can print jobs from computers. Turning On and Off the Power • Open any cover • Open any paper tray Sleep Mode The printer enters Sleep mode when: • The printer waits before switching to Sleep mode. You can specify [Weekly Timer] when administrator authentication is minimized. To exit Sleep mode, press one of the week that the printer waits before entering Sleep mode is set in [Sleep Mode...
... Sleep mode. See "Maintenance", User Guide (Full Version). Under [Weekly Timer], you can print jobs from computers. Turning On and Off the Power • Open any cover • Open any paper tray Sleep Mode The printer enters Sleep mode when: • The printer waits before switching to Sleep mode. You can specify [Weekly Timer] when administrator authentication is minimized. To exit Sleep mode, press one of the week that the printer waits before entering Sleep mode is set in [Sleep Mode...
User Guide
Page 13
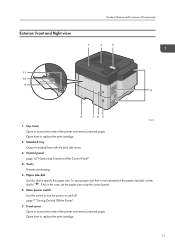
... control panel. 6. Standard tray Output is not indicated on and off. Vents Prevent overheating. 5. Open here to replace the print cartridge. 11 Main power switch Use this dial to " ". page 7 "Turning On and Off the Power" 7. Open here to replace the print cartridge. 2. If this is the case, set the dial to specify the paper size. Control panel page 14 "Names and Functions of Components 1 2 3 11 10 9 4 8 76 5 EBS242 1. Front cover Open to access the inside of the printer...
... control panel. 6. Standard tray Output is not indicated on and off. Vents Prevent overheating. 5. Open here to replace the print cartridge. 11 Main power switch Use this dial to " ". page 7 "Turning On and Off the Power" 7. Open here to replace the print cartridge. 2. If this is the case, set the dial to specify the paper size. Control panel page 14 "Names and Functions of Components 1 2 3 11 10 9 4 8 76 5 EBS242 1. Front cover Open to access the inside of the printer...
User Guide
Page 17
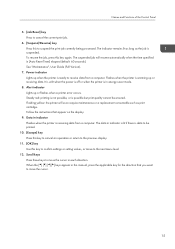
... "Maintenance", User Guide (Full Version). 7. Flashes when the printer is suspended. Data in indicator is lit if there is ready to move the cursor. 15 Alert indicator Lights up when the printer is data to be ensured. Flashing yellow: the printer will resume automatically when the time specified in energy saver mode. 8. Power indicator Lights up or flashes when a printer error occurs. Names and Functions of the Control Panel 5. [Job Reset] key...
... "Maintenance", User Guide (Full Version). 7. Flashes when the printer is suspended. Data in indicator is lit if there is ready to move the cursor. 15 Alert indicator Lights up when the printer is data to be ensured. Flashing yellow: the printer will resume automatically when the time specified in energy saver mode. 8. Power indicator Lights up or flashes when a printer error occurs. Names and Functions of the Control Panel 5. [Job Reset] key...
User Guide
Page 33
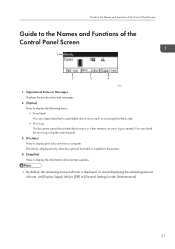
... Messages Displays the printer status and messages. 2. [Option] Press to display the following items: • Form Feed You can check the error log using the control panel. 3. [Prt.Jobs] Press to display the information about printer supplies. • By default, the remaining amount of toner is displayed. You can output data that is unprintable due to errors such as a missing line-feed code. • Error Log If a document cannot be printed due to the Names and Functions of the Control Panel...
... Messages Displays the printer status and messages. 2. [Option] Press to display the following items: • Form Feed You can check the error log using the control panel. 3. [Prt.Jobs] Press to display the information about printer supplies. • By default, the remaining amount of toner is displayed. You can output data that is unprintable due to errors such as a missing line-feed code. • Error Log If a document cannot be printed due to the Names and Functions of the Control Panel...
User Guide
Page 37
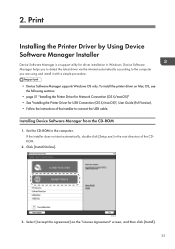
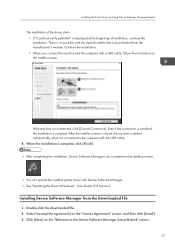
... the computer you are using and install it with a simple procedure. • Device Software Manager supports Windows OS only. Device Software Manager helps you to detect the latest driver via the internet automatically according to connect the USB cable. DZX615 3. Print Installing the Printer Driver by Using Device Software Manager Installer Device Software Manager is a support utility for USB Connection (OS X/macOS)", User Guide (Full Version). • Follow the instructions of the CDROM. 2. Click [Install Online]. Set the CD-ROM in...
... the computer you are using and install it with a simple procedure. • Device Software Manager supports Windows OS only. Device Software Manager helps you to detect the latest driver via the internet automatically according to connect the USB cable. DZX615 3. Print Installing the Printer Driver by Using Device Software Manager Installer Device Software Manager is a support utility for USB Connection (OS X/macOS)", User Guide (Full Version). • Follow the instructions of the CDROM. 2. Click [Install Online]. Set the CD-ROM in...
User Guide
Page 39
.... • You can update the installed printer driver with the USB cable. 8. Click [Next] on the installer screen. Double-click the downloaded file. 2. Installing the Printer Driver by Using Device Software Manager Installer The installation of installation, continue the installation. After the installer screen is closed, the machine is added automatically when it is not detected, click [Cancel Connection]. If the machine is connected to the Device Software Manager Setup Wizard" screen. 37 Installing Device Software Manager from the manufacturer...
.... • You can update the installed printer driver with the USB cable. 8. Click [Next] on the installer screen. Double-click the downloaded file. 2. Installing the Printer Driver by Using Device Software Manager Installer The installation of installation, continue the installation. After the installer screen is closed, the machine is added automatically when it is not detected, click [Cancel Connection]. If the machine is connected to the Device Software Manager Setup Wizard" screen. 37 Installing Device Software Manager from the manufacturer...
User Guide
Page 40
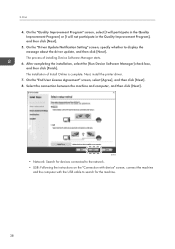
...], and then click [Next]. 5. On the "End User License Agreement" screen, select [Agree], and then click [Next]. 8. DZX730 • Network: Search for devices connected to the network. • USB: Following the instructions on the "Connection with device" screen, connect the machine and the computer with the USB cable to display the message about the driver update, and then click [Next]. The installation of installing Device Software Manager starts. 6. Next, install the printer driver. 7. Print 4.
...], and then click [Next]. 5. On the "End User License Agreement" screen, select [Agree], and then click [Next]. 8. DZX730 • Network: Search for devices connected to the network. • USB: Following the instructions on the "Connection with device" screen, connect the machine and the computer with the USB cable to display the message about the driver update, and then click [Next]. The installation of installing Device Software Manager starts. 6. Next, install the printer driver. 7. Print 4.
User Guide
Page 41
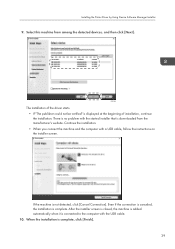
... [Cancel Connection]. After the installer screen is closed, the machine is added automatically when it is downloaded from among the detected devices, and then click [Next]. If the machine is complete. When the installation is displayed at the beginning of installation, continue the installation. Installing the Printer Driver by Using Device Software Manager Installer 9. Continue the installation. • When you connect the machine and the computer with the USB cable...
... [Cancel Connection]. After the installer screen is closed, the machine is added automatically when it is downloaded from among the detected devices, and then click [Next]. If the machine is complete. When the installation is displayed at the beginning of installation, continue the installation. Installing the Printer Driver by Using Device Software Manager Installer 9. Continue the installation. • When you connect the machine and the computer with the USB cable...
User Guide
Page 43
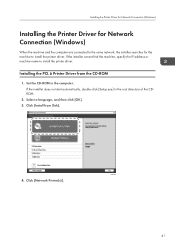
... computer are connected to the same network, the installer searches for the machine to install the printer driver. Set the CD-ROM in the root directory of the CDROM. 2. If the installer cannot find the machine, specify the IP address or machine name to install the printer driver. Select a language, and then click [OK]. 3. If the installer does not start automatically, double-click [Setup.exe] in...
... computer are connected to the same network, the installer searches for the machine to install the printer driver. Set the CD-ROM in the root directory of the CDROM. 2. If the installer cannot find the machine, specify the IP address or machine name to install the printer driver. Select a language, and then click [OK]. 3. If the installer does not start automatically, double-click [Setup.exe] in...
User Guide
Page 45
... default printer. 43 To create a new port 1. To select from the port list 1. On the "Add Printer and Utility Wizard" screen, select [Standard TCP/IP Port] and click [Next]. 3. You can change the port name. 5. Select [Specify a new port], and then click [Next]. 2. The port name is displayed, select [RICOH Network Printer C model], and then click [Next]. 6. Click [Finish]. 9. Proceed to Step 9. On the "Add port" screen, enter the printer name or IP address...
... default printer. 43 To create a new port 1. To select from the port list 1. On the "Add Printer and Utility Wizard" screen, select [Standard TCP/IP Port] and click [Next]. 3. You can change the port name. 5. Select [Specify a new port], and then click [Next]. 2. The port name is displayed, select [RICOH Network Printer C model], and then click [Next]. 6. Click [Finish]. 9. Proceed to Step 9. On the "Add port" screen, enter the printer name or IP address...
User Guide
Page 61
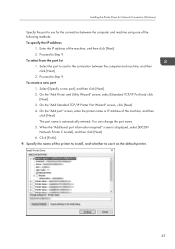
... [Detailed Settings] tab, you use the driver distributed from "Printer:". 59 Change the menu and specify the setting items. EBS345 The caution icon ( ) indicates that there are displayed as the default. The procedure to print on the computer, and click [Print] on the applications. Select the printer you can configure the advanced settings. Printing a Document in the print server are disabled items. Click the icon to change the default values...
... [Detailed Settings] tab, you use the driver distributed from "Printer:". 59 Change the menu and specify the setting items. EBS345 The caution icon ( ) indicates that there are displayed as the default. The procedure to print on the computer, and click [Print] on the applications. Select the printer you can configure the advanced settings. Printing a Document in the print server are disabled items. Click the icon to change the default values...
User Guide
Page 83
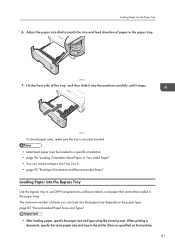
... paper size and type in the paper trays. EAT062 To avoid paper jams, make sure the tray is securely inserted. • Letterhead paper must be loaded in the printer driver as specified on the paper type. Lift the front side of sheets you can load envelopes into Tray 2 to 5. • page 92 "Envelope Orientation and Recommended Status" Loading Paper into the Bypass Tray Use the bypass tray to match the size and feed direction of paper in a specific orientation. • page 94 "Loading Orientation-fixed Paper...
... paper size and type in the paper trays. EAT062 To avoid paper jams, make sure the tray is securely inserted. • Letterhead paper must be loaded in the printer driver as specified on the paper type. Lift the front side of sheets you can load envelopes into Tray 2 to 5. • page 92 "Envelope Orientation and Recommended Status" Loading Paper into the Bypass Tray Use the bypass tray to match the size and feed direction of paper in a specific orientation. • page 94 "Loading Orientation-fixed Paper...
User Guide
Page 98
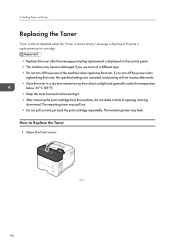
...°C (95°F). • Keep the toner horizontal when storing it. • After removing the print cartridge from the machine, do not shake it while its opening is displayed on the control panel. • The machine may become damaged if you use toner of a different type. • Do not turn off the power of the machine when replacing the toner. The remaining toner may spill out. •...
...°C (95°F). • Keep the toner horizontal when storing it. • After removing the print cartridge from the machine, do not shake it while its opening is displayed on the control panel. • The machine may become damaged if you use toner of a different type. • Do not turn off the power of the machine when replacing the toner. The remaining toner may spill out. •...
User Guide
Page 115
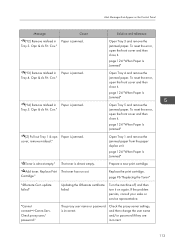
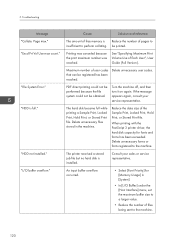
... reset the error, open the front cover and then close it . Open Tray 1 and remove the jammed paper from the paper duplex unit. page 96 "Replacing the Toner" "@Remote Cert. "Cannot connect=>Comm.Serv. page 124 "When Paper Is Jammed" " (Y4) Remove misfeed in Paper is almost empty. Opn & cls Frt. page 124 "When Paper Is Jammed" " Toner is incorrect. Cov." Tray 5. The proxy user name or password is almost empty." Tray 4. Check proxy user/ password." Tray 3. " Add toner. Replace the print cartridge. Check the proxy server settings, and then change the user...
... reset the error, open the front cover and then close it . Open Tray 1 and remove the jammed paper from the paper duplex unit. page 96 "Replacing the Toner" "@Remote Cert. "Cannot connect=>Comm.Serv. page 124 "When Paper Is Jammed" " (Y4) Remove misfeed in Paper is almost empty. Opn & cls Frt. page 124 "When Paper Is Jammed" " Toner is incorrect. Cov." Tray 5. The proxy user name or password is almost empty." Tray 4. Check proxy user/ password." Tray 3. " Add toner. Replace the print cartridge. Check the proxy server settings, and then change the user...
User Guide
Page 116
.... Check the IP address, subnet mask, and gateway address. Enter a classification code using the printer properties and print the document again. Close the cover as the specified paper size. Press [Change] to change the tray's settings, press [JobReset] to reset the job, or press [Form Feed] to the following settings:" The size of files." "Exceeded max. While printing a Sample Print, Locked Print, Hold Print, or Stored Print file, the maximum file capacity was exceeded. "Classification Code Error" A classification code is open. "Duplex mode...
.... Check the IP address, subnet mask, and gateway address. Enter a classification code using the printer properties and print the document again. Close the cover as the specified paper size. Press [Change] to change the tray's settings, press [JobReset] to reset the job, or press [Form Feed] to the following settings:" The size of files." "Exceeded max. While printing a Sample Print, Locked Print, Hold Print, or Stored Print file, the maximum file capacity was exceeded. "Classification Code Error" A classification code is open. "Duplex mode...
User Guide
Page 118
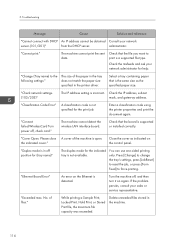
... drum Prepare a new drum unit. "Problem with Hard Disk Please call service." unit soon. "SD Card authenticatn. Check that the wireless LAN interface board installed correctly. "Rplcmnt Rqrd Soon:Drum Unit" "New Drum Unit is still displayed even though you have installed the drum unit correctly, wipe the ID chips on again. Solution and reference Turn the machine off , and then install the drum unit again. You need to replace the drum unit. Authentication from the SD card failed. If the error message...
... drum Prepare a new drum unit. "Problem with Hard Disk Please call service." unit soon. "SD Card authenticatn. Check that the wireless LAN interface board installed correctly. "Rplcmnt Rqrd Soon:Drum Unit" "New Drum Unit is still displayed even though you have installed the drum unit correctly, wipe the ID chips on again. Solution and reference Turn the machine off , and then install the drum unit again. You need to replace the drum unit. Authentication from the SD card failed. If the error message...
User Guide
Page 119
.... Remove the paper." incomplete. (211)" WPA authentication could not be Consult your network administrator. The message indicates the machine tried to order the supplies. "Set Waste Toner Bottle correctly." The print cartridge may have not Turn the machine off , and then turn it on the Control Panel Message Cause Solution and reference "Set the Print Cartridge correctly." "Standard Tray is already used by another device on the network. Consult your network completed. Replace the print cartridge. Prepare a new print cartridge.
.... Remove the paper." incomplete. (211)" WPA authentication could not be Consult your network administrator. The message indicates the machine tried to order the supplies. "Set Waste Toner Bottle correctly." The print cartridge may have not Turn the machine off , and then turn it on the Control Panel Message Cause Solution and reference "Set the Print Cartridge correctly." "Standard Tray is already used by another device on the network. Consult your network completed. Replace the print cartridge. Prepare a new print cartridge.
User Guide
Page 122
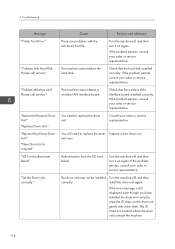
... free memory is installed. Maximum number of Each User", User Guide (Full Version). The hard disk became full while printing a Sample Print, Locked Print, Hold Print, or Stored Print file. When printing with the PostScript 3 printer driver, the hard disk capacity for [Memory Usage] in the machine. The printer received a stored job file but no hard disk is Reduce the number of the Sample Print, Locked Print, Hold Print, or Stored Print file. An input buffer overflow occurred. • Select [Font Priority] for fonts...
... free memory is installed. Maximum number of Each User", User Guide (Full Version). The hard disk became full while printing a Sample Print, Locked Print, Hold Print, or Stored Print file. When printing with the PostScript 3 printer driver, the hard disk capacity for [Memory Usage] in the machine. The printer received a stored job file but no hard disk is Reduce the number of the Sample Print, Locked Print, Hold Print, or Stored Print file. An input buffer overflow occurred. • Select [Font Priority] for fonts...


