User Guide
Page 1
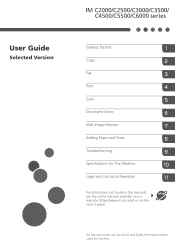
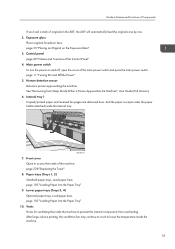
User Guide Selected Version Getting Started Copy Fax Print Scan Document Server Web Image Monitor Adding Paper and Toner Troubleshooting Specifications for The Machine Legal and Contact Information For information not found in this manuals, see the online manuals available on our web site (https://www.ricoh.com/) or via the control panel. For safe and correct use, be sure to read Safety Information before using the machine.
User Guide Selected Version Getting Started Copy Fax Print Scan Document Server Web Image Monitor Adding Paper and Toner Troubleshooting Specifications for The Machine Legal and Contact Information For information not found in this manuals, see the online manuals available on our web site (https://www.ricoh.com/) or via the control panel. For safe and correct use, be sure to read Safety Information before using the machine.
User Guide
Page 8
Adding Paper and Toner Loading Paper into the Paper Tray...185 Loading Paper into Tray 1 to 4...186 Loading Paper into the Bypass Tray...190 Loading Paper into Tray 3 (LCT)......
Adding Paper and Toner Loading Paper into the Paper Tray...185 Loading Paper into Tray 1 to 4...186 Loading Paper into the Bypass Tray...190 Loading Paper into Tray 3 (LCT)......
User Guide
Page 9
... Codes 277 Messages Displayed with Auto Paper Select...226 Replacing the Toner...228 Precautions When Storing Toner...229 Precautions When Replacing the Toner 230 Disposing Exhausted Toners...231 Replacing the Waste Toner Bottle...232 Precautions When Replacing the Waste Toner Bottle 232 Disposing the Used Waste Toner Bottle 234 9. Sizes Detectable with Error Codes 292 When a Message...
... Codes 277 Messages Displayed with Auto Paper Select...226 Replacing the Toner...228 Precautions When Storing Toner...229 Precautions When Replacing the Toner 230 Disposing Exhausted Toners...231 Replacing the Waste Toner Bottle...232 Precautions When Replacing the Waste Toner Bottle 232 Disposing the Used Waste Toner Bottle 234 9. Sizes Detectable with Error Codes 292 When a Message...
User Guide
Page 17
... inside of the Control Panel" 4. Vents Holes for ventilating the inside the machine to lower the temperature inside the machine. 15 page 228 "Replacing the Toner" 8. page 11 "Turning On and Off the Power" 5. page 55 "Placing an Original on and off, open the cover of originals in the ADF, the...
... inside of the Control Panel" 4. Vents Holes for ventilating the inside the machine to lower the temperature inside the machine. 15 page 228 "Replacing the Toner" 8. page 11 "Turning On and Off the Power" 5. page 55 "Placing an Original on and off, open the cover of originals in the ADF, the...
User Guide
Page 24
... power indicator The main power indicator lights up when you turn the power off or remove the media. 2. Stays lit when an error occurs or toner runs out. In Sleep mode, it flickers slowly. 22 1. Getting Started 1. Data In indicator Flashes when the machine is receiving data sent from or written...
... power indicator The main power indicator lights up when you turn the power off or remove the media. 2. Stays lit when an error occurs or toner runs out. In Sleep mode, it flickers slowly. 22 1. Getting Started 1. Data In indicator Flashes when the machine is receiving data sent from or written...
User Guide
Page 26
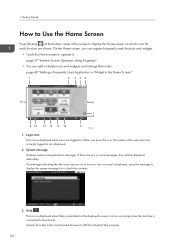
.... 3. System message Displays system and application messages. When you can add or delete icons and widgets, and change their order. If a message indicating that the toner has run out or an error has occurred is available for each function are displayed. 2. Help This icon is displayed when Help is displayed, press...
.... 3. System message Displays system and application messages. When you can add or delete icons and widgets, and change their order. If a message indicating that the toner has run out or an error has occurred is available for each function are displayed. 2. Help This icon is displayed when Help is displayed, press...
User Guide
Page 28
Date/Time and Toner remaining The current date and time is turned on under [Function Priority]. • See "Displaying Frequently Used Functions on the First Screen", User Guide (Full ... each function Status of date and time. Icon display area Displays the icons and widgets. • You can select to display the remaining amount of toner instead of functions such as Copy or Scanner • Current jobs • Job history • Machine's maintenance information See "Checking the Machine Status from the...
Date/Time and Toner remaining The current date and time is turned on under [Function Priority]. • See "Displaying Frequently Used Functions on the First Screen", User Guide (Full ... each function Status of date and time. Icon display area Displays the icons and widgets. • You can select to display the remaining amount of toner instead of functions such as Copy or Scanner • Current jobs • Job history • Machine's maintenance information See "Checking the Machine Status from the...
User Guide
Page 187
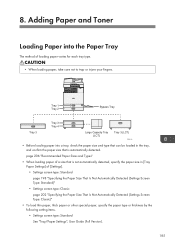
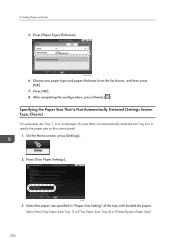
... a size that is not automatically detected, specify the paper size in the tray, and confirm the paper size that is automatically detected. Adding Paper and Toner Loading Paper into a tray, check the paper size and type that can be loaded in [Tray Paper Settings] of loading paper varies for each tray...
... a size that is not automatically detected, specify the paper size in the tray, and confirm the paper size that is automatically detected. Adding Paper and Toner Loading Paper into a tray, check the paper size and type that can be loaded in [Tray Paper Settings] of loading paper varies for each tray...
User Guide
Page 188
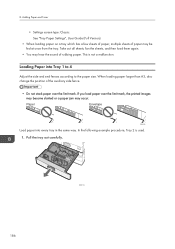
... tray. DZW132 186 Paper Envelope DZX185 Load paper into Tray 1 to 4 Adjust the side and end fences according to the paper size. Adding Paper and Toner • Settings screen type: Classic See "Tray Paper Settings", User Guide (Full Version). • When loading paper on a tray which has a few sheets of paper...
... tray. DZW132 186 Paper Envelope DZX185 Load paper into Tray 1 to 4 Adjust the side and end fences according to the paper size. Adding Paper and Toner • Settings screen type: Classic See "Tray Paper Settings", User Guide (Full Version). • When loading paper on a tray which has a few sheets of paper...
User Guide
Page 190
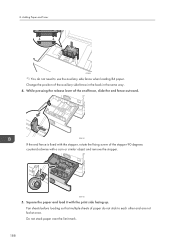
... fence outward. Fan sheets before loading so that multiple sheets of the auxiliary side fence in the back in the same way. 4. Adding Paper and Toner DZW116 *1 You do not stick to use the auxiliary side fence when loading B4 paper. DZW183 5. Do not stack paper over the limit mark. 188...
... fence outward. Fan sheets before loading so that multiple sheets of the auxiliary side fence in the back in the same way. 4. Adding Paper and Toner DZW116 *1 You do not stick to use the auxiliary side fence when loading B4 paper. DZW183 5. Do not stack paper over the limit mark. 188...
User Guide
Page 192
... the paper may be loaded into the bypass tray depends on the paper type. 8. Left: Plain Paper Right: Thick Paper 190 DZX190 Adding Paper and Toner • Tray 1 does not have the auto detect function for the paper size. On the control panel, specify the paper size to use. • Settings...
... the paper may be loaded into the bypass tray depends on the paper type. 8. Left: Plain Paper Right: Thick Paper 190 DZX190 Adding Paper and Toner • Tray 1 does not have the auto detect function for the paper size. On the control panel, specify the paper size to use. • Settings...
User Guide
Page 194
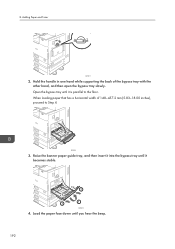
When loading paper that has a horizontal width of the bypass tray with the other hand, and then open the bypass tray slowly. Load the paper face down until it is parallel to Step 4. DZC912 3. 8. Hold the handle in one hand while supporting the back of 148-457.2 mm (5.83-18.00 inches), proceed to the floor. Open the bypass tray until it becomes stable. 2 2 1 DZC913 4. Adding Paper and Toner DZC911 2. Raise the banner paper guide tray, and then insert it into the bypass tray until you hear the beep. 192
When loading paper that has a horizontal width of the bypass tray with the other hand, and then open the bypass tray slowly. Load the paper face down until it is parallel to Step 4. DZC912 3. 8. Hold the handle in one hand while supporting the back of 148-457.2 mm (5.83-18.00 inches), proceed to the floor. Open the bypass tray until it becomes stable. 2 2 1 DZC913 4. Adding Paper and Toner DZC911 2. Raise the banner paper guide tray, and then insert it into the bypass tray until you hear the beep. 192
User Guide
Page 196
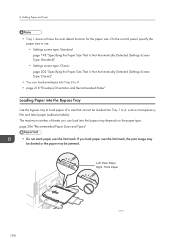
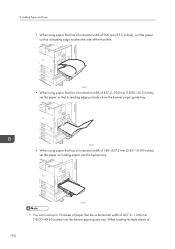
Adding Paper and Toner • When using paper that has a horizontal width of 900 mm (35.5 inches), curl the paper so that its leading edge touches the side of ...
Adding Paper and Toner • When using paper that has a horizontal width of 900 mm (35.5 inches), curl the paper so that its leading edge touches the side of ...
User Guide
Page 198
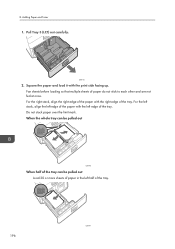
... more sheets of paper in the left edge of the paper with the print side facing up. Pull Tray 3 (LCT) out carefully. Adding Paper and Toner 1. For the right stack, align the right edge of the paper with the right edge of the tray. For the left stack, align the left...
... more sheets of paper in the left edge of the paper with the print side facing up. Pull Tray 3 (LCT) out carefully. Adding Paper and Toner 1. For the right stack, align the right edge of the paper with the right edge of the tray. For the left stack, align the left...
User Guide
Page 200
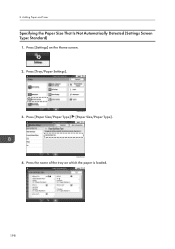
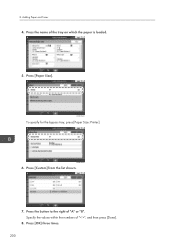
8. Press the name of the tray on the Home screen. 2. Press [Tray/Paper Settings]. Press [Settings] on which the paper is loaded. 198 Press [Paper Size/Paper Type] [Paper Size/Paper Type]. Adding Paper and Toner Specifying the Paper Size That Is Not Automatically Detected (Settings Screen Type: Standard) 1. D0BLPM6320 4. D0BLPM6319 3.
8. Press the name of the tray on the Home screen. 2. Press [Tray/Paper Settings]. Press [Settings] on which the paper is loaded. 198 Press [Paper Size/Paper Type] [Paper Size/Paper Type]. Adding Paper and Toner Specifying the Paper Size That Is Not Automatically Detected (Settings Screen Type: Standard) 1. D0BLPM6320 4. D0BLPM6319 3.
User Guide
Page 202
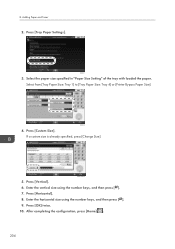
8. D0C9PA5254 6. Press [OK] three times. 200 Adding Paper and Toner 4. Specify the values within the numbers of "A" or "B". Press [Paper Size]. Press [Custom] from the list shown. 7. D0C9PA5253 To specify for the bypass tray, press [Paper Size: Printer]. Press the button to the right of "< >", and then press [Done]. 8. Press the name of the tray on which the paper is loaded. 5.
8. D0C9PA5254 6. Press [OK] three times. 200 Adding Paper and Toner 4. Specify the values within the numbers of "A" or "B". Press [Paper Size]. Press [Custom] from the list shown. 7. D0C9PA5253 To specify for the bypass tray, press [Paper Size: Printer]. Press the button to the right of "< >", and then press [Done]. 8. Press the name of the tray on which the paper is loaded. 5.
User Guide
Page 204
... in "Paper Size Setting" of a size that is not automatically detected into Tray 2 to 4, specify the paper size on the control panel. 1. Adding Paper and Toner 5. Press [OK]. 8. Select from the list shown, and then press [OK]. 7. Press [Tray Paper Settings]. DZX121 3. Choose one paper type and paper thickness from [Tray...
... in "Paper Size Setting" of a size that is not automatically detected into Tray 2 to 4, specify the paper size on the control panel. 1. Adding Paper and Toner 5. Press [OK]. 8. Select from the list shown, and then press [OK]. 7. Press [Tray Paper Settings]. DZX121 3. Choose one paper type and paper thickness from [Tray...
User Guide
Page 206
... "Paper Size Setting" of the tray with loaded the paper. Press [Custom Size]. If a custom size is already specified, press [Change Size]. Adding Paper and Toner 2. Enter the vertical size using the number keys, and then press [ ]. 9. DZX121 3. D0BLPM2531 5. Select from [Tray Paper Size: Tray 1] to [Tray Paper Size: Tray 4] or...
... "Paper Size Setting" of the tray with loaded the paper. Press [Custom Size]. If a custom size is already specified, press [Change Size]. Adding Paper and Toner 2. Enter the vertical size using the number keys, and then press [ ]. 9. DZX121 3. D0BLPM2531 5. Select from [Tray Paper Size: Tray 1] to [Tray Paper Size: Tray 4] or...
User Guide
Page 208
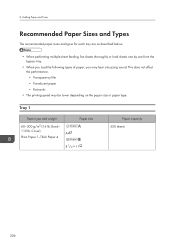
... g/m2 (16 lb. Cover) A4 Plain Paper 1-Thick Paper 4 Paper size 81/2 × 11 Paper capacity 550 sheets 206 Bond- 110 lb. 8. Adding Paper and Toner Recommended Paper Sizes and Types The recommended paper sizes and types for each tray are as described below. • When performing multiple sheet feeding, fan...
... g/m2 (16 lb. Cover) A4 Plain Paper 1-Thick Paper 4 Paper size 81/2 × 11 Paper capacity 550 sheets 206 Bond- 110 lb. 8. Adding Paper and Toner Recommended Paper Sizes and Types The recommended paper sizes and types for each tray are as described below. • When performing multiple sheet feeding, fan...

User Guide
Page 210
Lower Paper Trays (Trays 3, 4) Paper type and weight 60-300 g/m2 (16 lb. Adding Paper and Toner Paper type and weight 60-300 g/m2 (16 lb. Cover) Plain Paper 1-Thick Paper 4 Paper size Custom size*2 *3: Vertical: 90.0-320.0 mm Horizontal: 148.0-457.2 ...
Lower Paper Trays (Trays 3, 4) Paper type and weight 60-300 g/m2 (16 lb. Adding Paper and Toner Paper type and weight 60-300 g/m2 (16 lb. Cover) Plain Paper 1-Thick Paper 4 Paper size Custom size*2 *3: Vertical: 90.0-320.0 mm Horizontal: 148.0-457.2 ...


