User Guide
Page 3
... America 33 Selecting the Line Type...34 Settings Needed for Each Function...36 Guide to Functions of the Machine's External Options (mainly Europe and Asia 37 Guide to Functions of the Machine's External Options (mainly North America 38 Order of Option Installation...39 Attaching the Paper Feed Unit...40 The number of tray that you can install...41 Installing the Offline Stapler...43 Installing the Wireless LAN interface board...
... America 33 Selecting the Line Type...34 Settings Needed for Each Function...36 Guide to Functions of the Machine's External Options (mainly Europe and Asia 37 Guide to Functions of the Machine's External Options (mainly North America 38 Order of Option Installation...39 Attaching the Paper Feed Unit...40 The number of tray that you can install...41 Installing the Offline Stapler...43 Installing the Wireless LAN interface board...

User Guide
Page 5
... Size Paper...106 Copying onto Envelopes...107 Sort...108 Changing the Number of the Paper (When Using the PCL 6 Printer Driver 135 Combining Multiple Pages into Single Page 136 How to Print Multiple Pages onto a Single Sheet (When Using the PCL 6 Printer Driver 136 Printing on Envelopes...138 Configuring Envelope Settings Using the Control Panel 138 Printing on Both Sides of Sets...108 Storing Data in the Document Server...109 3. Print Installing the Printer Driver for Network Connection (Windows 123 Installing the PCL 6 Printer Driver from the CD-ROM 127 Displaying the Printer...
... Size Paper...106 Copying onto Envelopes...107 Sort...108 Changing the Number of the Paper (When Using the PCL 6 Printer Driver 135 Combining Multiple Pages into Single Page 136 How to Print Multiple Pages onto a Single Sheet (When Using the PCL 6 Printer Driver 136 Printing on Envelopes...138 Configuring Envelope Settings Using the Control Panel 138 Printing on Both Sides of Sets...108 Storing Data in the Document Server...109 3. Print Installing the Printer Driver for Network Connection (Windows 123 Installing the PCL 6 Printer Driver from the CD-ROM 127 Displaying the Printer...

User Guide
Page 15
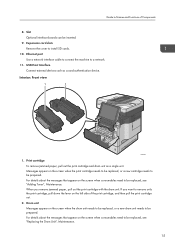
... and Functions of the Machine's Control Panel". 11. Control panel See page 65 "Guide to replace the print cartridge and the drum unit. 18. Tray 1 Load paper here. 17. If it is off . 10. Cover for the ADF Originals scanned with the ADF are delivered here. 14. Output tray for installing an offline stapler Remove when you install the offline stapler. 13. Stop fence Pull this fence to open button Push this when placing paper longer than A4...
... and Functions of the Machine's Control Panel". 11. Control panel See page 65 "Guide to replace the print cartridge and the drum unit. 18. Tray 1 Load paper here. 17. If it is off . 10. Cover for the ADF Originals scanned with the ADF are delivered here. 14. Output tray for installing an offline stapler Remove when you install the offline stapler. 13. Stop fence Pull this fence to open button Push this when placing paper longer than A4...
User Guide
Page 17
... "Replacing the Drum Unit", Maintenance. 15 Expansion card slots Remove the cover to a network. 11. For details about the messages that appear on the left side of Components 8. If you remove jammed paper, pull out the print cartridge with the drum unit. Ethernet port Use a network interface cable to connect the machine to install SD cards. 10. Interior: Front view 1 2 DVL354 1. For details about the messages that appear on the screen when consumables need to remove only the print cartridge...
... "Replacing the Drum Unit", Maintenance. 15 Expansion card slots Remove the cover to a network. 11. For details about the messages that appear on the left side of Components 8. If you remove jammed paper, pull out the print cartridge with the drum unit. Ethernet port Use a network interface cable to connect the machine to install SD cards. 10. Interior: Front view 1 2 DVL354 1. For details about the messages that appear on the screen when consumables need to remove only the print cartridge...

User Guide
Page 70
... of the screen, the number of icons indicates the number of screens on each screen, see "Inserting/Removing an SD Card" or "Inserting/Removing USB Flash Memory Device", For First-time Users. 13. [Check Status] Press to switch between the five home screens. Pressing [Change Settings] in the network status displays network setting menu and allows you are used. Icons to switch between screens Press to check the machine's system status, network setting, operational status of the application you are...
... of the screen, the number of icons indicates the number of screens on each screen, see "Inserting/Removing an SD Card" or "Inserting/Removing USB Flash Memory Device", For First-time Users. 13. [Check Status] Press to switch between the five home screens. Pressing [Change Settings] in the network status displays network setting menu and allows you are used. Icons to switch between screens Press to check the machine's system status, network setting, operational status of the application you are...

User Guide
Page 125
... are connected to the same network, the installer searches for the machine to install the printer driver. Set the CD-ROM in the root directory of the CDROM. 2. Select a language, and then click [OK]. 3. For information not included in this chapter, see Print available on our website. Click [Install from the CD-ROM 1. DZC992 123 Print This chapter describes frequently used printer functions and operations...
... are connected to the same network, the installer searches for the machine to install the printer driver. Set the CD-ROM in the root directory of the CDROM. 2. Select a language, and then click [OK]. 3. For information not included in this chapter, see Print available on our website. Click [Install from the CD-ROM 1. DZC992 123 Print This chapter describes frequently used printer functions and operations...
User Guide
Page 127
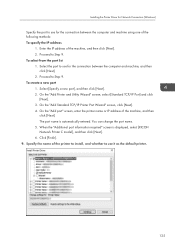
Installing the Printer Driver for Network Connection (Windows) Specify the port to use for the connection between the computer and machine using one of the machine, and then click [Next]. 2. Enter the IP address of the following methods: To specify the IP address 1. The port name is displayed, select [RICOH Network Printer C model], and then click [Next]. 6. When the "Additional port information required" screen is automatically entered. Proceed to Step 9. Specify the...
Installing the Printer Driver for Network Connection (Windows) Specify the port to use for the connection between the computer and machine using one of the machine, and then click [Next]. 2. Enter the IP address of the following methods: To specify the IP address 1. The port name is displayed, select [RICOH Network Printer C model], and then click [Next]. 6. When the "Additional port information required" screen is automatically entered. Proceed to Step 9. Specify the...

User Guide
Page 129
Installing the Printer Driver for USB Connection (Windows) Installing the Printer Driver for USB Connection (Windows) When you connect the machine and the computer with a USB cable, the installer searches for the machine to install the printer driver. • Follow the instructions of the CDROM. 2. Select a language, and then click [OK]. 3. DZC992 127 Installing the Printer Driver from Disk]. 4. Click [Install from the CD-ROM 1. If the installer does not start automatically, double-click [Setup.exe] in the computer. Set the CD...
Installing the Printer Driver for USB Connection (Windows) Installing the Printer Driver for USB Connection (Windows) When you connect the machine and the computer with a USB cable, the installer searches for the machine to install the printer driver. • Follow the instructions of the CDROM. 2. Select a language, and then click [OK]. 3. DZC992 127 Installing the Printer Driver from Disk]. 4. Click [Install from the CD-ROM 1. If the installer does not start automatically, double-click [Setup.exe] in the computer. Set the CD...
User Guide
Page 141
... the Document Server. The procedure to specify settings such as the Document Server, the maximum number of the documents that are using , and then click [Print]. 2. Click the menu button of stored pages in the machine and the sent data has reached 9,000 (It may be stored when 3,000 files have already been stored. The process may differ depending on the operating system or the printer driver you...
... the Document Server. The procedure to specify settings such as the Document Server, the maximum number of the documents that are using , and then click [Print]. 2. Click the menu button of stored pages in the machine and the sent data has reached 9,000 (It may be stored when 3,000 files have already been stored. The process may differ depending on the operating system or the printer driver you...
User Guide
Page 185
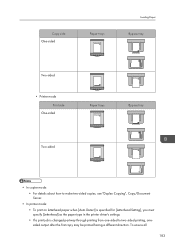
...-sided Paper trays Bypass tray Two-sided • In copier mode: • For details about how to make two-sided copies, see "Duplex Copying", Copy/Document Server. • In printer mode: • To print on letterhead paper when [Auto Detect] is specified for [Letterhead Setting], you must specify [Letterhead] as the paper type in the printer driver's settings. • If a print job is changed partway through printing from one-sided to two-sided printing, onesided output after the first copy may be printed facing a different direction...
...-sided Paper trays Bypass tray Two-sided • In copier mode: • For details about how to make two-sided copies, see "Duplex Copying", Copy/Document Server. • In printer mode: • To print on letterhead paper when [Auto Detect] is specified for [Letterhead Setting], you must specify [Letterhead] as the paper type in the printer driver's settings. • If a print job is changed partway through printing from one-sided to two-sided printing, onesided output after the first copy may be printed facing a different direction...

User Guide
Page 226
... Web Image Monitor Help. • If the paper tray runs out of the remote machine is set "Display" by using the remote fax function to add paper. Troubleshooting Message Cause "Transfer error has occured. If you can turn this message is not correctly connected to the machine, check the message and resolve the problem accordingly. appears, the machine is not displayed, and then [Check Status] no paper. appears on the Error Logs or Reports When You Use the Printer Function". • If "Check...
... Web Image Monitor Help. • If the paper tray runs out of the remote machine is set "Display" by using the remote fax function to add paper. Troubleshooting Message Cause "Transfer error has occured. If you can turn this message is not correctly connected to the machine, check the message and resolve the problem accordingly. appears, the machine is not displayed, and then [Check Status] no paper. appears on the Error Logs or Reports When You Use the Printer Function". • If "Check...

User Guide
Page 250
Troubleshooting Messages Displayed on the Client Computer When You Use the Scanner Function This section describes likely causes of the exposure glass cover or the Auto Document Feeder (ADF) triggers the automatic original size detection process. The entered login user name, password, or driver encryption key was misaligned. However, the access privileges for the main error messages displayed on the exposure glass, the lifting/ lowering action of and possible...
Troubleshooting Messages Displayed on the Client Computer When You Use the Scanner Function This section describes likely causes of the exposure glass cover or the Auto Document Feeder (ADF) triggers the automatic original size detection process. The entered login user name, password, or driver encryption key was misaligned. However, the access privileges for the main error messages displayed on the exposure glass, the lifting/ lowering action of and possible...

User Guide
Page 251
... scanning settings made with the application exceed the setting range of the machine. Contact your service representative. "Fatal error has occurred in the scanner driver." Memory is recognized correctly by the machine. Messages Displayed on the client computer. • Uninstall the TWAIN driver, and then reinstall it after restarting the computer. 249 For details about jammed paper, see "Removing Jammed Paper", Troubleshooting. • When a misfeed occurs, replace the jammed originals. • Check...
... scanning settings made with the application exceed the setting range of the machine. Contact your service representative. "Fatal error has occurred in the scanner driver." Memory is recognized correctly by the machine. Messages Displayed on the client computer. • Uninstall the TWAIN driver, and then reinstall it after restarting the computer. 249 For details about jammed paper, see "Removing Jammed Paper", Troubleshooting. • When a misfeed occurs, replace the jammed originals. • Check...

User Guide
Page 263
... Messages Appear Message Cause "Print cartridge is almost full of waste toner. Prepare print cartridge replacement. Please contact your local vender." "Print cartridge is a problem with the device certificate or user certificate, a new certificate must be installed. The waste toner in the print cartridge is almost full. The waste toner in the print cartridge is almost full. For details about how to replace Print Cartridge." Follow the instructions on the right to install a new certificate, see "Configuring...
... Messages Appear Message Cause "Print cartridge is almost full of waste toner. Prepare print cartridge replacement. Please contact your local vender." "Print cartridge is a problem with the device certificate or user certificate, a new certificate must be installed. The waste toner in the print cartridge is almost full. The waste toner in the print cartridge is almost full. For details about how to replace Print Cartridge." Follow the instructions on the right to install a new certificate, see "Configuring...

User Guide
Page 270
... result in burns. • When replacing paper or removing jammed paper, make sure not to occur, see "When You Have Problems Operating the Machine", "When You Cannot Make Copies As Wanted", "When You Cannot Send or Receive Fax Messages As Wanted", and "Other Printing Problems", Troubleshooting for some time until the covers of the fusing unit and duplex unit get cool. • The metallic parts of the internal tray may get very hot. If...
... result in burns. • When replacing paper or removing jammed paper, make sure not to occur, see "When You Have Problems Operating the Machine", "When You Cannot Make Copies As Wanted", "When You Cannot Send or Receive Fax Messages As Wanted", and "Other Printing Problems", Troubleshooting for some time until the covers of the fusing unit and duplex unit get cool. • The metallic parts of the internal tray may get very hot. If...

User Guide
Page 294
... pages/minute (300 dpi), 30 pages/minute (200 dpi) (Original Type: Full Color: Text / Photo, Compression (Gray Scale / Full Color): Default, Original Chart) Scanning speed differs depending on the following; 10. Information for This Machine Specifications for black and white (two-value): TIFF (MH, MR, MMR, JBIG2) 292 operating environment of the machine and computer, scan settings, and the content of originals (denser images require more time...
... pages/minute (300 dpi), 30 pages/minute (200 dpi) (Original Type: Full Color: Text / Photo, Compression (Gray Scale / Full Color): Default, Original Chart) Scanning speed differs depending on the following; 10. Information for This Machine Specifications for black and white (two-value): TIFF (MH, MR, MMR, JBIG2) 292 operating environment of the machine and computer, scan settings, and the content of originals (denser images require more time...

User Guide
Page 303
IPP does not support SSL. • The USB device server allows simultaneous connection of up to 8 sessions of printing protocols. 301 Specifications for USB Device Server Specifications for USB Device Server Interfaces: • Gigabit Ethernet (10BASE-T/100BASE-TX/1000BASE-T) • USB 2.0 (For connecting the printer and the print server interface) Operating Systems: • Windows 7/8.1/10, Windows Server 2008/2008 R2/2012/2012 R2/2016/2019 • OS X 10.11 or later Protocols: • The USB device server supports Port 9100, IPP, and LPR only.
IPP does not support SSL. • The USB device server allows simultaneous connection of up to 8 sessions of printing protocols. 301 Specifications for USB Device Server Specifications for USB Device Server Interfaces: • Gigabit Ethernet (10BASE-T/100BASE-TX/1000BASE-T) • USB 2.0 (For connecting the printer and the print server interface) Operating Systems: • Windows 7/8.1/10, Windows Server 2008/2008 R2/2012/2012 R2/2016/2019 • OS X 10.11 or later Protocols: • The USB device server supports Port 9100, IPP, and LPR only.

User Guide
Page 306
...-fixed paper 181 Original orientation 100 Output tray for the ADF 13 P Paper capacity 186 Paper Feed Unit 40 Paper guides 14 Paper size 186 Paper thickness 186 Paper trays 186 Paper type 186 Paper weight 186 PCL 123, 127 PCL 6 131, 135, 136 Placing originals 95 Power connector 14 Power switch 13 Print cartridge 15 Printer 131, 225, 290 Printer driver properties 130 Privilege 254 Problem 206 Program 88 Q Quick Application 73 Quick Print Release 141 R Rear cover 14 Rear cover open...
...-fixed paper 181 Original orientation 100 Output tray for the ADF 13 P Paper capacity 186 Paper Feed Unit 40 Paper guides 14 Paper size 186 Paper thickness 186 Paper trays 186 Paper type 186 Paper weight 186 PCL 123, 127 PCL 6 131, 135, 136 Placing originals 95 Power connector 14 Power switch 13 Print cartridge 15 Printer 131, 225, 290 Printer driver properties 130 Privilege 254 Problem 206 Program 88 Q Quick Application 73 Quick Print Release 141 R Rear cover 14 Rear cover open...

Users Guide
Page 24
... the host name of the proxy server. Enter the port number of the proxy server. Discard changes to display the Settings dialog box, see page 21 "Displaying the Settings Dialog Box". 2. Apply changes to configure proxy connections. • If [Auto] is selected, the settings of the device are applied when the next remote support connection starts. 22 Menu Proxy Proxy Host Proxy Port Cancel OK Description Specify how to...
... the host name of the proxy server. Enter the port number of the proxy server. Discard changes to display the Settings dialog box, see page 21 "Displaying the Settings Dialog Box". 2. Apply changes to configure proxy connections. • If [Auto] is selected, the settings of the device are applied when the next remote support connection starts. 22 Menu Proxy Proxy Host Proxy Port Cancel OK Description Specify how to...
AirPrint Guide
Page 23
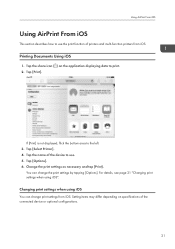
... connected device or optional configurations. 21 Tap [Select Printer]. 4. You can change the print settings by tapping [Options]. Tap [Print]. Changing print settings when using iOS". Tap the name of the device to the left. 3. Setting items may differ depending on the application displaying data to use . 5. Using AirPrint From iOS Using AirPrint From iOS This section describes how to print. 2. Tap [Options]. 6. Tap the share icon ( ) on specifications...
... connected device or optional configurations. 21 Tap [Select Printer]. 4. You can change the print settings by tapping [Options]. Tap [Print]. Changing print settings when using iOS". Tap the name of the device to the left. 3. Setting items may differ depending on the application displaying data to use . 5. Using AirPrint From iOS Using AirPrint From iOS This section describes how to print. 2. Tap [Options]. 6. Tap the share icon ( ) on specifications...


